X9.4 Release Notes - January 2024
Enhancements
Visa Restriction Exceptions
A new application setting is added to the Visa that defines Visa Restriction exceptions for non-residents of Australia. The purpose of setting is to apply Visa Restriction exceptions while calculating the regular work hours limit of the members for selected shift type(s).
The staff can select multiple shift type(s) for the Visa Restriction exceptions, and the selected shift type(s) are considered as regular work hours.
To access this application setting:
-
Go to Application Settings → System Configurations → Other Settings
-
A new setting ‘Visa Restriction exceptions for calculating regular work hours considering various shift types’ is added as shown in the figure below

The staff can select multiple shifts from the available drop-down (as shown in the figure below) to apply shift types to the members' work schedules. Selected shift types will be excluded from the work hours limit as per Visa conditions.
Visa Restriction exceptions for calculating regular work hours considering various shift types settings, active shift types are fetched from the Members Shifts master.

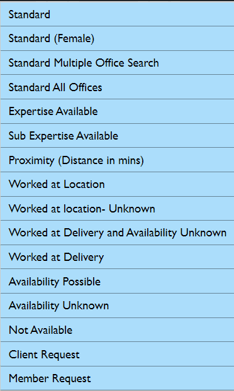
For instance, before applying the ‘Visa Restriction exceptions for calculating regular work hours considering various shift types’ setting, a member ‘ABBIE PSALTIS’ booked for the AM shifts shows the ‘Work Hours limit will exceed’ message in the Quick Search screen of Client Allocations as shown in the figure below.

On applying the ‘Visa Restriction exceptions for calculating regular work hours considering various shift types’ setting for the ‘AM’ shift type, the 'AM’ shift hours will be calculated as regular work hours for the member, and the message will disappear as shown in the figure below.

Impact on Staff Portal in Case of Work Hour Restrictions
Quick New Shift Booking
In the Quick New Shift Booking screen, when you Appoint Member to the shift and they have exceeded the work hours restrictions, a warning message is displayed as shown in the figure below. You cannot allocate the selected member to the shift.

Multiple Shift Booking
In the Multiple Shift Booking screen, a warning message is displayed as shown in the figure below when you Appoint Member(s) to the shift and they have exceeded the work hours restrictions. You cannot allocate the selected member(s) to the shift.

Edit Shift
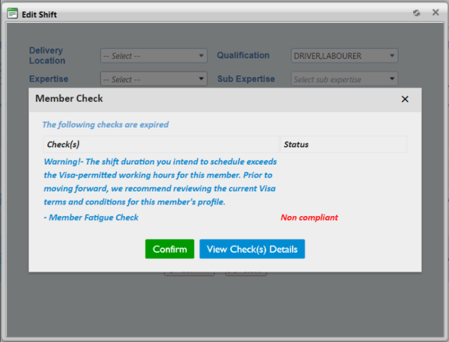
In the Edit Shift screen, a warning message is displayed as shown in the figure below when you edit the existing shift and the member has exceeded the work hours restrictions. You cannot edit the existing shift with the selected member.
Assign Members
In the Assign Members screen, a warning message is displayed as shown in the figure below when you assign member(s) to the shift and the selected member has exceeded the work hours restrictions. You cannot allocate the selected member to the shift.

Assign Member By Name
In the Assign Member By Name screen, a warning message is displayed as shown in the figure below when you select a member to the shift and the selected member has exceeded the work hours restrictions. You cannot allocate the selected member to the shift.

Member Contact Card
In the Members Contact Card screen, a warning message is displayed as shown in the figure below when you accept the shift and the member has exceeded the work hours restrictions.

Bulk Push Notification
While sending the Bulk Notification to the members, the member(s) who has exceeded the work hours restriction will not appear in the list of matched members.

Impact on Member App in case of Work Hour Restrictions
Accept Release Shift
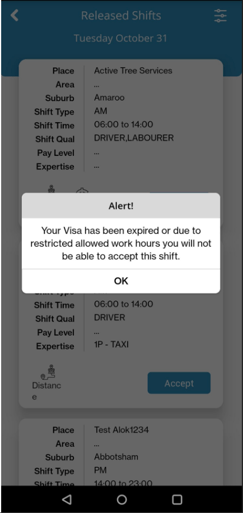
While accepting the released shift, the member who has exceeded the work hours restriction will not be able to accept the shift, and the Alert message is displayed as shown in the figure below.
Impact on Professional App in case of Work Hour Restrictions
While selecting the member(s) in the Orders screen, the member(s) who has exceeded the work hours restriction will not appear in the Select Personnel screen.
Impact on Client Portal in case of Work Hour Restrictions
New Booking - Assign Member
While assigning a member in the New Booking of the Client Portal, the member(s) who has exceeded the work hours restriction will not appear in the Assign Member screen.
Impact on New Client Portal in case of Work Hour Restrictions
New Booking - Select Preferred Personnel
While assigning a member in the New Booking of the Client Portal, the member(s) who has exceeded the work hours restriction will not appear in the ‘Available Personnel who worked at your location’ screen.
The Shift Type(s) selected in the ‘Visa Restriction exceptions for calculating regular work hours considering various shift types’ setting will be exempted in all the impacted areas of Staff Portal, Member App, Professional App, Client Portal, and New Client Portal as explained above.
Applicant Address Details (Latitude and Longitude)
The applicant’s address details will capture the latitude and longitude details in Entire OnHire. Note that the captured latitude and longitude details are used to calculate distance and direction in the different areas of the member app and web portal for a shift.
When a new/ existing applicant’s address details are added, the latitude/longitude details are added/updated in Entire OnHire. Also, the member’s updated address details will capture the new latitude/longitude details in the different areas of Entire OnHire.
Listed below are the affected areas when the address details (latitude/longitude) are added/ updated for the applicant/ member:
Casual Application Page
While adding a new applicant’s address details in the Casual Application page, new latitude/longitude details are captured in Entire OnHire.

Personal Details Page
While adding/ updating the address details of the member in the Personal Details page of the Staff Portal, new latitude/longitude details are captured in Entire OnHire.

Recruitment Stages
While adding/ updating address details in the various Recruitment Stages (Staff Portal) of the applicant/member, new latitude/longitude details are captured in Entire OnHire.
The Recruitment Stages include INBOX, LEFT MESSAGE, CALL BACK, APPLICANT LOGIN, TBC INTERVIEW, NON COMPLIANT, REFERENCE PENDING, INCOMPLETE APPLICATION, and ON HOLD/ REJECTED.

Applicant Portal
While adding/ updating personal details in the Applicant Portal page, new latitude/longitude details are captured in Entire OnHire.

Create New Applicant
While adding Personal Details in the Create New Applicant page of the Staff Portal (Applications → Miscellaneous → Create new Application), new latitude/longitude details are captured in Entire OnHire.

Note that when an applicant converts into a member, the same address details (latitude and longitude) of the applicant are used.
Low SMS Balance Email Alerts
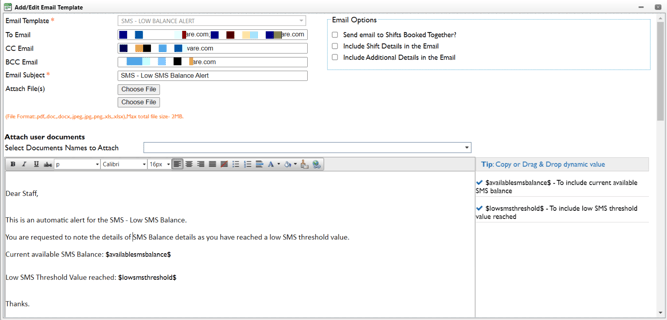
Entire OnHire provides the facility to set up low SMS Balance Email Alerts. The email alerts are triggered whenever the SMS Balance reaches defined threshold values specified by you and the user will be prompted to refill the SMS balance.
Set up Low SMS Balance Alert
The low SMS Balance Alert will be set up by the Entire OnHire Support Team as per your requirement. The staff needs to provide the Threshold value 1 and Threshold value 2 to receive the email Alerts. Whenever Threshold value 1 (with the range 0 - 5000) or Threshold value 2 (with the range 0 - 5000) is reached, the system will trigger an email alert using the Email Template defined in the Email Template Master.
Based on the threshold values set, the amail alerts will be triggered while using the SMS feature in the Staff Portal, Client Portal, and Professional App.
Client Allocation Filter
In the Allocation → Client Allocations on setting the Client Allocations Filter, the user will not be able to set the date range that exceeds 6 months in the By Period for ‘By Client Group’, ‘By Industry Type’, ‘By Servicing Office’, ‘By Visible Complete Section’, ‘By Staff’ and ‘By Single Shift Per Group’ except for ‘By Member’ and ‘By Service Location’.
On selecting the date range that exceeds 6 months, the validation message appears as shown in the figure below.

Updates in Client Allocations: Addition of New Columns
In the Client Allocations page, new columns are added as explained below.
1. Booked Hours
In the Client Allocations page, a new column is added as Bkd. Hrs i.e. Booked Hours as shown in the figure below. The Booked Hours will be calculated time based on the formula → “End time - Start time = Booked Hours”.

2. Last Shift in Member Assign
In the Member Assign search of the Client Allocations page, a new column is added as the Last Shift that shows the last shift details of each member for a quick review before assigning the shift. On mouse over, the Last Shift date shows the tooltip as location worked on.
Note that the Last Shift column will show the details of the shifts that are older than the selected Entered/ Release shift date.
For example, if the Shift Date selected is ‘18/10/2023’ and the member has 2 shifts already booked on ‘16/10/2023’ and ‘22/10/2023’. The new last shift details will show ‘16/10/2023’ and not ‘22/10/2023’ as the shift date in the Member Assign search screen provided is ‘18/10/2023'.

How to Generate New Applicant Login Credentials?
In case the Applicant has missing login credentials, the Staff can generate a new login credential for the Applicant in the Entire OnHire System.

To generate new login credentials, go to the Applications → Incomplete Applications → Member Menu → Recruitment. In the Recruitment page, select the Appointment tab and click Save & Exit.

The new login credential of the applicant is generated successfully and shared with the applicant.
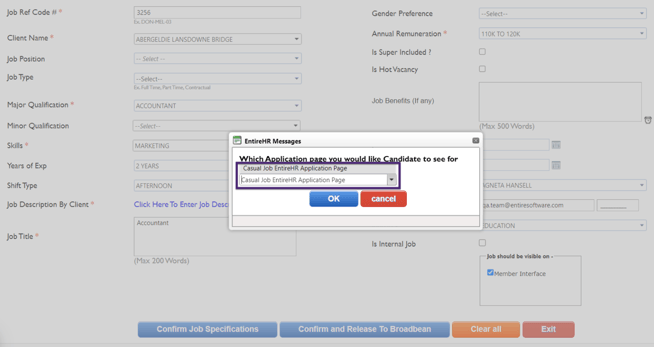
Broadbean - Permanent Placement EntireHR Application Option Removed
When releasing a job on Broadbean from Placement → Create Job Ad - Broadbean, on clicking the ‘Confirm and Release to Broadbean’ button, the Permanent Placement EntireHR Application Page option is unavailable now.
Contact Log Date Period Validations
In the Entire OnHire Contact Log page, Date Period validations are added while searching the data for the User Type ‘Staff’.
In the Date Period, the validation message ‘You can only access contact log data for a period of 30 days’ appears on selecting the Future Only, Today & Future, This Year, This Month (if more than 30 days), or Custom options.
Note that the Date Period validation will not appear for Today Only, Today and Tomorrow, This Week, This Month (if less than 30 days) options.

Members Employment Work Status Report
In Reports → Member Employment Work Status Report, new fields are introduced as Member Id, Mobile, Job Source Board, and How did you hear about us?. The fields will fetch the Member ID, Mobile number, and job source details.
To generate the Member Employment Work Status Report:
-
Click Reports → Recruitment Reports → Member Employment Work Status Work and the Member Employment Work Status Report page opens
-
Select the Relationship Office and other required details
-
Click Report and the report shows the Member Id and Mobile number of all the members including other details

-
Click Export to Excel and the Employment Status Report is generated and downloaded. The downloaded Excel report includes the Member Id, Mobile number, Job Source Board and How did you hear about us? of all the members.
Note that the ‘Job Source Board’ and ‘How did you hear about us?’ details are shown only when the Members Employed option is selected in the report including other details.

Training and Health Check Reports
From this version Training Report and Health Check Report will not be available in the Member Reports of the Staff Portal application.

Member Detail Report
In the Member Detail Report, a new field is added as ‘Terminated Date’ while exporting the member detail report in Excel. This field will fetch the Termination Date of all the terminated members.
To generate the Member Detail Report:
-
Click Reports → Member Reports → Members Detail Report and the Member Detail Report page opens
-
Select the Office and other required details
-
Click Export Members Report to Excel and the Member Detail Report is generated and downloaded. The downloaded Excel report includes the ‘Termination Date’ of all the terminated members

Talent Search
In the Talent Search page, a new field is introduced as ‘How did you hear about us?’. This field will fetch the response provided by the Applicant about the job source details.
The Export to Excel feature is also added to export filtered data into Excel files. To export filtered data, click Export to Excel as shown in the figure below.

On clicking Export to Excel, the report is generated and downloaded in Excel. The downloaded Excel report shows ID, First Name, Last Name, Industry, Qualification, Suburb, Current Status, Job Source, and CV Parsed.

Current Booking Report
In the Current Booking Report, a new field is introduced in Include Fields as ‘Booking Hour’. The Booking Hour will fetch the total booking hours for the shift and is calculated based on the formula → “End time - Start time = Booking Hours” in the report.

On selecting the Include field name as ‘Booking Hour’, the report will show the Booking Hours for the Shift, Total booking hours for the selected Offices, and combined Total booking hours for all the Offices as shown in the figure below.

Job Applied Source Report
In the Job Applied Source Report, a new field is introduced as ‘How did you hear about us?’. This field will fetch the response provided by the Applicant about the job source details.

Date Range in Reports
In the listed below Reports of the Staff Portal, the date range will be prefilled and the users can modify the date range as per their requirement. This enhancement is incorporated to improve the efficiency of the reports and retrieve the required data swiftly and efficiently.
-
Applicant Detail Report
-
Client Compliance Report
-
Availability Member Status Report
-
Booking Hours and Variation Report
-
Employee Hours Summary Report
-
NDIS Claim Report
-
Print Employee Time Sheet
Finance Application
Shift Payroll Verification Notes
In the Shift Verification and Award Interpretation screen of the Finance application, the user can add Shift Payroll Verification Notes up to 500 characters.
-
In the Shift Verification and Award Interpretation screen, right-click on the shift to select the Add Verification Notes

-
The Add Payroll Verification Notes pop-up opens, add the required notes with a maximum limit of 500 characters and click Save Notes

-
Hover over the icon question mark icon to view the tips provided

Increased Timesheet PDF Image Size
The timesheet PDF images of the members attached to the invoices are increased in size to enhance the clarity of the available detailed information.

Superannuation in the Gross Margin Report
In the Masters → Allocation Master → Members Shifts, the superannuation will be included based on the value selected as ‘Yes or No’ in the ‘If this Shift Type is Super Exempted' field.
In the ‘If this Shift Type is Super Exempted' field in case the value:
-
Set to Yes - The Superannuation amount will be exempted from the shift
-
Set to No - The Superannuation amount will not be exempted from the shift

In the Gross Margin Report, the superannuation amount in the AD column of the Excel file appears as ‘0' based on the Members Shifts master settings provided for the ‘If this Shift Type is Super Exempted' field. Here the '0’ in the AD column indicates that the Superannuation amount is exempted from the shift.

Handling of Special Characters
In this version, the special characters are handled in various sections of the Finance application.
Special Characters in Family Name
In the Personal Details page of the member, all the special characters in the Family Name field provided will be processed successfully in the STP member file without any validations.

Special Characters in Address
In the Personal Details page of the member, the special characters in the Address field provided will be processed successfully in the STP file without any validations.
Note that as per ATO, the valid special characters allowed are ([0-9 a-z A-Z . , ? ( ) [ ] : ; ' - = / @ $ % * & ! " ] ) to verify the employee details.

If any special character is provided apart from the list provided by ATO, a validation is generated in the Invalid/ Missing Member Details file. The validation shows the member Id, Member Name, and the validation details as shown in the figure below.

Special Characters while Generating Bank File (.ABA)
In the Member Payroll screen, the special character provided in the Account Name field will be processed successfully during the payroll process and while generating the bank file or .ABA file.

Now, the special character does not appear in the generated bank file or ABA file.
![]()
Allowance Template - Default Template with Exclude Default Allowance Value
For the Allowances, the Exclude Default Allowance data can be imported in bulk using the Allowances Import Template Excel file.
In the Allowances Import Template, a new column ‘Exclude Default Allowances’ is added to set the value ‘True' or ‘False’.
-
‘True’ indicates the default allowances for pay and invoice will be included for the shift
-
'False’ indicates the default allowances for pay and invoice will be excluded for the shift.
The value provided in the Allowances Import Template will be imported in the Allowance Rates for the selected Rates Table in the Finance application.

In the Rates → Export/Import Rates, select the Allowance Rates option and click Import Rates (.xlsx only). Select the updated Allowance Import Template Excel file that includes the Exclude Default Allowance values and the Allowance Rates are imported/updated successfully.

For the selected Rates Table Name in the Service Rates Table, you can View Allowance Rates and check the imported data for the Exclude Allowance according to the imported Allowance Import Template Excel file as shown in the figure below.

Reference in XERO Service Sales Report
The Reference detail in the XERO Service Sales report is generated based on the Customer ID, Show Invoice Billing Details as Per Area Location flag, and Invoice Billing Optional details provided in the Obligations and Invoice tabs of the Client Payroll screen.
In the XERO Service Sales report, the Reference details are fetched based on the following criteria:
-
In the Obligations tab, if the Show Invoice Billing Details as Per Area Location flag is not selected and the Customer ID details are available, the Customer ID is shown.

-
In the Obligations tab, if the Show Invoice Billing Details as Per Area Location flag is selected in the Separate Invoice Per Area Location option and

Invoice Billing Optional details are provided in the Invoice tab, and the Billing Name (with Delivery Location (in case it exists)) is shown.

3. If Invoice Billing Optional details are unavailable and the Show Invoice Billing
Details as Per Area Location flag is selected, the Client Name/ Location Name (with
Delivery Location (in case it exists)) is shown.

4. If the Customer ID is unavailable and the ‘Show Invoice Billing Details as Per Area Location’ flag is not selected, the Reference column in the XERO Service Sales report will be blank.
Please take a look at the sample downloaded XERO Service Sales Excel report below that shows the Reference details are provided in the Obligations and Invoice tabs of the Client Payroll screen.

Resolved Issues
We are constantly working to improve our Entire OnHire Application and have resolved the following issues for you ![]() .
.
|
Issues |
Summary |
Status |
|
Issue Resolved. In the Finance application, the difference in the amount payable (varying in decimal amount) is now fixed and showing accurately in the Pay Slips Advice/ Dockets of the members. |
RESOLVED |
|
Issue Resolved. If the duplicate record is created in the Member Payroll → Obligations tab, the duplicate record will be handled from the backend while processing the pay run, the obligation error is fixed now. |
RESOLVED |
|
Issue Resolved. In the Allocation page of the Staff Portal, the break in minutes are calculated correctly in the Shift Worth for the shift.
On providing the Break in minutes in the Shift Worth Details pop-up screen, the Shift Worth is calculated as required (as shown in the figure).
|
RESOLVED |
|
Issue Resolved. Now, on editing the shift date in the Current Booking of the Client Portal, the Allocations page of the Staff Portal shows the edited shift date correctly. |
RESOLVED |
|
Issue Resolved. Now, the page title with the published link is updated correctly when posting a Job via a link on social media platforms such as LinkedIn. |
RESOLVED |
Feedback
We have incorporated the new features, enhancements, and fixes to provide you with a delightful user experience ![]() . We would love to hear from you about your experience with our product or service. Please drop your suggestions and feedback at
. We would love to hear from you about your experience with our product or service. Please drop your suggestions and feedback at ![]() support@xeople.com.
support@xeople.com.


