

In these release notes, you'll find the summary of new features, enhancements, and resolved issues in the latest version of the Entire OnHire application. This document lets us update you with all the latest information about our products and services.
Explore the comprehensive X.0 Version Release Notes with each new feature, enhancement, and resolved issue explained clearly and concisely with screenshots to showcase the descriptions in action ![]() .
.
Content
🆕 Dashboard
🆕 Click to Dial Log - Incoming and Outgoing Call Logs
🆕 XeopleRecruit Integration into Entire OnHire
📈Enhancements in Staff Portal
📈Enhancements in Finance Portal
📈Enhancements in Client Portal
Resolved Issues
🆕 Dashboard
The Dashboard feature is designed as a centralised interface that integrates vital information and insights, enabling the effective monitoring, measurement, and analysis of relevant data across key areas to serve as a valuable decision-making tool. The global filters are configured to retrieve data based on the selected Organisation name, Dashboard, and provided filter criteria.
In the X.Beta version, the Organisation Progress section was introduced, and in this version, newly sections introduced are:
- System Consumption - This section helps to gain clarity about your system usage, including all credit-based actions and consumptions. Ideally, leverage this insight to optimise your system usage and identify any excessively high consumption rates
This provides comprehensive insights for Plan Usage Overview, Monthly Usage, Application Total Users, Remaining Credit Balance, Total Database Storage, and File Server Storage
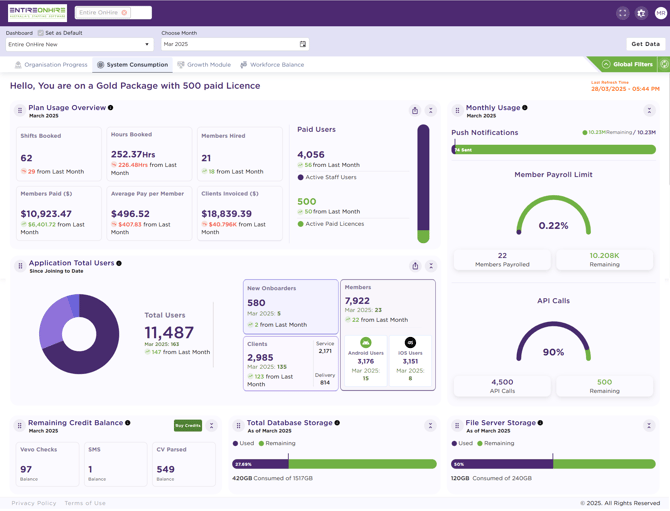
- Growth Module - This section displays details of the 'In-use features (Free), 'Available Features (Free)', 'Active Features', and 'Available Features (Contact Us)' of your Entire OnHire system

- Workforce Balance - The Workforce Balance section offers comprehensive insights into the skill-based distribution of the workforce at the State level, categorised by Workforce Overview, Workforce Distribution by States, and Workforce Distribution Across States (Group based)
This section helps organisations to effectively monitor and manage workforce distribution, workload, and efficiency, thereby ensuring optimal staffing to enhance productivity

🔗For detailed articles on System Consumption, Growth Module, and Workforce Balance, click the respective links.![]() 😊
😊
🆕Click to Dial Log - Incoming and Outgoing Call Logs
The Click to Dial Log feature allows you to register all manual incoming and outgoing calls. The key functionalities of the Click to Dial Log are outlined below:
- Tracking Communication: It helps you to keep track of conversations, ensuring that important calls are not forgotten
- Contact Information: It enables efficient access to recently contacted phone numbers and individuals, facilitating effective follow-up actions
- Managing Call Logs: It helps organise and manage communication patterns, which is especially useful for businesses or individuals to maintain a record of calls for professional or personal purposes
To access the Click to Dial Log page, click the Click to Dial Log icon as shown in the figure below.
The Click to Dial Log icon shows the number of calls based on the configuration settings in the Call Status master. In the Call Status master, when the 'Attention Status' is configured to 'Yes' for 'Revert Back', 'Successful', 'Unsuccessful', or 'Missed Call', the call count will be displayed in the Click to Dial Log icon.
By default, 'Attention Status' is set to 'Yes' for the 'Revert Back' call status.
To configure these settings, please contact our Entire OnHire Support team.

Click to Dial Log
The Click to Dial Log page shows the call log details of all the Members, Applicants, Clients, and Professionals and includes Call To, Call From, Call Type, Saved To, Call Status, Date/Time, and Call Duration details.
The Click to Dial Log page displays the aggregate count of both incoming and outgoing calls and is configured with a default filter set to one week. In the Click to Dial Log page, you can:
- Display call history from - allows you to customise the Click to Dial Log page by selecting the Start Date and End Date, followed by clicking Apply
Note that the selection of a date range is limited to a maximum duration of one year, with the default filter set to one week
- Search - allows you to search the specific details from the Click to Dial Log page
- Filter icon
 – allows you to apply filters in the Click to Dial Log page
 - Export - allows you to export all the available Click to Dial Log data into an Excel file
- Three Dots – for each registered call, three dots allow you to perform the following action:
- Edit – allows you to edit the selected call
- Delete – allows you to delete the selected call
- Expand/ Collapse View - allows you to view/hide the details of the call

Register a Call
To Register a Call:
- Click the Register a Call from the Click to Dial Log page and the 'Register a Call' pop-up opens
- You can register an Incoming call (Call From)
 or Outgoing call (Call To)
- Provide all the required details
- Click Save
|
Field Name |
Description |
| Save To |
Select a Member, Applicant, Client, or Professional to register a new call. |
| Call From |
Call From indicates an Incoming Call and based on the selected option in the 'Save To', the values in the 'Call From' are displayed. For instance, if the Save To is selected as Member, all the member names along with their Favor ID are displayed in the Call From drop-down. When the value in the 'Call From' is selected, the profile picture, phone numbers, and email id of the Member, Applicant, Client, or Professional is displayed. If the profile picture is not available, the initials of the recipient is displayed. |
| Call To |
Call To indicates an Outgoing Call and based on the selected option in the 'Save To', the values in the 'Call To' are populated. When the value in the 'Call To' is selected, the profile picture, phone numbers, and email id of the Member, Applicant, Client, or Professional is displayed. If the profile picture is not available, the initials of the caller is displayed. |
| Call Status |
You can select Call Status as Successful, Unsuccessful, Missed Call, or Revert Back, and by default, Successful call status is selected. |
| Duration | Select the duration of the call, by selecting the Minute(s) and Second(s). |
| Notes |
Provide the required notes for the call. There is no word limit for providing notes for the call. |
| Date |
By default, the current date is displayed and to select the customised date, click the calendar icon. |
| Time |
By default, the current time is displayed and to select the customised time, click the clock icon. |
| Call Tag |
Select the Call Tag as Shift Confirmation, Shift Cancellation, Availability Update, Urgent Shift Request, Follow-up Call, and Client Inquiry. |
| Related To Client |
Select the available client for the Professional. Note that this option is available when the call is registered for a Professional and must be selected. All the clients associated with the selected professional will appear in the list. |
| More Details |
Click to add details such as Reason of Contact, Contact Outcome, Log Type, and Source. Note that the options available in the Reason of Contact are updated based on the selection in the Save To field for Member, Applicant, Client, or Professional. |
| Source | Shows the source of the call as 'Manual'. |
| Log Type |
Select the Log Type that is fetched from Log Type Masters (Home → Settings → Object Keywords → Contact Log).
|
| Reason of Contact |
Select the Reason of Contact to the selected caller (Member, Applicant, Client, or Professional). The Reason of Contact is fetched Reasons (Personnel) Masters → CRM → Profile Type selected (as Member, Applicant, Client, Professional).
|
| Contact Outcome |
Select the Contact Outcome for the selected caller. The Contact Outcome is fetched from CRM, Contact Outcome Masters. |

.png?width=670&height=368&name=Reasons%20(Personnel).png)


🔗For a detailed article on the Click to Dial Log Article, click here.![]() 😊
😊
🆕XeopleRecruit Integration into Entire OnHire
The XeopleRecruit and Entire OnHire integration feature is designed to share, exchange, and synchronise data automatically and efficiently between XeopleRecruit and Entire OnHire systems. This integration allows both applications to access and use the same data, ensuring consistency, reducing duplication, promoting efficient collaboration, and improving overall workflow.
In this version, the XR-EOH integration focuses on the sharing and synchronising of Member, Applicant, Client, Job, and Professional data between the two systems. The key functionalities available are:
-
Share and Synchronise Member Profile
-
Share and Synchronise Applicant Profile
-
Share and Synchronise Client Profile
-
Share and Synchronise Professional Profile
-
Share Job Profile
1. Share and Synchronise the Member Profile
To share the Member from XR to EOH, an XR recruiter can share an existing Candidate (Share Personnel) or add and share a new candidate (Add Candidate) as 'Member'.
🔗 Click to access the related XR articles for detailed instructions on:
- 'Create Candidate Via Form'
- 'Push Candidate as a Member - Candidate Landing & Summary'
- 'Push Candidate as a Member - Job Action'
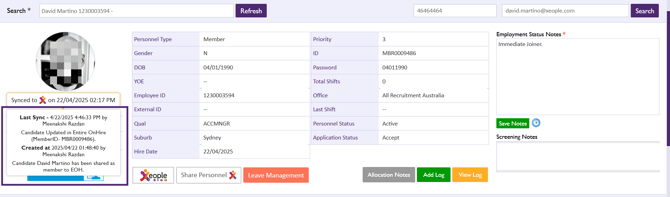
Personnel Card
When a member is shared from XR to EOH, the XR logo with a Last Sync button is displayed. Hovering over the Last Sync details shows the synchronisation information.
During the initial synchronisation, the creation date, timestamp, and the recruiter's name are displayed. Subsequent synchronisations will show the last sync date, timestamp, and the recruiter's name.
Upon successful integration of a member with the EOH system, the Personnel Card page will be updated to include the following details:
- Member Personal Details, Education Details
- Employment Status Notes - notes provided in the 'Employment Status Notes' in the XR are added
- Missing Banking & Financial Details. Please Update - This highlighted text indicates the banking and financial details are missing. On clicking the link, you will be redirected to the member's Finance Details page. Staff can provide the required details directly, or members can update their banking and financial information via the Workforce App
Note that the highlighted text will continue to appear until the banking and financial details are updated by a staff/member.

- Send Workforce App Login Details - if this check box is selected while sharing the member from XR, an email notification will be sent to the member with all the required login details
Member Sync Details
When a Member profile is updated in XR or EOH, the field details are updated with the synchronisation details are displayed in both systems, showing the Last Sync information, including the date, timestamp, and the recruiter's name as shown in the figure below. Any modification provided in the listed below fields will the updated in XR:
- Member’s Name
- Phone Number
- Gender
- DOB
- Address (location details-default)
🔗For a detailed article on the XeopleRecruit Integration with Entire OnHire, click here.![]() 😊
😊
📈Enhancements in Staff Portal
- Renamed Menus/Headings
- Access Legacy Home Screen
- New Referrals and View Referrals Option Removed
- Client Compliance Rules and Restrictions for Expertise
- New Master - Lead Source
📈Enhancements in Finance Portal
📈Enhancements in Client Portal
Resolved Issues
- No Status Change or Duplication in Superannuation Masters
- User Authorisation Based on Role Type and Level
- Rates Accurately Populated in Travel Allowance and Pay Allowance