You can create a new client or update any existing client details using the Client feature in the Entire OnHire Application. You can use the client name while creating job entries in the Entire OnHire Application for SEEK and Broadbean job platforms.
How to Create a New Client?
There are prerequisites steps that need to be followed before creating a new client. It will add the new client details to EntireRecruit’s database.
-
Go to Profiles → Client → Add New Client.

-
Fill in the mandatory details and click Save & Continue

Field Name
Description
Location Type
Select location type from the drop-down menu.
Location Function
Select the client’s location function from the drop-down menu.
Servicing Office
Select the servicing office from the drop-down menu.
Location Name
Input the new client name.
Group Name
Select the group name from the drop-down menu.
Priority
Set the client’s priority.
Status
Select the client’s status.
-
You will be redirected to a new screen. Fill in all the mandatory details (as shown in the below screenshot) and click Save.
It is mandatory to select the client’s Industry Type and Status (change the status to Client Active.)

-
To create a new client for the job, Click Placements → Client (as shown in the below screenshot.) On clicking the Client, the new Client Details page opens.

-
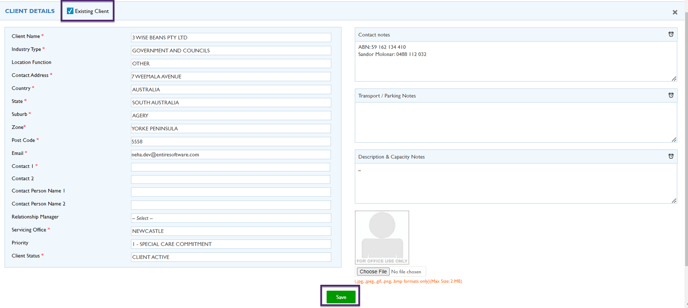
You have to fill in all the mandatory details and click Save (as shown in the below screenshot).

|
Field Name |
Description |
|---|---|
|
Client Name |
Name of the new client. |
|
Industry Type |
Select the client’s industry from the drop-down menu. |
|
Location Function |
Select the client’s location function from the drop-down menu. |
|
Contact Address |
Input the contact address of the client. |
|
Country |
Select the client’s country from the drop-down menu. |
|
State |
Select the client’s state from the drop-down menu. |
|
Suburb |
Select the client’s suburb from the drop-down menu. |
|
Zone |
The zone will be automatically selected when you select Suburb. |
|
Postal Code |
Postal Code will be automatically selected when you select Suburb. |
|
|
Mention the email address of the client. |
|
Contact 1 |
Mention the contact person’s number. |
|
Contact 2 |
Mention the contact person’s secondary number. |
|
Contact Person Name 1 |
Input the primary contact person’s name. |
|
Contact Person Name 2 |
Mention the secondary contact person’s name. |
|
Relationship Manager |
Select the relationship manager from the drop-down menu. |
|
Servicing Office |
Select the servicing office from the drop-down menu. |
|
Priority |
Select the priority from the drop-down menu. |
|
Client Status |
Select the client status from the drop-down menu. There are 5 client statuses:
|
|
Contact Notes |
Describe the contact notes for the client. |
|
Transport/Parking Notes |
Describe the transport/parking notes for the client. |
|
Description & Capacity Notes |
Describe the description & capacity notes for the client. |
|
Choose File |
Upload the picture in this section.
|
How to Update an Existing Client?
To update an existing client to create the job entries, you have to tick the Existing Client option and fill in the updated information and click Save (as shown in the below screenshot).