X9.3 Release Notes - September 2023
We are delighted to roll out the Version Release Notes for the newest upgrade of Entire OnHire, Version X9.3.
|
|
In these release notes, you'll find the summary of any new features, enhancements, and resolved issues in the latest version of the Entire OnHire application. This document allows us to keep you updated with all the latest information about our products and services. Explore the comprehensive X9.3 Version Release Notes with each new feature and enhancement explained clearly and concisely with screenshots to showcase the descriptions in action |
|
|
|
|
Member App - Smart Shifts |
|
|
|
|
|
|
|
|
September 2023 |
|
|
|
New Features
Member App - Smart Shifts
The brand new Smart Shifts feature in the Workforce App allows your members to narrow down the search of the specific Released Shifts by using their preferred restriction criteria. A popular example would be to use Smart Shifts to filter the list by Shift Distance Range.
Rather than sifting through potentially hundreds of released shifts on their small mobile screen, members can view the Released Shifts with this custom filtered view in order to best meet their travel requirements. Members can add multiple Smart Shift filters, and each filter can have multiple matching conditions.
When the Smart Shift filters are applied, the Released Shifts screen shows Released Shift numbers, Shifts Filtered numbers, name(s) of any filters applied, as well as the number of filters applied on the filter badge icon. The member can easily add, edit, or remove any applied Smart Shift filters in order to view a broader range of released shifts on their screen 😊.
How to Access Smart Shifts?
To access Smart Shifts from the Member App:
-
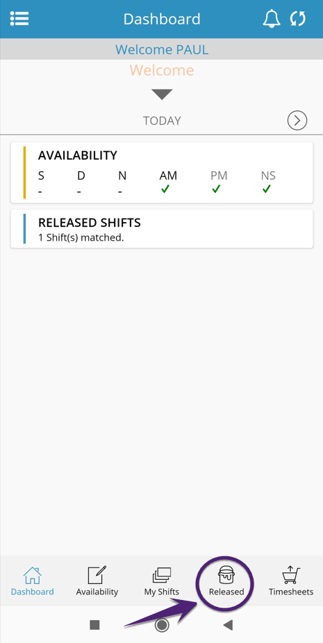
From the Dashboard, click the Released icon to open the Released Shifts screen
-
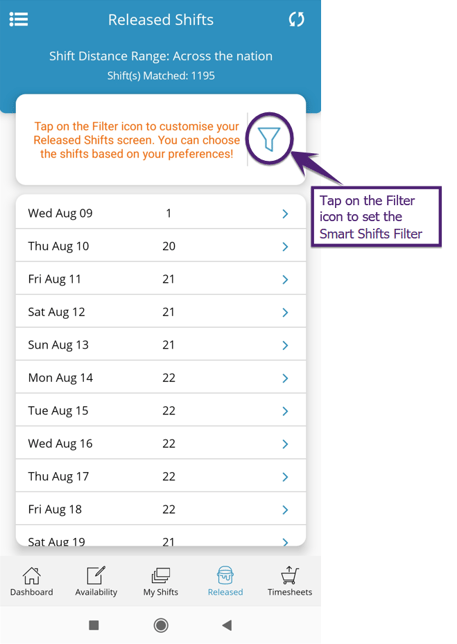
The Released Shifts screen shows the Shifts based on the default Shift Distance Range filter with the number of Shift(s) Matched. Tap on the filter badge icon (as shown in the figure below) to open the Smart Shifts Filter screen
-
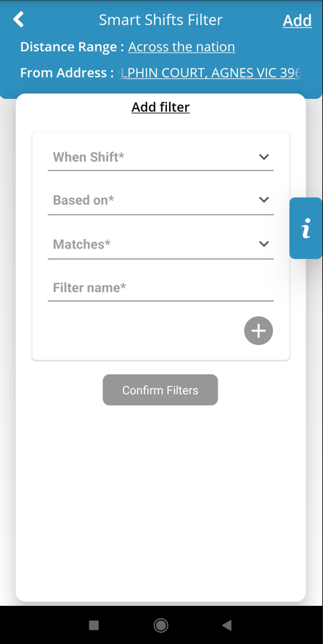
In the Smart Shifts Filter screen, you can add a new filter to search the Released Shifts as per your requirements. For the first time Add filter header appears as shown in the figure below
How to Add New Smart Shift Filters?
To add a new filter in the Smart Shifts Filter screen:
-
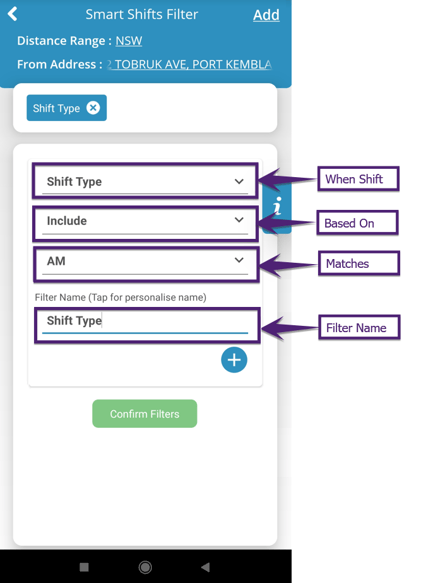
Provide the When Shift, Based on, Matches, and Filter Name details
-
You can add conditions to the new filter by clicking the plus icon
-
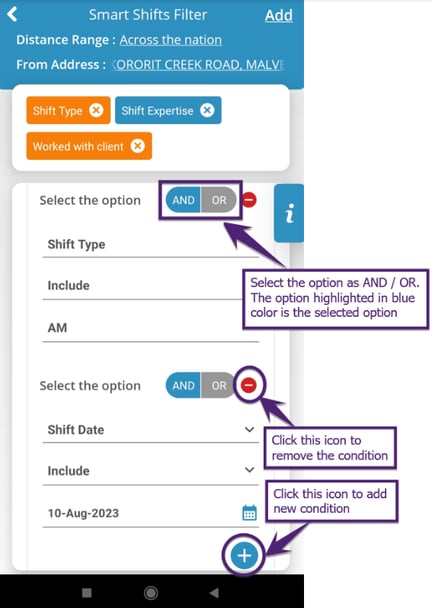
In the Add Condition, Select the option ‘AND / OR’ by clicking on the required option. By default, the ‘AND / OR’ condition is enabled and the option highlighted in blue is the selected option. Note that ‘AND’ evaluates all conditions added must be true and ‘OR’ evaluates any one of the conditions added must be true for the overall condition to be true
-
Provide the When Shift, Based on, and Matches details. You can further add multiple conditions as per your requirements
-
You can remove the Condition by clicking the minus
 icon as shown in the figure below
Note that you cannot add conditions with the same ‘When Shift’ filter condition in the filter, it will show the message ‘This filter condition is already applied’.
|
Field Name |
Description |
|
When Shift |
In the When Shift, the filter options are available that are Based on added conditions and selected Matches. The following options are available in the When Shift:
|
|
Based on |
In the Based on, select the condition related to the selected ‘When Shift’ that can be applied to the selected Matched option. The Based on condition is predefined for all the ‘When Shift’ filters as per the requirement and is loaded based on the selected option. The ‘Based on’ conditions available for the selected ‘When Shift’ filter are:
|
|
Matches |
The When Shift filter shows the options as Shift Type, Shift Date, Shift Day, Shift Expertise, Client Industry, and Worked with client. Depending on the selected filter, the Based on conditions and Matches options are available. If the When Shift option selected is:
Note that the Shift Types available in the pop-up window are based on the ‘Show in Booking’ flag in the Allocation Master → Members Shifts of the Staff Portal application. 


The Delivery filter is added for the Worked with the client. Note that the Add Delivery option appears only if the selected Service Location has a delivery attached to it.
 |
|
Filter Name |
Name of the Filter. By default, the filter name is provided as the ‘When Shift’ filter option selected. You can provide the new filter name as per your requirement. New Smart Shifts filter are named automatically based on the selected ‘When Shift’ filter. If a similar ‘When Shift’ filter option is selected, a number is added in front of the filter name to generate the unique filter names. For instance, if the ‘When Shift’ filter is added twice for Shift Type, the first filter will be named ‘Shift Type’, and the second filter will be named ‘2 - Shift Type’. |
|
Plus icon |
To add multiple conditions in any filter.  |
|
Add Filter |
To add a new filter that can include multiple conditions.  |
|
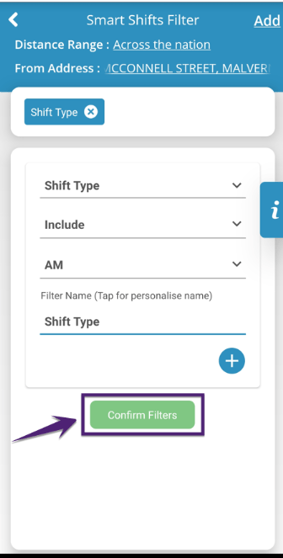
Confirm Filters |
Saves and applies the filter in the Released Shift screen. |
-
Once all the required filter details are provided, click Confirm Filters as shown in the figure below
-
The filter is applied successfully in the available Released Shifts screen
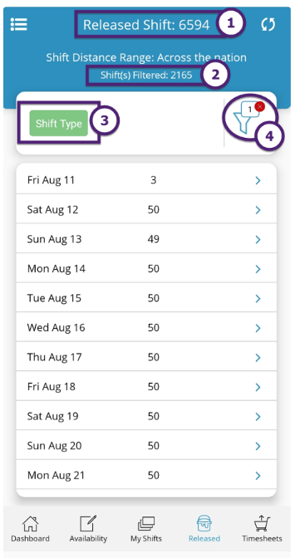
 . Now, the Released Shifts screen shows:
- Released Shifts: shows the total number of Released Shifts by the agency based on the member release shift matching criteria
- Shift(s) Filtered: shows the total number of Shift(s) Filtered based on the new filter added
- Filter: shows the filter name ‘Shift Type’ applied and highlighted in green color. You can click the filter name to edit this filter
- Filter badge icon: shows the red cross icon with the number of filters applied
![]() Click this link to view the detailed Smart Shifts Feature.
Click this link to view the detailed Smart Shifts Feature.
Enhancements
Set Permanent Availability
During the hiring process, the Entire OnHire application does not allow to set the permanent availability of the members. In this enhancement, the Staff of the EOH can set the Permanent Availability of the member while configuring their employment status and this can be set at the global level and member level.
How to Set Permanent Availability at the Global Level?
You can set the Permanent Availability at the Global Level for all the members in the application settings of the Entire OnHire application. The staff has the authority to set/reset the Permanent Availability of all the members at the Global Level.
When you set or reset the Permanent Availability of all the members and click Save, this action will override all the members availability as per your selection that cannot be reverted.
To set the Permanent Availability of the members at the Global Level:
-
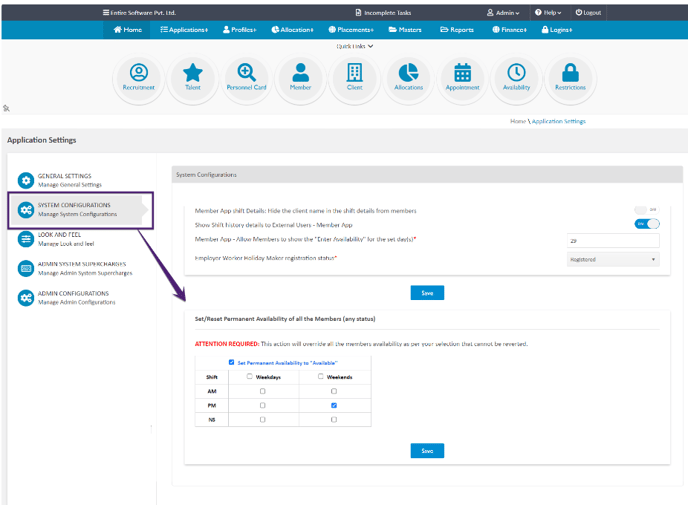
Click the Application Settings from the user login of the Entire OnHire application as shown in the figure below.

-
Click System Configurations and scroll down to the “Set/Reset Permanent Availability of all the Members (any status)” settings
-
By default Set Permanent Availability to "Available" checkbox is not selected. To set the Permanent Availability of the members:
-
Click the Set Permanent Availability to "Available" checkbox, and the Weekdays and Weekends checkboxes for the AM, PM, and NS Shifts are activated.
-
You can select the Weekdays checkbox to select all weekday shifts and/or you can select Weekends shifts to select all weekend shifts.
-
You can also select customised days for Permanent Availability of all the members such as AM, PM, and NS shifts for weekdays and/or weekends.
-
When the required checkbox(es) are selected, click Save.
-
On clicking Save, an Alert message is displayed ‘Are you sure you want to save the Permanent Availability of all the members?’. Click Ok to set the permanent availability of all the members.
-
Simultaneously, the Member Status Log of all the members will be updated in the Employement Status page.
-
-
Next time the user accesses the “Set/Reset Permanent Availability of all the Members” settings, by default all the checkboxes will be deselected.
How to Set Permanent Availability at the Member Level?
You can similarly set the Permanent Availability at the Member Level. To set the Permanent Availability at the Member Level:
-
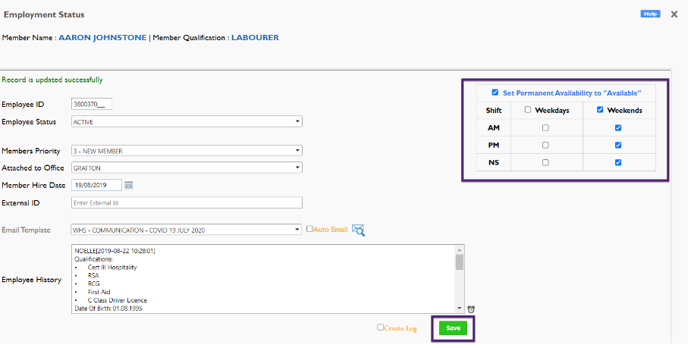
In the Employment Status page of the member, the Set Permanent Availability to "Available" (in the right-hand corner) settings appears
-
Activate the settings by clicking the Set Permanent Availability to "Available" checkbox. Select the required checkbox(es) and click Save.
-
On clicking Save, the new Permanent Availability settings will be reflected in the Members Availability page of the EOH application as well as in the Permanent Availability screen of the Members App.
-
The Member Status Log of the member is updated in the Employment Status page.
How to view Member Status Log?
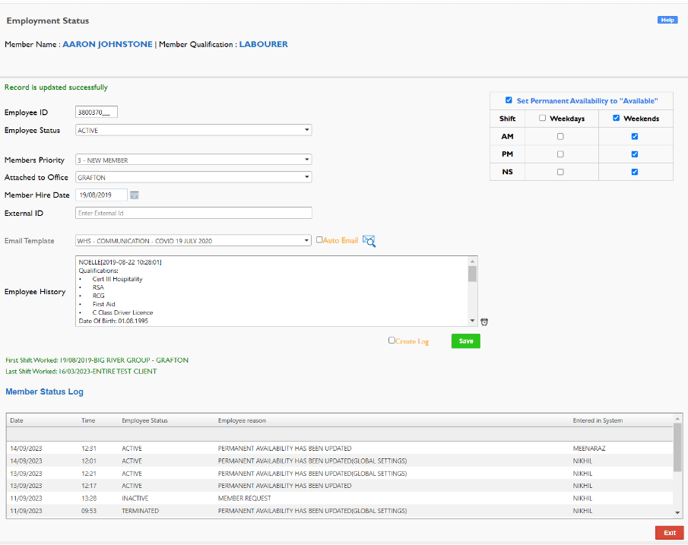
Whether the Set Permanent Availability to "Available" settings are updated at the Global Level or Member Level, the Member Status Log is updated for all the members in the Employment Status page as shown in the figure below.
The log shows the Date, Time, Employee Status, Employee Reason, and Entered in System (name of the user). Note that the Employee Reason for Global Level and Member Level are different ![]() .
.
Process Availability Member Status Screen
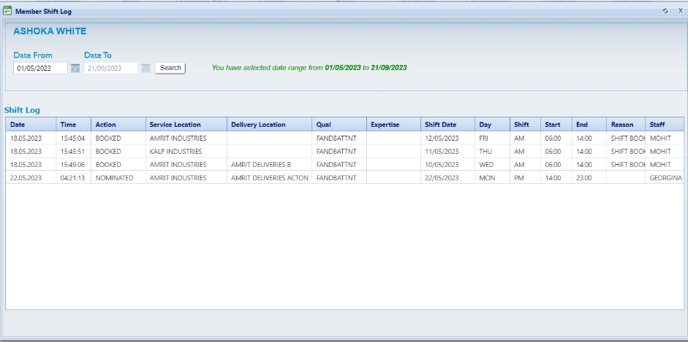
In the Reports → Availability Reports → Process Availability Member Status Screen of the Staff Portal, a new Last Location Worked field is added as shown in the figure below.

On clicking the Last Location Worked in the Process Availability Member Status Screen, the Member Shift Log pop-up window opens. This Member Shift Log is similar to the Member Log of the Members Availability page.
Availability Member Status Report
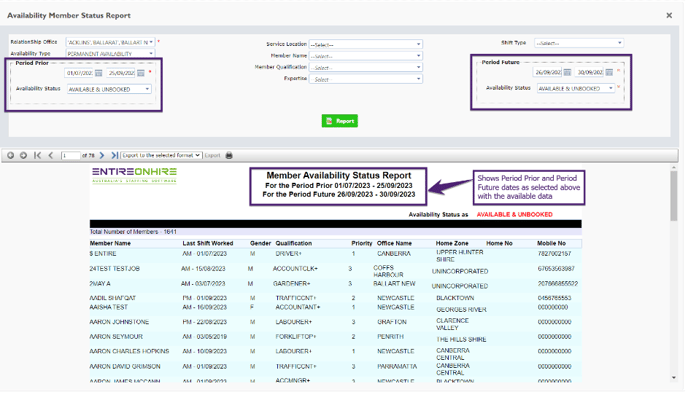
In the Reports → Availability Reports →Availability Member Status Report of the Staff Portal, the Period Prior and Period Future date fields are mandatory.
On clicking the Report, the Availability Member Status Report shows the heading including the ‘For the Period Prior <date range>’ and ‘For the Period Future <date range>’ with the available data for the selected date range.
Member App
What is Bulk Push Notification Shift Confirmation?
The Bulk Push Notification feature releases the shifts in bulk to the members and the members receive the notifications showing the details of the shifts. When the member receives the push notification, the shift details and the shift confirmation message are shown. The member can accept this shift by clicking the Accept button.
Before the member accepts the shift, the following Shift Confirmations messages are displayed.
The Shift Confirmation message should be read carefully before accepting the shift and take necessary action (if required).
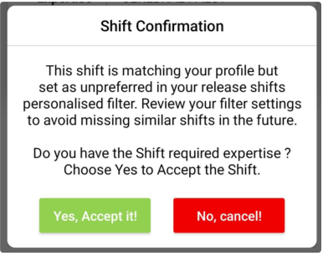
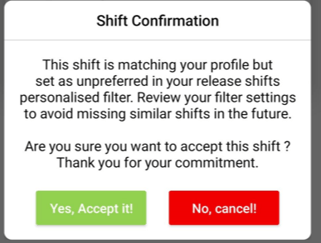
Scenario 1: When the shift matches the member’s profile but the shift is set as unpreferred in the release shifts personalised filter.
A. Shift Confirmation message with the shift that requires expertise
B. Shift Confirmation message (without expertise)
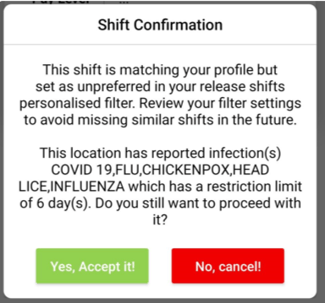
Scenario 2: When the shift matches the member’s profile but the shift is set as unpreferred in the release shifts filter and has reported infection(s).
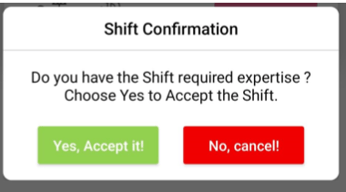
Scenario 3: When the shift matches the member’s profile and the member needs to accept the shift.
A. Shift Confirmation message with the shift that requires expertise
B. Shift Confirmation message (without expertise)
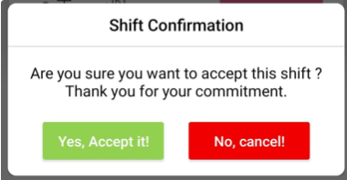
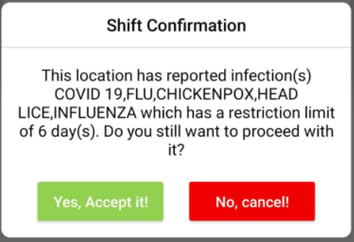
Scenario 4: When the shift matches the member’s profile but has reported infection(s).
Force Update
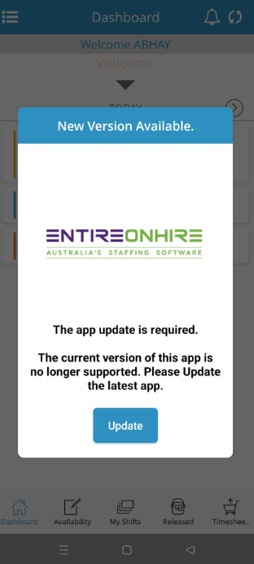
The Force Update feature in the Member App will push the members to update to the latest available Member App version. This feature is introduced to implement any specific update or fix required in the Member App and to activate this feature contact the EOH support team.
A ‘New Version Available’ pop-up appears in the member app when the Force Update is initiated. The members need to click the Update to install the latest app version released.
Resolved Issues
We are constantly working to improve our Entire OnHire Application and have resolved the following issues for you ![]() .
.
|
Issues |
Summary |
Status |
|
The Passport Country of the member in the Employment Detail's Visa page should be the same as shown in the Personal Details page of the Applicant. |
Issue Resolved. Now, in the Employment Detail's Visa page of the Staff Portal application, the Passport Country is the same as shown in the Address field of the Personal Details page of the Applicant. Users will also be able to update the Passport Country in the Employment Detail's Visa page and that will be updated in the Visa Details tab of the Applicant Portal. |
RESOLVED ✅ |
| The Recruitment Dashboard of the Staff Portal application facing “504 Gateway timeout” issues in Reschedule, Activate Member, and Interviews. |
Issue Resolved. On the Recruitment Dashboard page, the performance issues are identified and fixed. Now, the Recruitment Dashboard is optimised to achieve better performance and efficiency. |
RESOLVED ✅ |
| Unable to send SMS via New Contact Log |
Issue Resolved. In the Personnel Card → Contact Log of the Staff Portal, the user will be able to send SMS successfully to the member. |
RESOLVED ✅ |
|
Timesheet error while approving timesheets in the Client/Professional Portals |
Issue Resolved. In the Client/ Professional Portals, now the client/professional can approve the Submitted Timesheets of the members without any issues. |
RESOLVED ✅ |
|
Supervisor’s details missing from the approved timesheets
|
Issue Resolved. In the digitally approved timesheet of the member, the Supervisor’s details including name, date, and email id are now appearing below the signature of the Supervisor. |
RESOLVED ✅ |
Feedback
We have incorporated the new features, enhancements, and fixes to provide you with a delightful user experience ![]() . We would love to hear back from you about your experience with our product or service. Please drop your suggestions and feedback at
. We would love to hear back from you about your experience with our product or service. Please drop your suggestions and feedback at ![]() support@xeople.com.
support@xeople.com.


