

On this Page:
- Enhancements
- Unmanaged Jobs – New Timesheet Process
- Client/ Professional Portal – Approve Timesheets
- Timesheet Approval Process
- Show Approved Shifts/ Jobs
- Timesheet Snap
- Client/ Professional App
- Filters
- Docket Id Link
- Review and Approve Timesheet
- Member App
- Disputed Timesheet
- Member App Push Notifications
- Apply with Seek – Change of Position in Casual Application Page
- Client/ Professional Portal – Booking Notes
- Request and Restriction
- Client/ Professional Portal
- Staff Portal
- Finance Application
- Confirm Shift
- Flag for Invoice and Docket Collation
- Location Selection for Docket Collation Report
- Invoice Processing
- Unmanaged Jobs – New Timesheet Process
- Resolved Issues
- Feedback
Enhancements
Unmanaged Jobs – New Timesheet Process
In the Unmanaged Job, the timesheet approval process is now enhanced with the simple and quick steps to approve timesheets for the Jobs.
The Client/ Professional can collectively select the job timesheets based on similar Job Id and Roster End Date and approve Multiple Timesheets using Client/ Professional Portal and Apps.
Client/ Professional Portal – Approve Timesheets
Login to the Client/ Professional Portal application and select the Approve Timesheets page to approve the timesheets for the Jobs.
Now, the Approve Timesheets page for the Jobs is divided into two sections:
-
Job Timesheet Review - Worked Hours submitted by the member for the confirmed Job
-
List of Timesheets waiting for Review
On selecting the member’s job from the ‘Job Timesheet Review - Worked Hours submitted by the member for the confirmed Job’ section, all the timesheets related to the selected Job Id (with similar Roster End Date) are highlighted and selected collectively for approvals in the ‘List of Timesheets waiting for Review’ section.
In the Job Timesheet Review - Worked Hours submitted by the member for the confirmed Job section, all the Unmanaged Jobs of the members are listed for client approval and displays:
-
Job Id – Job Id of the Job
-
Member Name – Name of the member
-
Roster End Date – End Date of the Roster Submission
-
Number of Shifts Submitted – Total number of shifts submitted with similar roster end date.
-
Submission Date/ Time – Date and Time of Timesheet Submission
In the List of Timesheets waiting for Review section the details of the submitted timesheet by the member are shown and displays:
-
The Job Id, Timesheet, Member Name, Service Location, Area, Date, Day, Shift, Start time, End time, Break time, Worked Hours and Review Timesheets.
Timesheet Approval Process
To Approve the submitted timesheets of the selected member from the Approve Timesheets page:
-
Select the From Date and To Date
-
Select the Member and click Search and the jobs are display based on the selected member.
❗Only those members will appear in the list whose timesheets are submitted for client approval.
-
Select the required Job selection checkbox from the ‘Job Timesheet Review - Worked Hours submitted by the member for the confirmed Job’ section
-
Subsequently, all the timesheets related to the selected Job Id are selected and highlighted collectively in the ‘List of Timesheets waiting for Review’ section
-
Now, click Approve Multiple Timesheets.
❗If required, you can deselect any of the timesheets from the highlighted ‘List of Timesheets waiting for Review’ section that are ‘Pending Client Review’.

The Multiple Timesheets Approval Screen appears.
-
Provide the Timesheet Approval Notes and Your Signature
-
Click Approve and the selected multiple timesheets are approved successfully.

❗Note that the procedure to approve single timesheet of the member has not changed.
Show Approved Shifts/ Jobs
You can view all the Approved Shifts/ Jobs or customize the search for Approved Shifts with the specific date range and/ or member.
To view the Approved Shifts:
-
Select the From Date and To Date
-
Select the Member and select Show Approved Shifts checkbox
-
Click Search and all the Approved jobs are display based on the selected member.
❗In case you need to view Approved Timesheets of all the members, you should not select any member from the Member drop-down.
On selecting the job in the ‘Job Timesheet Review - Worked Hours submitted by the member for the confirmed Job’ section, the timesheets corresponding to that job are selected in the ‘List of Timesheets waiting for Review’ section in the disabled mode. The selected approved jobs are highlighted and grouped collectively in the ‘List of Timesheets waiting for Review’ section.
Here you can view the Timesheet Snap of the member that includes all the timesheets submitted by the member for that job. The approval status of the submitted timesheet is displayed in the Approved by Client in the timesheet snap.

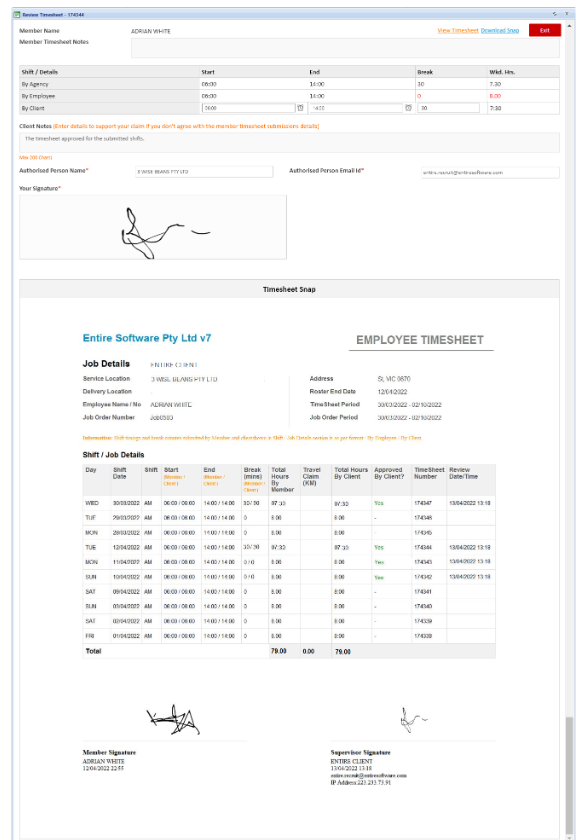
Timesheet Snap
When the client approves multiple timesheets collectively against a job, a new single Timesheet Snap is generated against all the timesheets for the Jobs. This timesheet snap has all the job details that were submitted by member collectively for a particular Roster End Date.
To view the Employee Timesheet Snap, click the Timesheet ID link or Review Timesheet link from the Approved Shifts page (as shown in figure above).
The Employee Timesheet Snap displays Job Details and Shift/ Job Details. The Job Details shows the Job Order Number, Roster End Date, and Job Order Period as the new added details for the Job.
The Shift/ Job Details shows the following as the new added details for the Job:
-
Approved by Client? – In the Approved by Clients:
-
The timesheet submitted from the Client app and the Client has not taken any action (i.e. approved or dispute timesheet) is represented as → ‘-',
-
The timesheet approved by the Client is represented as → ‘Yes’,
-
The timesheet disputed by the Client is represented as → ‘No’,
-
-
Review Date/ Time – shows the review date and time, when the Client/ Professional approved the timesheet
The Supervisor Name, Supervisor Email ID, date & time (date and time when the Supervisor actioned on the timesheet), latest Supervisor Signature and IP Address of the Supervisor is reflected at the bottom of the Timesheet Snap.
Client/ Professional App
In the Unmanaged Jobs, the Client/ Professional can approve or dispute the submitted timesheet of the Jobs. The required jobs can be searched easily using the Filters.
In the Client/ Professional App, to approve or dispute the submitted timesheets of job for the member:
-
Select the required Client for which you need to approve the timesheets.

-
The Timesheet page opens with all Jobs/ Shifts timesheets submitted by the member for approval. In the Timesheet screen:
-
The Job shows the Job Order No, Job Period, Roster End Date, Shift Date, Qualification, Supervisor and link to the Docket Id (as shown in the figure below)
-
To view the timesheet of a member, select the Member Name from the Select Member Name drop-down. All the submitted timesheets will be filtered based on the selected member name
-
Click the Docket ID number of the Job to view the Timesheet Snap
-
Click the Filter icon to search the customized timesheets.
-

Filters
You can apply filter to search the required Jobs/ Shifts based on Order No/ Timesheet No, Shift Date, Member Name, and Supervisor Name.
-
The Supervisor Name filter displays all the available names of the supervisors that are selected to approve the submitted Shifts/ Jobs
-
In the Shift Date, provide the search Start and End date range
The Filters helps to narrow-down the search for the submitted timesheets. You can select single or multiple filters and click Apply.

Docket Id Link
On clicking the Docket Id link from the Timesheet screen, the timesheet snap opens. The Timesheet Snap for the job shows:
-
The Job Details section with the new added details as Job Order Number, Roster End Date, and Job Order Period
-
The Shift/ Job Details section with the new added details as Approved by Client?, and Review Date/ Time.
 For details refer to the Timesheet Snap detail above

Review and Approve Timesheet
To review and approve the jobs, click required Job from the Timesheet screen (as shown in the figure above) and the Member’s Review Timesheet screen opens.
In this screen the Job Order No, Job Period, Roster End Date, Supervisor name, Supervisor Email are displayed for the job. The Client/ Professional can:
-
Edit the Supervisor, Supervisor Email by clicking the pen icon
-
Edit Client Shift Details details (if required)
-
Add notes in the Client Notes
The Member Notes are displayed in case any notes were provided by the member.

To Approve the timesheet:
-
Click Approve Docket
-
Provide Your Signature and click Approve
-
The success message for timesheet approved is displayed as ‘Timesheet has been successfully approved. Thank you’
Simultaneously, the member will also receive the ‘Job Timesheet Approved' notification through email.

To dispute the timesheet:
-
Provide the Client Shift Detail and specify reason of dispute in the Client Notes
-
Click Lodge Query
-
Provide Your Signature and click Lodge Query
-
The Query Lodged message for the timesheet dispute is displayed as ‘Query Lodged successfully. We will further investigate the Submitted Timesheet before Approval!’

Simultaneously, the member will also receive the ‘Timesheet Action Required' notification through email.
Member App
Disputed Timesheet
When the member taps on the Push Notification in case of Dispute Timesheet, it will redirect member to the Disputed Timesheets section. The ‘Job Timesheet Action Required’ pop-up appears with the disagreed shift date details.

The Disputed Timesheet screen for the Job shows the Job Order Number, Job Period, Roster End Date and Docket No with the link to the timesheet snap.
-
Click the Docket Id to view the timesheet snap.

-
Tap on the Disputed Timesheet and submitted job details are displayed.
-
The Job Order Number, Roster End Date and Job Period are shown with the Client Review Notes
-
You can view the timesheet snap by clicking the Timesheet snap link
-
Member can Agree or Disagree with the client reviewed timesheet.

Member App Push Notifications
When the Client/ Professional approves or disputes the timesheet, the members will receive the Push Notifications
 for both Timesheet Approved or Timesheet Dispute.
-
In case of Approve Timesheet – Your job timesheet has been successfully approved by the client for the roster ending date <DD/MM/YYYY>. Total Worked Hours: <HH:MM>
-
When this Flag is switched ON – This generates the invoice with docket collation from Invoice → Email Invoices option in the Finance application
Note that this is similar to the Invoice Docket Collation report that you generate from Reports → Invoice → Invoice & Docket Collation. Refer to the sample figure shown below for the Invoice Docket Collation report generated by switching ON the ‘Generate Invoices with Docket Collation’ flag -
When this Flag is switched OFF – Generated invoices will not include the docket collation
-
In case of Dispute Timesheet – The Client has disagreed with the submitted shift timing by you for the shift date <DD/MM/YYYY>

Apply with Seek – Change of Position in Casual Application Page
Now, the position of Apply with Seek app icon is changed in the Casual Application page. On clicking the Apply with Seek app icon, the SEEK job search page opens.

Client/ Professional Portal – Booking Notes
In the Client/ Professional Portal, the New Booking page is updated with the new Booking Notes details (as shown in the figure below). The New Booking includes the following new details in the Booking Notes:
-
All current site Infections / Outbreaks must be entered here
-
Important information about this shift and/or location
-
-
Go to the Application Settings → System Configurations
-
Switch ON the ‘Generate Invoices with Docket Collation’ flag as shown in the figure below.dditional information member/ agency/ supervisor need to know.

Request and Restriction
Client/ Professional Portal
In the Client/ Professional Portal, the Request and Restriction page now displays the Request Personnel tab as the default selected tab.
In the Request Personnel tab:
-
On adding new personnel request, the Personnel Full Name field displays only active member names in the list.

In the Restriction Personnel tab:
-
On adding new personnel restriction, the Personnel Full Name field displays only active member names in the list.

Staff Portal
In the Staff Portal, on clicking the Restriction quick link , the Requests & Restrictions tab displays only active members in the Member Name drop-down list.

Finance Application
Confirm Shift
In the Finance Application, the Confirm Shift screen now shows the shift data as per the client confirmed data in case the timesheet is Client Disputed. For the disputed timesheet by the client:
-
The shift data is displayed by default as provided by the client
-
This new shift data provided by the client is highlighted in orange color with red text
-
On mouse-over, the text balloon shows the disputed shift data details provided by the agency, member and client (refer to the figure shown below)
The Member Timesheet Notes and Client Timesheet Notes are displayed as provided by the member and/or Client.
 Flag for Invoice and Docket Collation
In the Finance Application, you can now generate Invoice with Docket Collation report directly while processing invoice through the Invoice Processing screen.
In the Staff Portal application, to activate this feature:
-
Go to the Application Settings → System Configurations
-
Switch ON the ‘Generate Invoices with Docket Collation’ flag as shown in the figure below.

-

-
-
When this Flag is switched ON – This generates the invoice with docket collation from Invoice → Email Invoices option in the Finance application
Note that this is similar to the Invoice Docket Collation report that you generate from Reports → Invoice → Invoice & Docket Collation. Refer to the sample figure shown below for the Invoice Docket Collation report generated by switching ON the ‘Generate Invoices with Docket Collation’ flag -
When this Flag is switched OFF – Generated invoices will not include the docket collation.


-

-
-
In the Finance application, you can also control to Generate Invoice with Docket collation using the ‘Generate Invoice(s) with timesheet(s)’ checkbox from the Invoice Processing screen as shown in the figure below.
-
In case the ‘Generate Invoices with Docket Collation’ flag is ON in the Staff Portal, the ‘Generate Invoice(s) with timesheet(s)’ checkbox is selected and the invoice will be generated with docket collision.

On clicking the Generate Batch to View / Print Invoices, an Alert message is displayed as shown in the figure below. Click Yes to continue and generating invoice(s) with docket collision takes a while and the file generated may be large in size.
-
In case the ‘Generate Invoices with Docket Collation’ flag is OFF in the Staff Portal, the ‘Generate Invoice(s) with timesheet(s)’ checkbox is deselected and the invoice will not be generated with docket collision.
In the Invoice Processing screen, you can also select/ deselect the ‘Generate Invoice(s) with timesheet(s)’ checkbox.
In case ‘Generate Invoices with Docket Collation’ flag is OFF in the Staff Portal, you can select this checkbox to generate invoices with docket collation or in case ‘Generate Invoices with Docket Collation’ flag is ON in the Staff Portal, you can deselect this checkbox to generate invoices without docket collation.
❗Note that by selecting/ deselecting the Generate Invoice(s) with timesheet(s) checkbox, you cannot control the Generate Invoices with Docket Collation flag in the Staff Portal application.
Location Selection for Docket Collation Report
In the Invoice and Docket Collation report, now you have the option to generate and save invoices in a new selected locations. To generate and save Docket Collation Report:
-
Click Reports → Invoice → Invoice & Docket Collation
-
Provide the Invoice No OR Period End Date to generate files
-
Click Generate Invoices and the pop-up window opens. In the window:
-
By default ‘Generate invoice(s) in the default set directory. Note that on selecting this option original invoice(s) will be replaced and cannot be restored.’ option is selected. On clicking OK, the new invoice will be generated in the same defined directory
-
Or click the Select to pick the new location
-
Select the destination folder and click Select Folder
-
The new folder location is now selected in the Location as shown in the figure below
-
Now, click OK and the new invoice report is exported successfully in a new provided location.
-
-
❗If the Generate invoice(s) in the default set directory. Note that on selecting this option original invoice(s) will be replaced and cannot be restored option is selected and you Select the option (b) to generate the invoice, a validation message is displayed ‘Untick the checkbox above to create invoices in the new location and proceed further’.
You need to select any one of the specified option to generate and save the invoice.

Invoice Processing
Now while Invoice Processing, you can modify the Invoice Date and Week Ending Date on Invoice at the time of finalizing and printing the invoices. These updated dates will be reflected in the Invoice Docket Collation report as well as in Invoice Reprint.

Based on this new Invoice Date and Week Ending Date, the Invoice Docket Collation report and Invoice Reprint will be generated.

Resolved Issues
We are constantly working to improve our Entire Recruit Application and have resolved all these issues for you ![]() .
.


Feedback
We have incorporated enhancements and fixes to provide you with a delightful user experience ![]() . We would love to hear back from you.
. We would love to hear back from you.