Content
Why Use the Shift Tasks Checklist?
Staff Portal – Creating Shift Tasks
Add New Task Group
Add New Task
How to Configure the Shift Tasks Checklist?
Member App – Responding to Shift Tasks Checklist
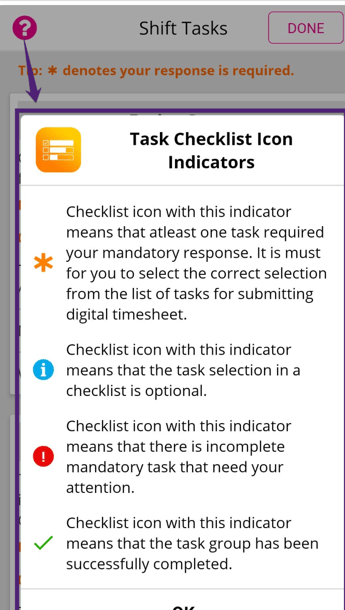
Task Checklist Icon Indicators
Submit Shift Tasks
Client Portal – Reviewing Shift Tasks
Show Responses in Digital Timesheet
Introduction
The Shift Tasks Checklist is a self-inspection checklist in the Digital Timesheet that members complete at the end of their scheduled shift. It helps reduce workplace risks and supports the client’s health and safety programs.
The client assigns the checklist and decides whether its tasks are mandatory or optional. Members respond to each assigned task before submitting their timesheet.
❗The Shift Tasks Checklist is available only in the Digital Timesheet.
- Mandatory tasks: Members must respond to all assigned tasks before they can submit the timesheet.
- Optional tasks: Members can submit the timesheet without responding, though responding is encouraged.
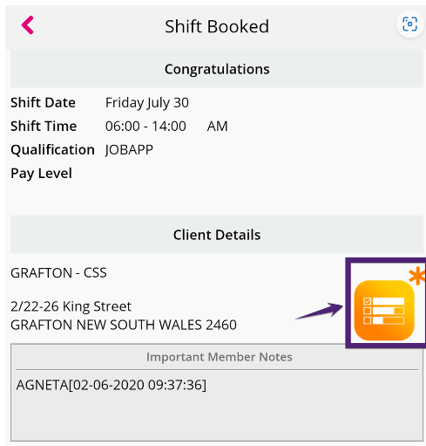
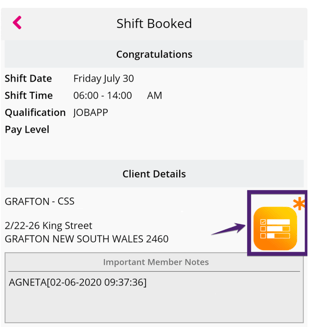
To respond to tasks, tap the orange Tasks Checklist icon on the Shift Booked screen.
Why Use the Shift Tasks Checklist?
Agencies in Healthcare, NDIS, and Education use the Shift Tasks Checklist to strengthen compliance and promote safe, accountable shift delivery.
You can configure up to three yes/no questions for members to answer at the end of their shift, before they submit their timesheet. Common examples include:
- Did you complete a handover with the person in charge?
- Did you report any incidents or hazards from your shift?
- Did you record all relevant notes in the communication book?
The checklist helps standardise post-shift responsibilities, ensures critical actions are not missed, and supports audit readiness across your workforce.
Each task can be set as mandatory or optional. The checklist is available only in the Digital Timesheet.
Need help setting it up? Contact support@xeople.com, and our team will help you configure tasks that match your compliance goals.
To know how members respond to the Shift Tasks Checklist, view Member – How to Submit Shift Tasks Checklist with your timesheets.
To create the Shift Tasks Checklist in the Staff Portal.
-
Go to Masters
→Member Master and click Shift Tasks Checklist.

-
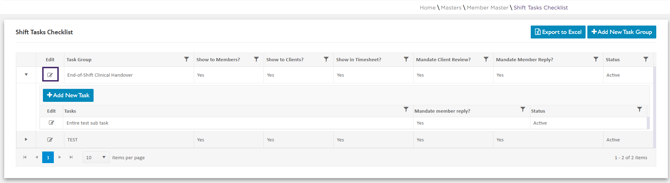
The Shift Tasks Checklist page opens and shows the existing Task Group, Show to Members?, Show to Clients?, Show in Timesheet?, Mandate Client Review?, Mandate Member Reply?, and Status of the task group.
-
Each Task Group consists of a task checklist with a set of Tasks. The Tasks are assigned to the member for their responses.
-
You can edit the existing Task Group by clicking the Edit icon as shown in the figure below.

Add New Task Group
To add a new task group:
-
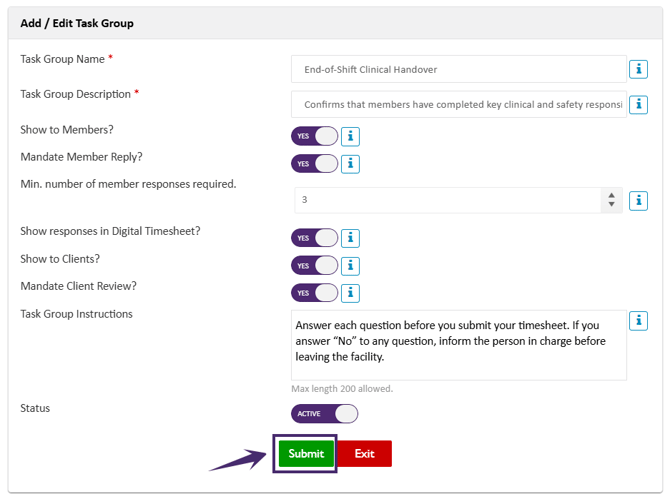
Click Add New Task Group and the Add/ Edit Task Group pop-up screen opens
-
Provide the details in all the required fields.
-
Click Submit and the New Task Group is created.

|
Field Name |
Description |
|---|---|
|
Task Group Name |
This Task Group Name signifies a task checklist title that includes a set of tasks for the members to respond. |
|
Task Group Description |
This description shows the information about the new task group. |
|
Show to Member? |
To select the option as ‘Yes’ indicates task group checklist will be visible to members for their responses and feedback. |
|
Mandate Member Reply? |
To select the option as ‘Yes’ indicates member response is mandatory for the provided task group checklist before submitting the timesheet from an App. |
|
Min. number of member responses required. |
This indicates the compulsory minimum task responses required by a member per shift. Note: If the Mandate Member Reply is set to ‘No’ and the Min. number of member responses required is set to ‘2’. In this case, a member must respond to a minimum of two tasks to submit the timesheet successfully. |
|
Show responses in Digital Timesheet? |
To select the option as ‘Yes’ indicates to print the member’s responses in the digital timesheet.
This option is disabled in case of Show to Members is disabled. |
|
Show to Client? |
To select the option as ‘Yes’ indicates task group checklist will be visible to the client during the timesheet review process. Note: This option is enabled only in case ‘Show to Members’ is enabled. |
|
Mandate Client Review? |
To select the option as ‘Yes’ indicates Client/Supervisor mandatory review is required for the provided task group checklist before approving the timesheet from an App. |
|
Task Group Instructions |
To provide the instruction for the task group that will be visible to the member. |
|
Status |
The Status of the Task Group can be set to Active or Inactive. |
- Click Add New Task , and the Add/ Edit Task pop-up opens.
-
Provide the details in all the required fields.
-
Click Submit.
-
Similarly, you can create all the required tasks in this Task Group.
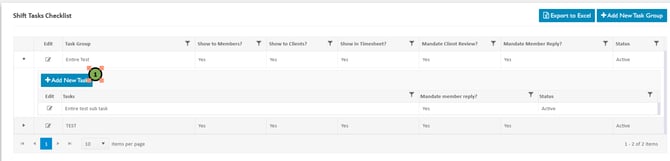
|
Field Name |
Description |
|---|---|
|
Task |
Provide the details about the new task. |
|
Mandate member reply? |
The ‘Yes’ indicates that the member response is mandatory for the task before submitting the timesheet from an App. |
|
Status |
The Status of the new Task can be set to Active or Inactive. |


How to Configure Shift Tasks Checklist?
To configure the Shift Tasks Checklist:
- Click Masters → Client Master, and click Configure New Client Web App Settings.

In the Configure New Client Web App Settings, configure the following fields in the Timesheets tab:
- Delivery Location Required: Delivery location is required for Member timesheet submission:
Select Yes if you require members to select a delivery location in the app before submitting their timesheet. Select No to make it optional. -
Timesheets: Shift Document Upload Required: A document upload is required during timesheet submission:
Select Yes if you require members to upload shift documents in the app before submitting their timesheet. Select No to make it optional. -
Digital Timesheet: Turn off the manual timesheet upload feature & create a system-generated timesheet document:
Select Yes if you require the Shift Task response to be printed in the timesheet for members. Select No to make it optional.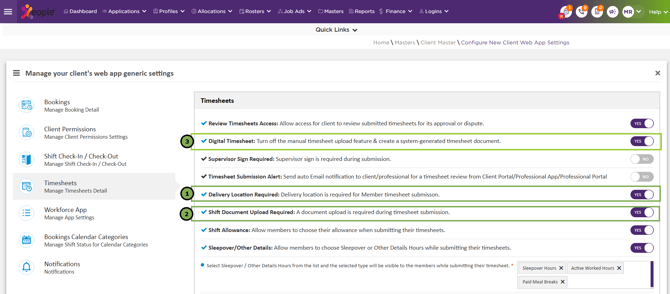
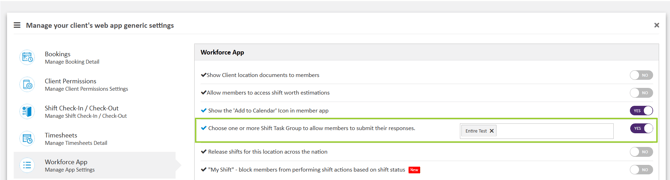
- Workforce App Tab: Choose one or more Shift Task Group to allow members to submit their responses. A list of all the Shift Task Group will be displayed.
Select Shift Task Group for members. Members must respond to the selected task groups. - Click Save, and the shift task group is set for the members.
When shifts are booked for a client, members can view the assigned tasks in the app and respond Yes or No to each one. Responses to mandatory tasks are required before the timesheet can be submitted.
To set up task groups for an individual client, view Client Level Settings?
Member App – Responding to Shift Tasks Checklist
When a client assigns a Shift Tasks Checklist, members respond to each task at the end of their shift. How to respond depends on whether the tasks are mandatory or optional:
- Mandatory tasks: Members must respond to all tasks before they can submit their timesheet.
- Optional tasks: Members can submit their timesheet without responding, though responding is encouraged.
How to Respond to Shift Tasks?
- In the member app, open the booked shift.
- On the Shift Booked screen, tap the floating orange Tasks Checklist icon.
The indicator on the top-right of the Tasks Checklist icon shows the status of the assigned Shift Tasks Checklist.
- Review the assigned tasks and select Yes or No for each one.
- Click Done to save your responses and submit your timesheet as usual.

Tasks Checklist Icon Indicators
An indicator on the floating orange Tasks Checklist icon shows the status of the checklist assigned to the member. Members should check it when they open a booked shift to check whether any tasks still need a response.
Tasks can be mandatory or optional, and the indicator changes accordingly.
| Indicator | Meaning |
|---|---|
| Orange asterisk | At least one task requires a response. You must respond to all mandatory tasks before submitting your digital timesheet. |
| Blue info icon | The tasks in this checklist are optional. |
| Red exclamation mark | One or more mandatory tasks are incomplete and need your attention. |
| Green tick | All tasks in this task group are complete. |

Submit Shift Tasks
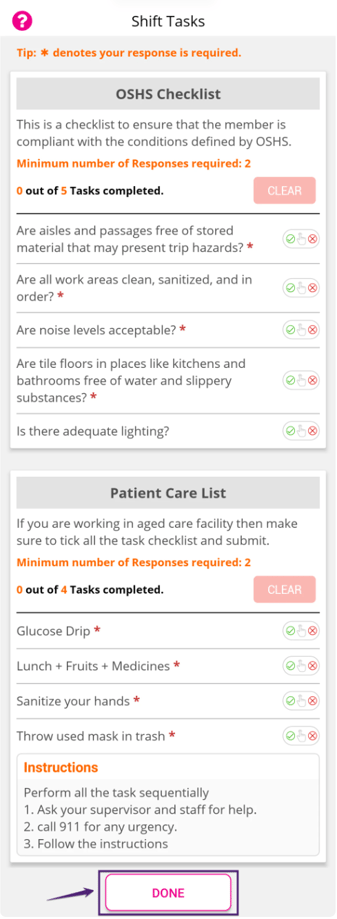
On clicking the floating Orange Tasks Checklist icon, the Shift Tasks screen opens. In the Shift Tasks screen:
-
The Shift Task Groups assigned to the member are displayed with the Shift Task Group Name, Group Description, number of tasks assigned, and instructions.
-
Each Shift Task Group can have a Minimum number of Responses required for the member. This implies that members must provide the specified minimum responses.
-
To respond to the Shift Tasks:
-
Members should tap to select the response as ‘Yes’ or ‘No’ for each task.
-
Based on the response provided by the member, ‘0 out of N Tasks Completed’ will be updated.
-
Members must respond to the tasks marked with a red asterisk (*).
-
The member can reset the responses provided for the task group by clicking Clear. On clicking the Clear, a confirmation message is displayed to confirm whether you want to clear the responses for the selected task group.
-
To reset responses for any task in the task group, clear the task response by sliding the required task towards the left of the screen.
-
If the member does not complete the required/mandatory tasks, he will not be able to submit the timesheet, and the Shift Task Submission Alert message will be displayed.
-
Once the required response is provided for the Shift Tasks assigned to the member, click Done.

-
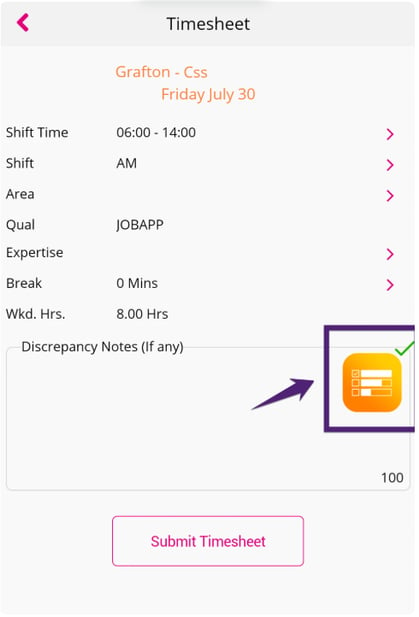
On completing the Shift Tasks Checklist, you will observe that the Task Checklist Icon Indicator will change to indicate that task selection is completed successfully, as shown in the figure below.
Before submitting the timesheet, the member must provide the Location (Area) if the Delivery Location Required: Delivery location is required for Member timesheet submission is set to ‘Yes’ in the Web Generic Settings/ Client Management Settings.
-
Now the timesheet is ready to be submitted.
-
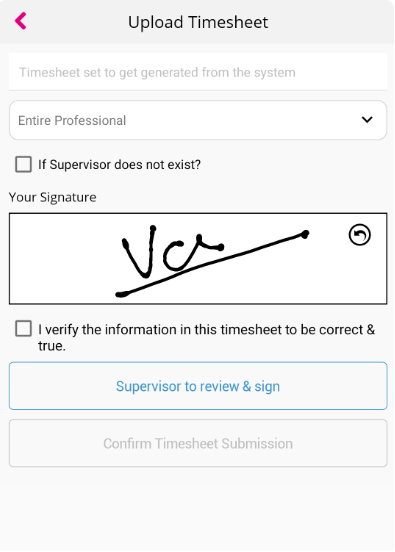
Provide the signature and submit the timesheet for client/supervisor review and approval.
-
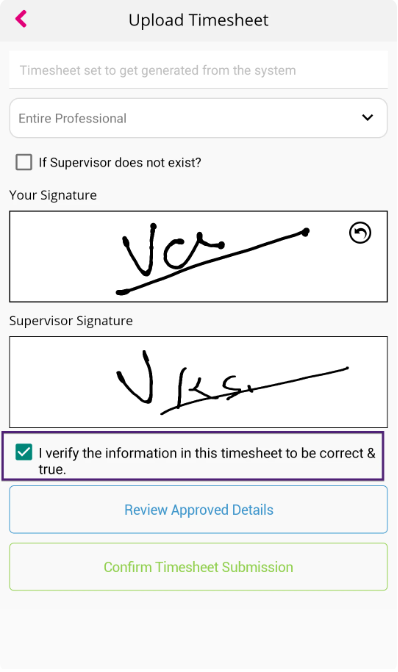
If required, provide the Supervisor Signature before ‘Confirm Timesheet Submission’.
The Supervisor will be able to review or view the task group if the
'Supervisor Sign Required: Supervisor sign is required during submission' field is set to ‘Yes’. 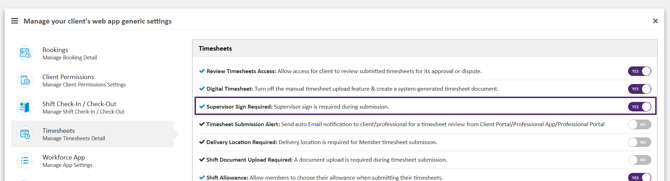
Before submitting the timesheet, ensure to select the ‘I verify the information in this timesheet to be correct & true’ checkbox to enable the Confirm Timesheet Submission else you will not be able to submit the timesheet.

After a member submits their timesheet with the Shift Tasks Checklist, the client can review and approve it.
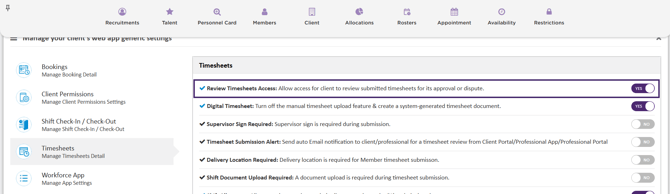
The client must review the member's Shift Tasks if 'Review Timesheets Access: Allow access for client to review submitted timesheets for its approval or dispute' in the Timesheet tab is set to 'Yes' in the Web Generic Settings/ Client Management Settings.
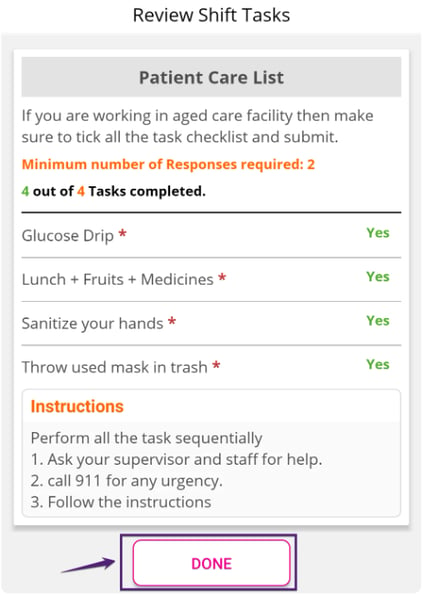
The client must review the Shift Tasks response provided by the member and click Done before approving the member’s timesheet.

Show Responses in Digital Timesheet
To print the member’s Shift Tasks Checklist responses on their submitted timesheet, set the following to 'Yes' in the Timesheet tab of the Web Generic Settings/ Client Management Settings:
Digital Timesheet: Turn off the manual timesheet upload feature & create a system-generated timesheet document
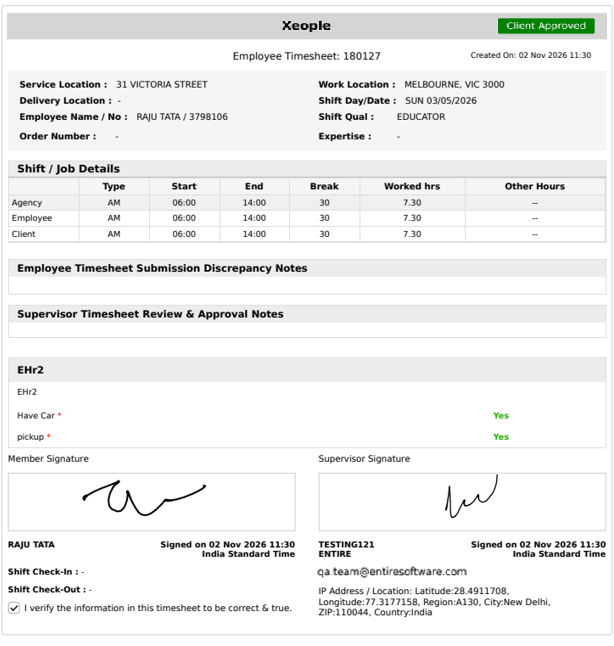
The responses then appear on the submitted timesheet, as shown in the figure below.
The member’s consent statement, I verify the information in this timesheet to be correct & true, is also printed on the submitted timesheet.