
Workforce App - Case Notes
The Case Notes in the Workforce App are visible on the basis of access permissions provided in the Masters for the members. The Members can view, comment, and add notes on the basis of the access permissions provided for the specified Case Notes.
Members can add Notes in the Workforce App:
-
To Add Client Specific Notes - accessible from the left navigation panel of the Workforce App (Only if currently booked for a shift)
-
To Add Notes directly on/for Shift(s) - From My Shifts section and Shift History section (on the timesheet)
Client Notes
In the Client Notes, the member can add notes directly for the client. Tap on the client name to open the active Notes Category on the basis of access permission provided by the staff in Masters. The member can add/view/comment on notes for the selected Notes Category.
Access Client Notes
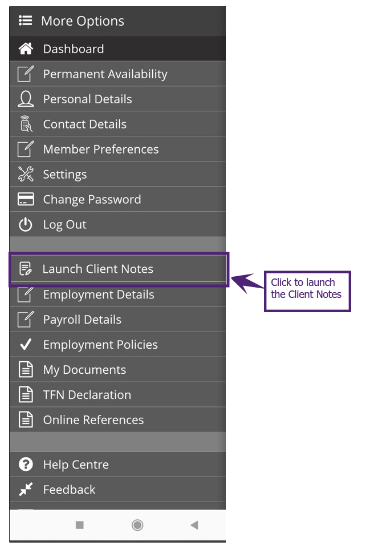
To open the Client Notes, open the left navigation panel of the Member App, and click Launch Client Notes as shown in the figure below.
The Select Client screen shows all the client names for which the member has access permissions. The member can select the Client Name or search Client Name to add notes for the selected Notes Category.

Notes
Each Client has the Notes Categories defined with the Notes added by the staff/member/other members.
Note that members can add/edit/view notes added by staff or other members on the basis of the access permission set in the Masters for Public or Custom Notes Categories.
The notification bell icon is visible on the top-right corner of the screen as shown in the figure below. The bell icon blinks for the new notifications in case:
Case 1: The staff adds the Notes for any category, selects the Notes Related To drop-down as Member, and adds the member’s name, the member will get the notification
Case 2: The staff adds the Note for the Shift, the active member on shift will get the notification
Case 3: The staff has added the Note for the Broadcast Shift, all the members of the Broadcast Shift will receive the notification.

Tap the Notification bell icon ![]() and the Notification pop-up opens and shows the details of the new notifications. Click to open the notification and the related Notes of the specific Notes Category open. If the member has access permissions, the member can also provide a Comment for the Note.
and the Notification pop-up opens and shows the details of the new notifications. Click to open the notification and the related Notes of the specific Notes Category open. If the member has access permissions, the member can also provide a Comment for the Note.
Click Clear to clear all the received Notifications.

Select the required Notes Category from the available list to add/view/edit/delete Notes and the selected Notes Category with all the available Notes are displayed. Each Note displays:
-
Name of the member or staff who added/edited notes with date & time stamp
-
Category - Name of the Category
-
Event Date - Date and Time of the Event
-
Title - Title of the Note
-
Description - Detailed Description of the Note
-
View More - Click to view the Note in detail.

-
Add New Note
To add a New Note:
-
Click the
 icon as shown in the figure above and the Add Note screen opens
 -
Provide all the required details
-
Click Save. The newly added note is reflected in the Notes screen
Field Name
Description
Note Category
Shows the name of the Note Category.
Event Date and Time
Date and Time of the Event.
Pick the date and time from the calendar picker.
Upload Files
Select files to be uploaded related to this Note. You can also upload multiple files at a time.
The file type should be in .jpeg, .jpg, .png, .doc, .docx, .pdf, .xls, and .xlsx format only with a maximum size of 5 MB.
Note Title
Title of the Case Note.
Notes
Description of the Case Note.
Use the formatting menu to edit text formatting that helps to create an effective and appealing Notes description.
-
In case the selected Note Category includes the Built-in form, you need to fill in all the mandatory fields available in the form to save the New Note and it will also display the progress percentage of the Built-in form.

In case the External Forms are linked with this Notes Category, a confirmation message ‘Please fill the below forms linked with the Note’ is shown on clicking the Save. To fill all the linked Forms together, click Continue to Fill Form(s) or else click Exit, to fill the Forms later.

On clicking the Continue to Fill Form(s), all the linked forms open. Now, fill in all the linked forms and click Submit All Form(s).

On clicking Submit All Form(s), a confirmation message ‘You cannot update the form(s) once you Submit it. Are you sure you want to proceed?’. Click Yes and the Forms are submitted successfully.

Edit Note
You can edit the existing Notes. To edit the existing Notes:
-
Click three dots at the bottom-right corner of the Note as shown in the figure below
-
Click Edit.
The Edit option is activated only in case the member has access permission to edit the Note for the selected Notes Category.

-
Edit all the required details in the existing note
-
Click Update
In case the selected Note Category includes the Built-in form, you need to fill in all the mandatory fields available in the form to save the existing Note and it will also display the progress percentage of the Built-in form.

Delete Notes
You can delete the existing Notes. To delete the existing Note:
-
Select the Note and click three dots at the top-right corner of the page as shown in the figure above.
-
Click Delete
-
A confirmation message is displayed 'Are you sure you want to delete the note?”. Click Yes and the selected Note is deleted successfully.
The Delete option is activated only in case the member has the access permission to delete the Note for the selected Notes Category.
Attach Document(s)
The Attach Document shows the total number of documents attached beside the attach icon as shown in the figure below.
You can view and download the attached document(s) of the Note. To download the attachment(s), click the download icon shown in the figure below.
You can Add more Document(s) from the Attach Document(s) pop-up. Click the ![]() icon and add the required document(s).
icon and add the required document(s).

External Forms
The Forms include the list of External Forms of the Note for the selected Notes Category. In the Form:
-
The green tick icon implies that the form is completed and submitted by the user.
The form icon without a green tick icon implies that the form is incomplete and not submitted by the user.

Click the Form icon and the list of available Form(s) is displayed. You can edit and download the existing form(s) by clicking the edit/ download icon respectively.

Comments
The staff, member (self), or other members can provide comments for a particular Note. For any existing comments on the Note, the total number of comments is displayed beside the Comment icon as shown in the figure below.
Note that based on the access permission provided in the Masters for Public and Custom Notes Categories, the member will be able to add/view the comments provided by staff or other members.

Add Comment
To add a comment for a Note:
-
Click the Comment icon as shown in the figure above
-
The Comment screen opens that displays the existing comments added (if any) by the member with the date and time stamp.
-
Now, provide your comment at the bottom of the screen. Click Send.
-
The latest comment provided is displayed at the top of the screen with the name, date & time. Initially, the first ten comments will be loaded, and to view the remaining comments click Load more Comments.

-
The creator of the Note or the member/staff can Edit, Copy or Delete the existing comment. To edit, copy or delete, click the Edit, Copy, or Delete respectively as shown in the figure below.

View More
You can view the Note in detail. To view the complete details of the Note, click View More.

On clicking the View More, the selected Note opens. You can download the Note by clicking the download icon.
Filters
The members can Apply Filter to retrieve specific Notes/Comments that facilitate to search the required details for a specific date range. To Apply Filter:
-
Click the Filter icon as shown in the figure below and the Apply Filter pop-up opens
-
Provide the date range by picking the date from the Calendar picker
-
Click Load Notes/ Load Comments
-
To clear the applied filters, click the red cross on the filter icon and view all notes in the selected category.
-
In the Client Notes the Show Shift(s) Notes Only checkbox is displayed. On selecting this checkbox, only notes related to shift(s) are displayed.

Shift Notes
Case Notes are also accessible from the My Shift and Shift History section of the Members App. In the Shift Notes, members can add notes directly on the shifts (shift status is timesheet submitted). Members will be able to add notes, edit notes, comment, and view notes on the basis of access permission (Public and Custom access) provided by staff in Masters. Members can add notes:
-
Directly on Shifts - From My Shift and Shift History (on timesheet)
-
Directly on Client (stand-alone) - From Shift History stand-alone (directly on the client).
In case the Shift is completed, the member can access Shift Notes from Shift History later.

Access Shift Notes
Tap on the Shift Notes in the My Shift or Shift History and it will open the Shift Notes screen as shown in the figure below.

Shift Notes
The Notes in the Shift Notes are added/edited similarly as explained in the Client Notes. In the Shift Notes, the Notes screen shows the Note Added for details that include the shift details.

Mandatory Shift Notes for Timesheet Submission
When the staff selects the Notes Categories for the ‘Mandate notes for timesheet submission’ in the Settings of Case Notes in the staff portal. For the selected Notes Categories, submitting the Shift Notes is mandatory for the member(s) during the timesheet submission.
To submit the timesheet successfully, members need to submit the Shift Notes. To submit the Shift Notes:
-
Click here to submit link on the Timesheet screen as shown in the figure below.
-
Click the Notes Category to add Notes showing the status as Pending.

In case the member proceeds with the timesheet submission without submitting the mandatory Shift Notes, a submission alert appears as shown in the figure below.
Once the member submits the mandatory Shift Notes:
-
The member can edit/view the Shift Notes.
-
The status of the Shift Notes for the Notes Category is shown as Completed.

-