How to create a Professional
To create a professional in the system please follow the below steps.
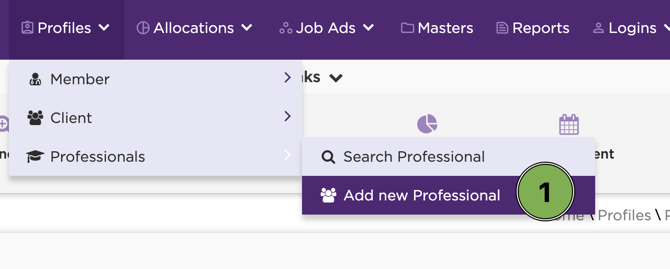
1. Hover the mouse over Profiles found in the drop-down menu, scroll the mouse down over Professionals and Move the mouse across to the right and down to select Add new Professional.

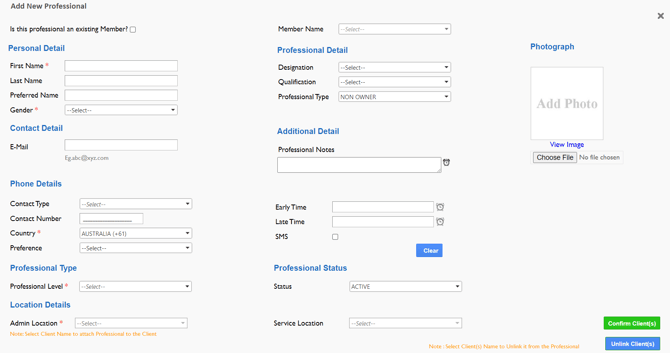
2. In the Add New professional page fill out as many fields as possible up until location details, ensuring all mandatory fields are entered.
The following are Mandatory fields:
- First name
- Gender
- Professional level (For further information on the professional levels please visit:
Once you have reached Location Details please got to step number 3.

3. Adding locations
When adding locations there are different steps depending on the client structure.
For locations that are set as Admin & Service
Select the location name from within the Admin location drop-down list and then select Update changes/Confirm Client(s).

For locations that are Service Only
The first step is to select the Admin location from the drop-down list. Once the Admin location is selected the Service location field will load with all locations under the Admin parent.
The example below shows the Admin location as Adelaide Hospital. when you select the Service location drop-down it loads all service locations that fall under the Admin location.
Once you have ticked the applicable service locations select Confirm Client to add the locations to the professional's profile.

Before saving the professionals file you can choose to send an email to the professional by selecting an email template and ticking the Auto Email Box. Entire OnHire set up a default template that provides login credentials with information on accessing the App and portal however this can be edited within the masters.

*MOST IMPORTANT STEP*
To save the professional profile you must select the bottom "Save Professional" button; if you don't, the profile will not be saved and the login details will not be sent.

