To Add a New Booking:
-
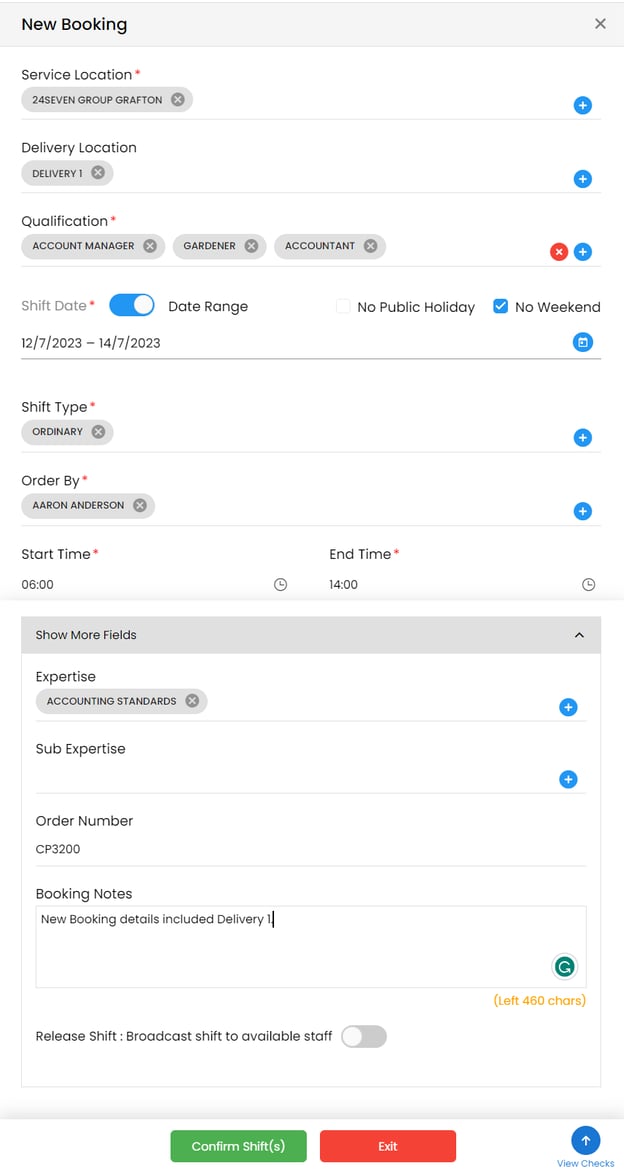
Click New Booking and the New Booking pop-up window will open

-
Provide all details into the required fields.
-
Click Confirm Shift(s) to save the newly added Booking
|
Field Name |
Description |
|
Service Location |
Select the selected Service Location. To select the Service Location(s):
If logged in as a Professional:
NOTE: If logged in as Admin - No Service Location will be selected.
|
|
Delivery Location |
Once a Service Location is selected, all associated Delivery Locations will show up. To select the desired Delivery Location:
|
|
Qualification |
As a default, all available active Qualifications will appear as per the Generic Client Portal Settings in your Booking Masters. Select the required Qualification. You can add multiple Qualifications.
|
|
Shift Date |
To select the date for the new Shift Booking, you can select customised date(s) or from the Date Range for multiple Bookings. Shift Bookings can only be created for current and future dates. To select the Shift Date(s) for a New Booking:
To select the Date Range for a multi-booking:
|
|
Shift Type |
Shows the list of available Shift Types. To select the required Shift Type:
PRO TIP: to save time in creating repeat shift types, use the “Client Default Shift” in the Members Shifts Masters. This will prefill your shift type with the Start Time and End Time of the shift in the New Booking.
 NOTE: Shift Types available in the pop-up window are fetched from the Allocations Master → Members Shifts of the Staff Portal application. Recall: How the shift names are fetched from the Member Shifts master? In the Members Shifts Master of the Staff Portal (refer to the figure shown below):
|
|
Order By |
Shows the name of the person who has ordered the Shift for the selected Service Location. It displays the account name or the name manually provided by the logged in user.
You can also select the name from the Order By pop-up window. To select the name:
|
|
Start Time - End Time |
The Start Time and End Time are auto-selected based on the Shift Type selected.
Users can also edit the Start Time / End Time. To edit:
|
|
Search Preferred Personnel |
To select your Preferred Personnel for a new booking:
The Search Preferred Personnel field appears only if “Allow “Search & Appoint" available members: Show previously worked members available for a shift appointment” flag is set to YES in the Global/Client Booking Masters Settings. The following criteria will need to match:
WARNING: Members with the following expired documents will not appear in the Preferred Personnel list:
NOTE: in case of multiple shift bookings, the Preferred Personnel option is not available.
The Search Preferred Personnel appears only if “Preferred Personnel: Set the Preferred Personnel count to show in new and edit booking” is setup in the Global/Client Level Master settings. By default, the value provided on that setting is “0” meaning zero preferences will be available and you’ll see all member names in new and edit booking screens. To set up the option for preferred personnel, you must enter a value between 1-5 in line with how many preference options you wish to be shown.
|
|
Show More Fields: To fill in more field details for a New Booking, click the expand icon. |
|
|
Expertise |
Select the Expertise based on the Qualification selected. To select the Expertise for the New Booking:
|
|
Sub Expertise |
Select the Sub Expertise based on the Expertise selected. |
|
Order Number |
Provide the Order Number of the new shift booking. The Order Number can be set as a mandatory or optional field based on the “Order no: Set Order number as mandatory in new and edit booking” flag being set to YES/NO in the Booking Masters Settings. |
|
Booking Notes |
Provide the Booking Notes for the new shift booking. The Booking Notes can be set as a mandatory or optional field based on the “Booking Notes: Set Booking notes as mandatory in New and Edit Booking” flag being set to YES/NO in the Booking Masters Settings. |
|
Release Shift: Broadcasting Shift(s) to Available Members |
To release the shift and broadcast it to available members, select the Release Shift toggle. Internal agency staff will be notified and the Shift Log will be created in the Staff Portal. The Release Shift toggle appears if “Release Shift: Allow the client the ability to release a shift” flag is set to YES in the Booking Masters Settings. |
|
Confirm Shift(s) |
When all the required details are provided in the New Booking, click Confirm Shift(s) and the message ‘Shift(s) created successfully’ appears. On clicking Confirm Shift(s) button, a shift is created as “Entered”. If the shift is created with preferred members selected, the status of the shift created will be “Client Confirmed”. A notification will be sent to the allocated member(s) along with the internal agency staff and client. A Shift Log will be created against the shift in the Staff Portal. Note that a notification is sent to members/ agency staff/ client based on the settings provided in the Global Master Level Settings or Client Level settings. The Client Level settings with the flags set to ‘YES’ will override the defined settings in the Global Master Level settings. The notifications are sent based on the templates set in the Notifications tab of the Global Master Level Settings. |