
xSign is designed to manage digital document workflows - allowing you to generate, submit/receive, and eSign digital documents. This saves you time with flexible workflow capabilities allowing you to automate and standardise critical processes - including setting the order of steps and recipients of documents. This includes tracking and reminding the status of the document until completed - emailing a link to the recipients, letting them sign online, and then storing them securely for easy retrieval ![]()
![]()
The key features of xSign are:
-
Generating templates and defining workflows – fields can be pre-populated and input by the signee
-
Tracking documents easily and securely – these generated legal documents can be quickly and securely accessed from any device
-
Transparency in managing document process – there is complete, constant visibility over the status of each document at every stage give you excellent oversight of the entire process
Table of Contents:
How to: add authorised xSign users:
Before you can access xSign, you need to ensure that you have access configured in the Jobs board master:
On this page, a list of all previously configured users will appear along with the option to add new users:
The required fields are:
- Internal Staff: an existing user from the Entire Users masters will need to be selected - this determines who the xSign profile belongs to
- Job Board User Name: this determines how that user will appear within xSign (generally, this is just set to match the internal staff)
- Job Board User Id: this is an associated email address and generally should match what has already been configured in the system for this user
- Job Board User Password: this sets a password that will generally not need to be used, given that xSign can be directly accessed from within Entire without the need to log on separately
- Status: by default this should be set to ACTIVE - if so, the user will be able to access xSign under the created profile. If set to INACTIVE, then the user will not be able to access xSign
If your login isn't associated with an ACTIVE xSign User profile you will get one of the following error messages:
-
If no profile is configured at all, you will get this message:

- Otherwise, if you have a profile - but it is inactive, you will get this message:
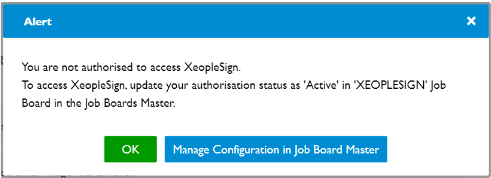
In either case, please contact your admin staff or configure your access directly (depending on user authorisation/permission levels).
How to: add and edit document types
All xSign documents need to have an associated document type - which lets you categorise documents according to their purpose.
To create a new document type:
- First, access the Document Type master on the left-hand side of the screen, within this screen you can also browse the existing document types to check a new document type does need to be added or not.

- If a new document type does need to be added, select Add New Type and you will be prompted to fill in the below details:

The relevant details are: - User Type: this includes Members and Professionals and determines which type of profiles within Entire the document can be sent to
- Document Type Name: this is a free-text field
- Status: by default, this is set to ACTIVE and document types should only be set to INACTIVE if they are no longer to be used
Once you hit Save, this will add to the existing document types - recording the creator and date.
How to Edit Existing Document Types
All existing document types are visible within the master - and can be edited freely at any time by clicking the edit icon. Note that changing the user type will cause issues in terms of member or professional specific fields - so this is not recommended.
How to: create and edit document templates
From the Document Templates master screen, you can view and edit existing templates. Additionally, you can add a new template by clicking on the "Add Template" button on the top right-hand side:
 Having selected this option, you will then need to complete the following areas:
Mandatory Details
These include general, required fields that dictate some of the document's structure and who will be notified once it is sent out and actions are taken.

Specifically, these fields are:
Field |
Details |
|---|---|
| Document Type |
Select one of the defined Document Types (if you created a new document type at step one, this will appear as an option here) |
|
Document Name |
Free-text entry |
|
Approval Required |
Select either "Yes" or "No" - if this is set to Yes, then an internal staff member will need to approve that the xSign document has been correctly completed, otherwise the document will be accepted by default |
|
Notify Users |
Add email addresses for all of the staff members who need to be notified when the xSign document changes status - add these one at a time, separated by a comma |
|
Browse Logo |
This adds a selected image as the logo that will appear on this document. Please note that only .png, .jpg, and .jpeg formats are allowed with a maximum size of 2 MB. |
|
Authorized Name |
Name of the authorized person (this will appear as the signee on your business' side) |
|
Authorized Role |
Role of the authorized person (this will appear as the signee on your business' side) |
|
Status |
Status of the document. Status of the document can be set to Active or Inactive. |
|
Browse Authorized Signature |
To add the authorized signatory in the document (this will appear as the signee on your business' side). Please note that only .png, .jpg, and .jpeg formats are allowed with a maximum size of 2 MB |
Template Details
In this section, you are able to define the document structure itself - including dynamically generated fields (which pull across from the users profile and differ depending on whether the document type is for members or professionals).
There are a number of different tools available to format the document per your specifications and requirements (as well as to make it visually effective and appealing). These include the ability to:
-
Key-in the content or you can copy-&-paste existing content in the new template details area.
-
Use the Formatting menu to make the document effective and appealing.
-
Use the Placeholder List. You can drag-&-drop the Placeholders from the available Placeholder List wherever required in the template details area. The details of the placeholder list are explained below.

Include Declaration:
This section allows you to add declarations while creating the template - this is a formal statement, consent, or announcement. To include a declaration:
-
Click + Add.
-
Provide a Title of the declaration.
-
Provide a Description of the declaration.
You can delete the existing declaration by clicking the delete icon at the end of the declaration.

Email Configuration:
In this section, you can configure the email address that the document will be sent from, any email addresses to be CC'd or BCC'd as well as a subject:

Email Template:
In this section, you can configure the layout of the email according to your brand/company voice and include any relevant details for this particular document as desired. Similar formatting tools are available as in the document template section:
Email Signature:
In this section you are able to provide the signature text which will be added to the end of the email - generally, including the sender's name, contact information, and/or company logo. To add a specific image to the signature, click the Browse Email Signature. The Email Signature allows only .png, .jpg, and .jpeg formats with a maximum size of 2 MB.

Footer:
The Footer information is added at the bottom of the document page which is kept the same across all pages of the xSign document. The footer would typically include page numbers, creation dates, copyrights, or references.
The available options include:
-
Provide the required details in the text area.
-
By default, the Footer Margin is set to ‘20’. You can increase/decrease the footer margin.
-
Select any one of the footer options for your document:
-
Include page footer on the first page
-
Include page footer on each page
-
Do not include page footer
-
Page Number:
This is the final setting available in the Document Template section and if selected, will add a page number to each page in the xSign document. 
Save:
The final option on the page is to the save the New Template - and this will add the template to your existing roster. Additionally, you are able to preview at this stage to confirming that once all sections have been configured, the final document is well formatted. 
Editing Existing Templates:
When looking at the Document Templates screen, you have the option to either edit a template via the pencil icon or copy a template via the paste icon: When editing a template, the same options are available as above - so refer to the relevant sections.
Note: if you have to create multiple, similar templates it's easiest to duplicate an original template and make slight changes as needed.
How to: send out xSign documents
Members:
A few options exist to send xSign documents out to members:
- Direct Dashboard: To access the xSign Dashboard, click the xSign logo in the dropdown member under your User name at the top of the Entire screen. The dashboard view shows you all documents at every stage of their workflow.

- Personnel Card & Member Profile: If you want to share a particular document with a single member - you have a few different options from the personnel screen:
- Within the Personnel Card, xSign is available as a quick link (Note: this will only appear AFTER an interview has been scheduled):

- From the Documents tab, there is additionally another xSign quick link:

- Finally, there is also a quick link under the Appointments tab:
 In all three of these case, note that this allows you to send any number of xSign documents to a specific member/applicant. This would be most useful as you are onboarding a new applicant and need to get a number of documents signed and returned quickly.
- Within the Personnel Card, xSign is available as a quick link (Note: this will only appear AFTER an interview has been scheduled):
- Contact Member Tab
This tab is useful to bulk send out xSign documents - as always, it is accessible under: Profiles → Members → Contact Member:
 Then, select members to bulk share the document and then select the xSign icon:
Professionals:
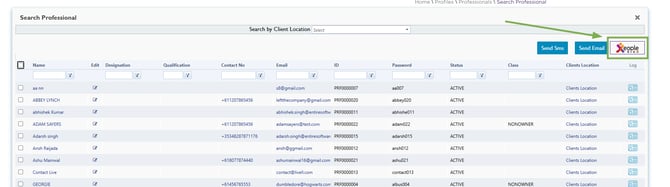
To share the documents with the Professionals for e-signing, select the required Professionals from the Search Professional page and click the xSign icon as shown in the figure below.
NOTE: professionals must have a valid, entered email address before selecting them via this option
The Send Document For E-Sign pop-up window then opens:

- The details shown include the Professional ID, Name of the Professional, Email Id of the Professional, Last Activity On (date and time of last activity), Document Status (current status of the document), Linked to Client(s) (shows names of the Client with whom the Professional is linked), and View Document link (only appears if the document has previously been sent and the status is one of 'Completed', 'Decline', 'Rejected', or 'Withdrawn') - this will generate a pdf of the previously received document
- Select the Document Type and Document Name of the professional from the drop-down box. The Send Document For E-Sign pop-up windows gets refreshed with the selected Document Type and Document Name
-
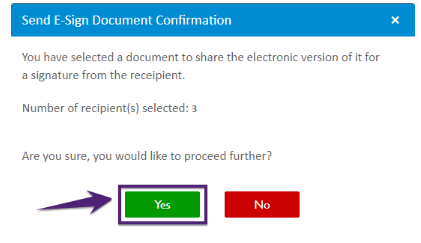
Select the professional by clicking the required checkbox(es) or to select all the professionals click the heading checkbox and click the Share Document. The Send E-Sign Document Confirmation pop-up window appears showing the number of recipients for the E-Sign document
NOTE: from this screen, each professional will only be sent the links for documents which are not registered as 'Completed' against their profile
NOTE: without selecting a Document Type, Document Name, and a Professional ID to share an alert message will be displayed
-
If you are happy with the selection, press Yes and after some time, the documents will all be sent. After allowing some time, the 'Documents Shared Successfully' message will appear
Tracking Documents via xSign:
For xSign Documents that are mapped to Member Documents, these will appear on the Member Profile once completed/approved. Alternately, these can be viewed via searching for a given user name on the xSign Dashboard:
Note that for professionals, this is the only way to track all xSign Documents sent to them.
Contact Log
When the xSign documents are sent to a Professional from the Staff Portal or xSign application, logs are created in the Contact Log against the client. If the professional is linked with multiple clients, logs will be created for each client. These are also generated when xSign documents are sent to members.
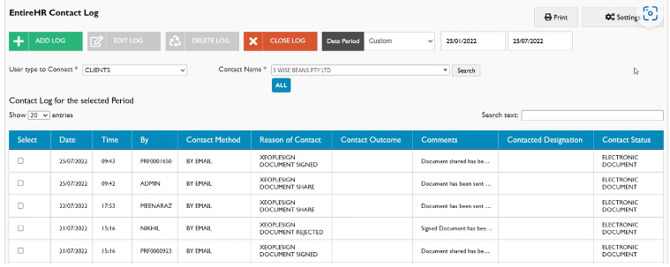
From the staff portal, the details of that particular document are accessible via the comments section of the contact log. For example, the below is sample comment for a completed xSign document:
|
Document Shared has been Signed and below are the details: Name: AAROB BARRY |
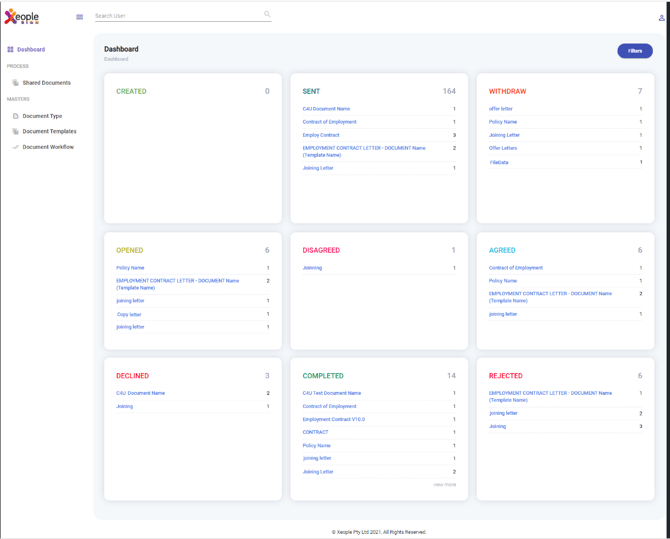
xSign Dashboard
The Dashboard provides a complete overview and control of all the documents. The dashboard displays the number of instances for each document name that are currently at the various stages:
![]() Created → When a document is added into a member/professional's account
Created → When a document is added into a member/professional's account
![]() Sent → When staff send the document out for signing
Sent → When staff send the document out for signing
![]() Withdraw → Internal staff have the option to withdraw the document
Withdraw → Internal staff have the option to withdraw the document
![]() Opened → When the recipient clicks the link shared over the email and opens the document
Opened → When the recipient clicks the link shared over the email and opens the document
![]() Disagreed → When the recipient disagrees with the terms and conditions shared document
Disagreed → When the recipient disagrees with the terms and conditions shared document
![]() Agreed → When the recipient agrees to the terms and conditions shared document
Agreed → When the recipient agrees to the terms and conditions shared document
![]() Declined → When the recipient has not given consent to sign the document (selected ‘Decline’)
Declined → When the recipient has not given consent to sign the document (selected ‘Decline’)
![]() Completed – When the recipient completes the signing of the document (selected ‘Complete’)
Completed – When the recipient completes the signing of the document (selected ‘Complete’)
![]() Rejected → Internal staff have rejected the document
Rejected → Internal staff have rejected the document
These statuses are related and flow from one to the other per the below diagram: In the dashboard, the documents placed at the various stages are linked to the Shared Documents page, which keeps a track of all documents sent out to members and professionals
Search User
As discussed above, there is option of searching the dashboard for a specific user (member or professional) to bring up the documents that have been sent to them.
Note that three or more characters must be entered to begin the search - additionally, members and professionals can be differentiated by their user code (for members, starting with MBR, and for professionals with PRF).
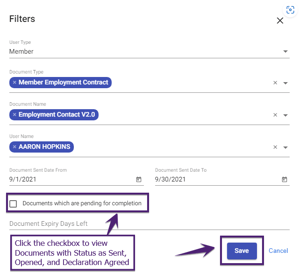
Filters
The Filters are used to retrieve specific documents from the Dashboard page and facilitate in narrowing down the search of the particular documents for the users.
Filters can also be used to narrow down the documents on screen to particular documents. The filters can be based on: User Type, Document Type, Document Name, User Name, and the date range of Documents Sent. These are saved in between logging in and out Xeople (similar to how the allocations page saves your global filters).
To set the Filters in the Dashboard:
-
Click Filters on the top right-hand side and the filters window opens
-
Select your filters and then press save
-
The dashboard will then refresh, having applied these filers
-
The new search criteria are saved for the user and the number appearing on the filters icon reflects the number of different criteria in place
-
To reset the filters, click Clear
For a more detailed description of each field see the below:
|
Field Name |
Description |
|---|---|
|
User Type |
For the type of user the document has been created for: including either members or professionals |
|
Document Type |
These have been defined previously and are related to the above user type |
|
Document Name |
Name of the Document(s) |
|
User Name |
Filters down to the specific user name (or part of the user name) |
|
Document Sent Date From & Document Sent Date To |
Filters down to a range of dates that the documents were shared between |
|
Documents which are pending for completion |
Shows the documents whose status is one of Sent, Opened, and Declaration Agreed |
|
Document Expiry Days Left |
Shows the documents whose link will expire in specified days. Note that the Days Left range should be between 0 -7 days. |
Then, by clicking on the document name link on the dashboard, this will open up the Shared Documents page - on this screen, the same filters previously applied will remain in place. Note that from this screen, these filters are read-only and cannot be edited (i.e., from the Shared Documents page, the other filters are treated as "masters" settings more or less).
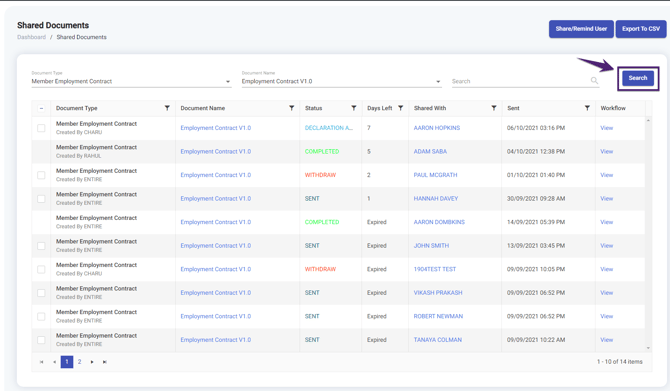
Shared Documents Page: See Status of a Single Document Sent to Multiple Users:
This screen allows you to track the status of each instance of a document that has been shared with multiple users (of the same type). This is accessible either directly from the dashboard - described above, or from the Shared Documents option on the left-hand side of the screen.
On this screen multiple fields are visible, which are:
|
Field Name |
Description |
|---|---|
|
Document Type |
Category of the document. |
|
Document Name |
Name of the Document with the link. By clicking the link you can preview the document. |
|
Status |
Shows the current Status of the document. The Status can be Created, Sent, Opened, Declaration Agreed, Completed, Rejected, Withdraw, Disagreed, and Declined. |
|
Days Left |
Number of days left for the expiry of the document link. In case the document link is expired, the Days Left will show ‘Expired’ and if the document link is expiring today, it will show ‘Expiring Today’. Note that the document link received by the member expires after 7 days of receiving the mail. |
|
Shared With |
Name of the recipient of the document (each line item will correspond to a different recipient) - clicking on this name will open the user documents page and show all shared xSign documents |
|
Sent |
Date and time when the document was shared with the recipient |
|
Workflow |
Link to view the Document Workflow of the recipient |

Share/Remind User:
From this screen, you can share select the checkbox on the left-hand side of each line item and then click Share/Remind User. A confirmation pop-up will appear - clicking Yes will then send an e-mail to the selected user. One the document is sent to the user, it will appear at the top of the page with the updated sent date and time. You can share with multiple users via this method. Similar clicking the top box will select all recipients on the screen, which you can use to resend the link to all of these users. Note that this won't be possible for recipients with a 'Completed' document.
Export To CSV
The Export To CSV creates and downloads a CSV file for all the available Shared Documents. To create a CSV file, click Export To CSV and all the records will be exported into the CSV file.
The downloaded CSV file shows the Document Id, Document Type, Document Name, User Name, Signing Status, Last Activity, Days Left, User Email, Sender Name, Created On, Send Date, and Reason details of the Shared Documents.
Search Documents
You can search specific documents using the search option in the Shared Documents. The documents can be searched based on Document Type, Document Name, or any data provided in the search. Once the search details are provided, click Search ![]() .
.
The Search helps to quickly find the desired documents from the list of Shared Documents.
How to: map to a document
Mapping lets you turn a completed xSign document into a Member document automatically: xSign → Member Document Tab (or training Details and Health Details).
To access this page:
- Click on the xSign icon (from the drop-down under your name)
- Select Settings - opening the correct page
 Each document can then be uniquely mapped from xSign to Member documents (so ONE member document per mapping rule).
Adding and removing mappings:
Once you have opened the settings page, the only option currently available is the mapping screen.
To successfully create a new mapping:
- In the xSign Document:
- Select the User Type as member
- Select the Document Type (options include all xSign document types with Users set to Member)
- Select the Document(s) from the auto-populated list of all associated xSign documents with the selected types. To select multiple, hit CTRL + click the relevant choices (Note: since you can have one mapping per member document, include all relevant xSign documents at this stage)
- In the Entire OnHire Document:
- Select the Document Type. (options include all member document types)
- Select the relevant Document (options include all member documents following under the relevant type and that DO NOT currently have a mapping in place)
- Once selected, press save and the mapping will have been created. To make changes at this stage, hit Reset
Once the mapping has been created, you are then able to view the mapping within the xSign settings per the below:

Please note that you are not able to edit the mapping once it has been created - you will need to delete the existing mapping and create a new on in the event that you need to replace the currently outstanding mapping. Any deleted mappings will then appear in the archive - including information on who and when the mapping was deleted.
NOTE: the document mapping will not be completed unless the document is mapped to the specific member qualification in the Member Qualifications master. Ensure that this is correctly configured for the relevant qualifications BEFORE sending out the document
How does the system handle mapped documents?
When the member completes the signing of the document (i.e. the xSign document status is set as Completed), the mapped documents are reflected in the member’s Document page:
 There are several further complexities depending on how the document is configured:
- If the document is flagged as a 'Health' document: in this case, the signed xSign document will appear in both the member's document tab and in their Health tab
- If the document is flagged as a 'Training' document: in this case, the signed xSign document will appear in both the member's document tab and in their Training tab
- If the 'Allow to Override Documents' flag is set to 'Yes' for any of the Documents: in this case, the documents will override any of the existing documents stored on the member profile and no approval process is required