This Client Mobile App guide has been created as an introductory guide to navigating and using the Client App. The images provided in this guide may appear slightly different depending on the make, model, and size of the device.
App Navigation – Main Screen
-
Additional Menu Options
-
Personal Details
-
Contact Details
-
Client Notes
-
Settings
-
Change Password
-
And more!
-
-
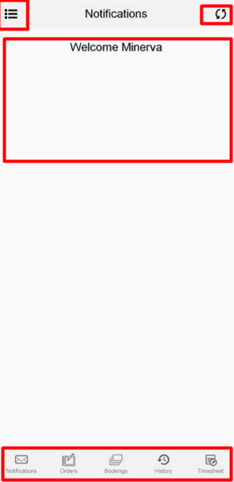
Notifications
-
Flashing Global notifications will appear here if applicable
-
-
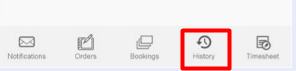
Main Access Menu
-
Notifications
-
Orders (Enter a new booking)
-
Bookings (Review current bookings)
-
History (Review past bookings)
-
Timesheet (Authorize Timesheets)
-
-
Refresh App Screen
-
Select this to refresh screen
-
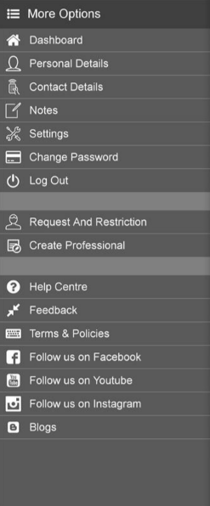
More options menu
Selecting the menu icon in the top left corner of the app will display open the More Options Menu.
-
Personal Details - Access to view and update personal details such as first name, surname, preferred name, designation (Position) and qualification (if applicable).
-
Contact Details - Access to view and update contact details such as Email, Phone number and contact preference.
-
Notes -Selecting this will allow you to view and update notes for all authorized locations. Notes available to view and update include:
-
Important Personnel Notes
-
Transport | Parking
-
Entry | Security | Timesheets notes.
-
-
App Settings - Selecting this will take you to General App settings.
-
Change Password - Click here to change your password.
-
Logout - It is recommended to stay logged in on your app. However, if you wish to log out click here.
-
Request and Restriction - Select here to view, add or edit location Requests and Restrictions.
-
Create Professional - Click here to create a new professional to authorize access to order staffing requests, view current bookings and booking history via the App and portal.
-
Help Centre - Access to Contact information of who to contact if you require assistance
-
Feedback - Click here if you wish to submit a complaint, compliment or Suggestion
-
Terms & Policies Click here to view Terms and Conditions
-
Social Media - Links Link to Facebook page Link to Youtube Link to Instagram
-
Blog Link - Link to access company Blog/Information
How to enter in a new booking
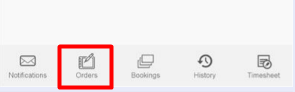
Step 1. Select Orders from the Main Access Menu

Step 2. Select the required Service Location from the displayed list
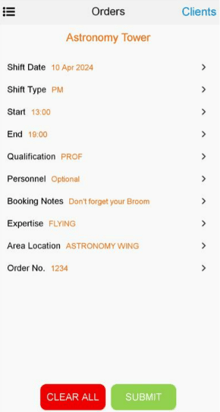
Step 3. Enter in mandatory order details Please begin from the top of the screen and apply all mandatory details.

Shift Date - The Shift Date is the Calendar date you request a staffing request. On selection of Shift Date, a calendar will appear. To apply a shift date, select from the calendar. To apply multiple dates for the same Qualification and Shift time please select more than one date from the calendar view.
Shift Type - The Shift type assists the system and users to search for available staff. On selection of the shift type the App will show all available Shift Type codes. If you are unsure on the shift types please contact your Help Centre personnel.
Start - The Start field is used to define the shift start time. Selecting this will provide a pop-up screen to select a start time in 15-minute increments. Please note the Start and End time are in 24hour format.
End - The End field is used to define the shift end time. Selecting this will provide a pop-up screen to select a start time in 15-minute increments. Please note the Start and End time are in 24hour format.
Qualification - The Qualification is used to identify the Skill Set/Role of the personnel you are requesting. On selection of Qualification a list of all available Qualifications will appear.
Step 4. Enter in any details in applicable optional fields
Update any of the optional fields.

The Personnel field provides the ability to nominate a single person from the list shown. On the selection of this field the screen will provide a list of Preferred Personnel.
Preferred personnel are available staff, that have attended your location in the past.
Booking Notes
Booking notes can be used to provide addition shift-specific information relating to the booking request.
Expertise
The Expertise field provides the ability to nominate additional skillsets/requirements relating to the qualification applied. On the selection of this field a list of available expertise for the qualification applied will appear.
Area Location
The Area location is a field that can be used to nominate an area or sub location connected to the service location. On the selection of Area location a list of available areas connected to the service location will appear.
Order No.
The Order No. field is used to apply a purchase order numbers for reference codes associated to the booking order. One the selection of this field it will allow users to enter in an order number.
Step 5. Click on Submit
Once all Mandatory and Optional Data are entered
How to view current bookings
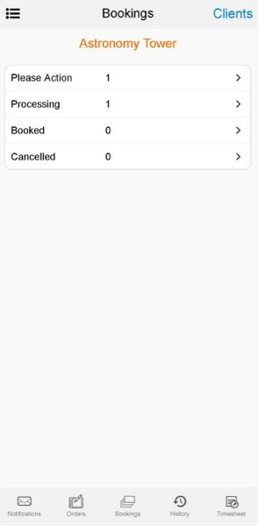
Step 1. Select Bookings from the Main Access Menu.

Step 2. Select the required Service Location from the displayed list.

The sections categorize shifts on their current statuses and highlight the total number of requests.
|
Please Action Shifts that require actioned will appear here. These include shifts that are: · Accepted by personnel and require client approval · Personnel nominated awaiting acceptance and client approval |
|
Processing Bookings that are entered and are currently “In progress”. |
|
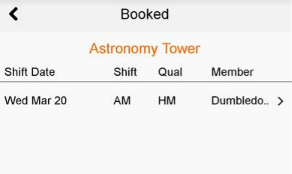
Booked Current and future shifts that are confirmed and no further action is needed unless a cancelation is required. If you wish to cancel a booked shift please contact agency. |
|
Cancelled This area will show any current/future shifts that have been cancelled and are no longer required. |
Once a section is selected a list of applicable shifts will appear. Select the shift to view specific shift details.
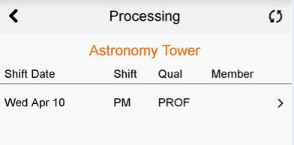
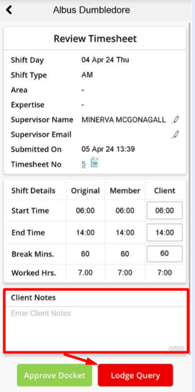
Below is an example of shift details shown in the expanded view
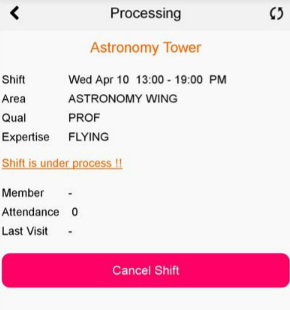
Step 5. Cancelling a shift in the processing section.
If a shift is in the processing section, you can cancel it by selecting the Cancel shift button.
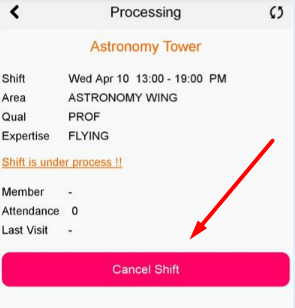
Please note if a shift has progressed past the processing section please contact the agency to cancel the booking.
How to view past bookings (History)
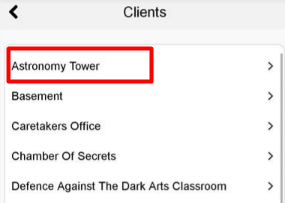
Step 1. Select History from the Main Access Menu.
Step 2. Select the required Service Location from the displayed list.
Step 3. Select the applicable section to view bookings.
Similar to current bookings each section categorised the final status of previous bookings and highlight the total number of requests for each.
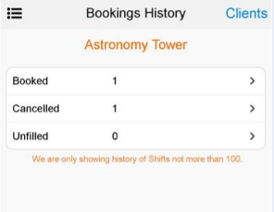
Booked
This section will show all shifts that were ordered and completed by personnel.
Cancelled
This section will show any past ordered shifts that were cancelled or withdrawn by client.
Unfilled
This section will show any past ordered shifts that were unfilled by the agency due to not being able to provide qualified staff to meet the requirements of the order.
Step 4. Viewing past shift details.
Once a section has selected a list of applicable shifts will appear. Select the shift to view specific shift details.
How to view and approval timesheets
Step 1. Select Timesheet from the Main Access Menu.

Step 2. Select the required Service Location from the displayed list.
Step 3. Select a timesheet to approve.
On the selection of a service location the screen will display any outstanding timesheets awaiting client approval.
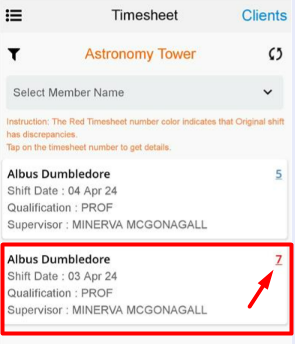
To view a timesheet submission and approve select the timesheet details.
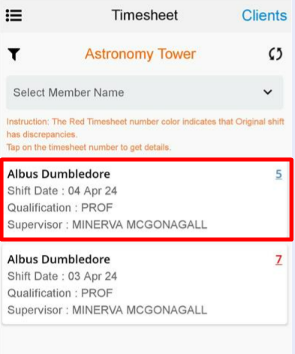
If a timesheet number is appearing in Red font it indicates a discrepancy from the original booking to what was submitted by the staff.
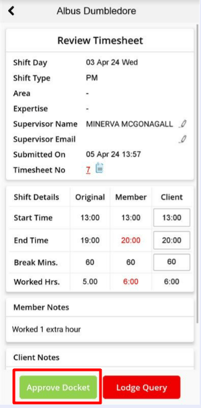
Step 4. Review Submission
Any fields appearing in Red font it indicates a discrepancy from the original booking to what was submitted by the staff.

Step 6. a. Approve submitted details for payment
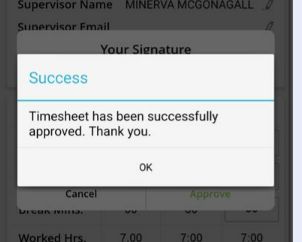
Select Approve docket if the details submitted by the Member are correct.
If you select Approve Docket the following message will appear.
Step 6. b. Lodge Query for timesheet submission
Select Lodge query if you wish to dispute the submission. If you select Lodge Query the following screen will appear.

Notes entered via this screen will be sent directly to the staff who submitted the timesheet to allow them to adjust their submission or dispute the discrepancy.
If the staff disputes the clients notes the query will be locked for the agency to review and process.