
The Allocation Section helps you manage shifts by grouping all shift statuses into four easy‑to‑understand stages (sections): Process, Hold, Finalise, and Completed. These sections are part of the default setup and are available from the time the feature is implemented. Think of them as buckets that show exactly where each shift stands. You can add new section or update existing ones whenever needed.
For example, in the Process stage, you choose which shift statuses should appear under it.
|
Shift Name |
Description |
|
Process |
Shifts that have been entered but not yet allocated to a member. Examples: shifts still being released for members to accept, or offers not yet responded to. |
|
Hold |
Shifts reserved for specific members or groups but not fully confirmed. Examples: shifts offered to a member who hasn’t responded, or shifts visible to multiple members on a first come, first served basis. |
|
Finalise |
Shifts with one remaining action pending, such as waiting for final confirmation from either the member or the client. |
|
Completed |
Shifts that are fully confirmed and closed — all parties have accepted, or the booking has been cancelled/acknowledged. No further action required. |
You can only appoint members while a shift is in the Process section (or stage), as this is the point where new allocations are actively managed. Once a shift moves to Hold, Finalise, or Completed, it indicates that the member has already been appointed, the booking is being confirmed, or the shift is closed—so no new appointments can occur at these stages.
The allocation section categories are managed through Master Data. To access them, follow the steps below:
- Click on Masters.
- Select Allocation Masters and click on the Allocation Sections.

Masters – Allocation Master - Allocation Section
- View the details of existing Allocation Sections.
- Click Add New Shift Section to create a new shift section category.
- Enter the Section Type as Shift (used for all shift-related categories).
- Enter the Sequence Type to define the order in which this section will appear on the Allocation screen.
- Enter a Section Name to label the shift section. Example: Pending Approval, Ready to Assign, Confirmed, Cancelled.
- Select a Colour Name from the dropdown to set the text colour for this section. Example: Blue for informational stages, Green for completed stages, Orange for action-required stages.
- The section status is set to Active by default.
- Click on the Green tick to save and Red cross to cancel the added details.
Setting a shift section to Inactive removes it from new allocations and hides it from future dropdowns. Any existing or mapped shifts using this section may become inaccessible or hidden in the system.
- Click on the Pencil/Edit button to edit the shift section details.
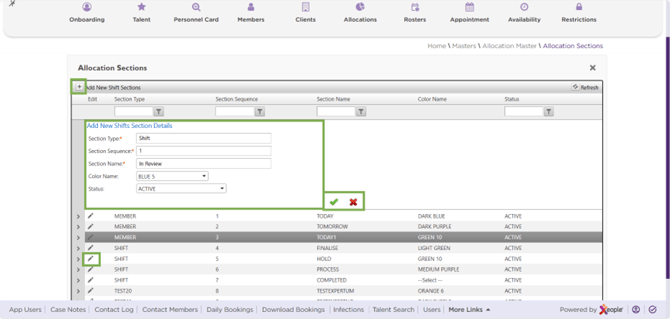
Master Data – Allocation – Add New Shift Stage (Section)
Add New Shift Colour Status for Shift Stage (Section)(s)
Each Shift Section can have its own set of Shift Statuses, allowing you to visually differentiate and manage shifts more effectively. These statuses are displayed with associated colours for quick identification.
To configure a shift status and colour under a shift section, follow the below steps:
- Select a Shift section and click the (>) arrow in front of it.
- The list of existing statuses with colour (if any) will appear. Click (+) Add New Colour Status to add a new one.
- Select a shift Status, Colour Name (Priority colour), and Priority from the dropdowns.
- Click the green tick to save or (X) to discard the update.
- Shifts with their respective statuses appear under the assigned section. For example, if the section is In Review, it will display shifts with statuses such as Member Compensate, Shift Booked, or Shift Cancelled.
- Click on the Pencil/Edit button to edit the shift status.
- Click on the (X) to delete the status.
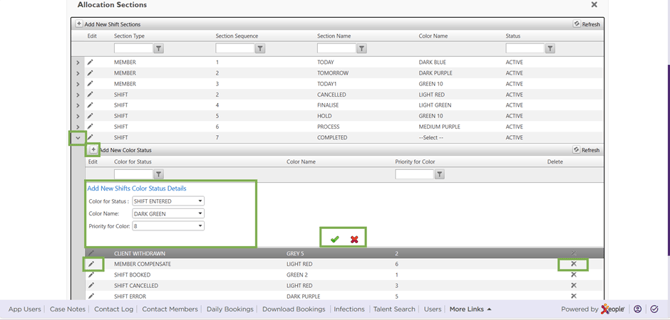
Allocation Section – Add New Colour Status
- Once you create a new Shift Section and assign statuses to it in the Allocation Master, it automatically appears in the Client Allocations.
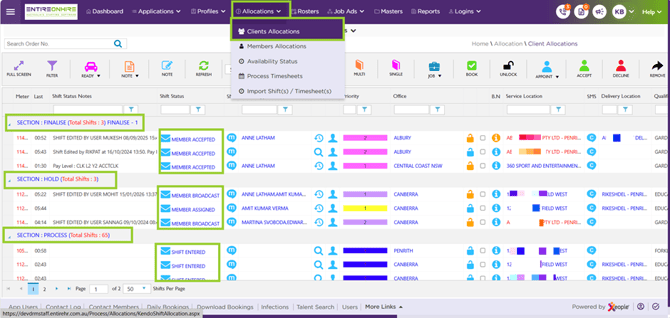
Allocation – Client Allocation – Section – Status
The roster uses EOH – Client Allocation as its data source, so all shifts appear in the calendar view on the roster screen. Each section is displayed as part of the Stage Breakdown.
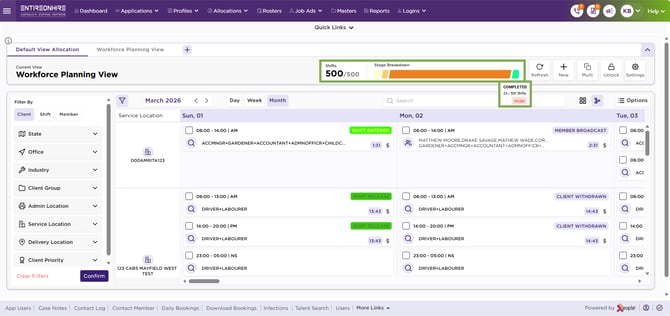
Rosters – Allocation Section – Stage Breakdown