We are delighted to roll out the Version Release Notes for the newest upgrade of Entire OnHire, Version X9.2.
|
|
In these release notes, you'll find the summary of any new features and resolved issues in the latest version of the Entire OnHire application. This document allows us to keep you updated with all the latest information about our products and services. Explore the comprehensive X9.2 Beta Version Release Notes with each new feature, and enhancement explained clearly and concisely with screenshots to showcase the descriptions in action |
|
|
|
|
|
|
|
December 2023 |
|
|
|
|---|---|
New Features
New Client Portal
The new Client Portal application is designed to manage Bookings, Staff Preferences, Timesheets, Appraisals, and Finance for the clients based on the defined Global Level Master Settings and Client Level Master Settings. This version covers Bookings, Staff Preferences, Generic Master Level Settings, and Client Level Master Settings.
The Bookings show all the available shift bookings in a Calendar view organized date-wise. You can add New Bookings, Edit Bookings, and navigate to view previous/future bookings. You can filter bookings based on the available Shift Categories in different colors.
The Staff Preferences shows the preferred, restricted, and no preferences/restrictions members' details of future shifts for the selected location. The client can request to prefer the member and/or restrict the member from accepting the future shift for the specific location.
The Bookings and Staff Preferences features are available and accessible through the web and mobile client portal view.
In Generic Master Level Settings, you can manage your global web app generic settings to pre-define the general configurations as per your preference. In Client Level Master Settings, you can Configure Client Interface to apply the client-level settings. It is important to note that the system will override the defined settings in the Generic Master Level Settings when you apply Client Level Master Settings ![]()
![]() .
.
Global Master Level Settings - New Client Portal Web App Settings
In the Configure New Client Web App Settings of the Staff Portal application, you can manage your global web app generic master settings to pre-define the general configurations as per your preference. You can manage and configure generic master settings for:
To configure the new client web app master generic settings as per your requirements, read the instructions below for each global master setting.
Important: Note that the client-level settings will override the defined settings in the global master settings.
To access Configure New Client Web App Settings in the Staff Portal application:
-
Click Masters→ Client Master → Configure New Client Web App Settings
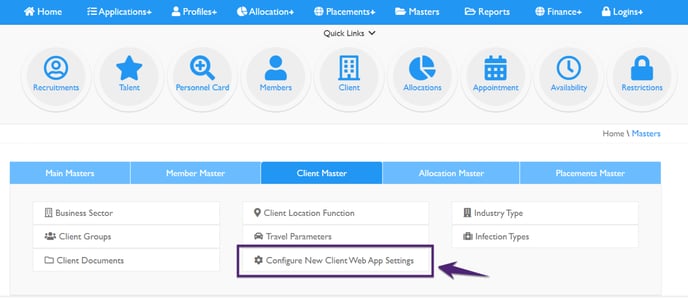
-
On clicking the Configure New Client Web App Setting, the Global Master Level Settings page opens that manages your client's web app generic settings
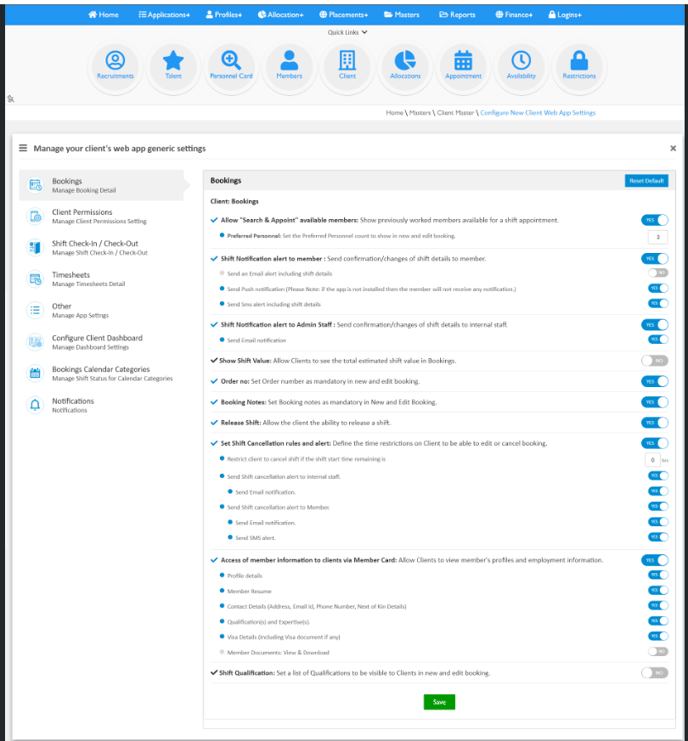
Bookings Settings
In the Bookings tab, you can manage and predefine the booking detail settings for the Client Portal. To define the settings:
-
Select the required settings by clicking the toggle to ‘YES’ or ‘NO’
-
The YES/NO toggle for the sub-settings will be enabled if the toggle for the parent setting is ON. In case all the sub-settings are set to OFF, the parent settings will automatically be set to OFF
-
You can reset the Bookings settings to default by clicking Reset Default
-
When all the settings are set, click the Save button
|
Field Name |
Description |
|
A. Allow "Search & Appoint" available members: Show previously worked members available for a shift appointment. |
'Yes’ indicates that the client is allowed to search previously worked members for shifts. Clients can directly request/appoint members using the Client Portal or Professionals App. The Client Portal shows the Search Preferred Personnel in New/Edit Booking and the Professional App will show a list of professionals (i.e. been before professionals). |
|
‘Yes’ indicates that the selected count of Preferred Personnel names are displayed in the new and edit bookings. By default value provided is ‘0' that means all the Personnel names are displayed in the new and edit bookings. Note that the Preferred Personnel count ranges between 0 to 5. |
|
B. Shift Notification alert to member: Send confirmation/changes of shift details to member. |
‘Yes’ indicates that the system allows you to send the shift confirmation details to the member for their acknowledgment. Warning: When the flag is set to 'Yes’, the child flags shown below are also activated for selection and the user can set Email Alert, Push Notification, and/or SMS Alert. Note that the predefined Email Alert/ Push Notification/ SMS Alert templates can be selected in the Notifications section of Masters. |
|
|
|
|
‘Yes’ indicates that the system will send an Email Alert to the members including shift details. The Email Alert to members is shared with the default Email Alert template having the User Type as 'Members’ as shown in the figure below. |
|
|
|
|
‘Yes’ indicates that the auto-push is ON and the system will send the push notification including shift details to members. The Push Notification to members is shared with the default template with the Module selected as 'Allocations’ as shown in the figure below. You can create the customised message template using the dynamic fields listed in the Add/ Edit SMS Messaging Template. |
|
|
|
|
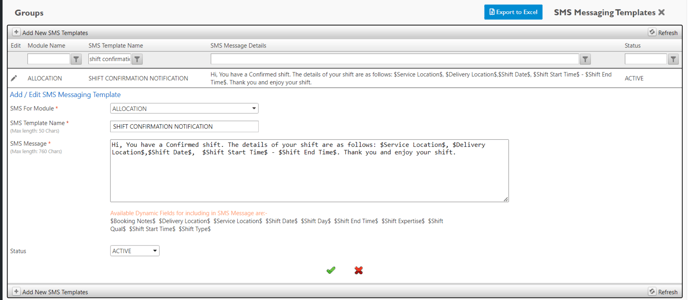
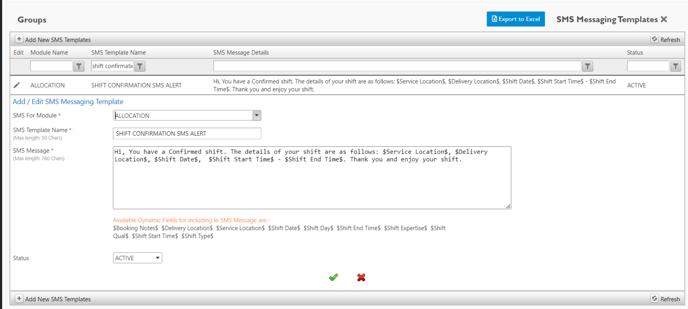
‘Yes’ indicates that the auto-SMS is ON and the system will send the SMS alert including shift details to members. The SMS alert to members is shared with the default template with the Module selected as 'Allocations’ as shown in the figure below. You can create the customised SMS Alert template using the dynamic fields listed in the Add/ Edit SMS Messaging Template. |
|
|
|
|
C. Shift Notification alert to Admin Staff: Send confirmation/changes of shift details to internal staff. |
‘Yes’ indicates that the system will allow to send the booking confirmation details to the internal staff via email. |
|
‘Yes’ indicates that the system will send an Email notification including shift details to the internal staff with the pre-defined email template for the staff defined in the Notification of the Masters. The Email notification to Admin Staff is shared with the default Email Template having the User Type as ‘Staff’ as shown in the figure below. |
|
|
|
|
D. Show Shift Value: Allow Clients to see the total estimated shift value in Bookings. |
‘Yes’ indicates that it allows the client to view the estimated shift value (shift worth) in the Booking page of the Client Portal.
|
|
E. Order no: Set Order number as mandatory in new and edit booking. |
‘Yes’ indicates that the Order Number field will be mandatory in the new and edit booking of the Bookings in the Client Portal. |
|
F. Booking Notes: Set Booking notes as mandatory in New and Edit Booking. |
‘Yes’ indicates that the Booking Notes field will be mandatory in the New and Edit Booking of the Bookings in the Client Portal. |
|
G. Release Shift: Allow the client the ability to release a shift. |
‘Yes’ indicates that the client will be allowed to release a shift. In the New Booking, Release Shift: Broadcast shift to available staff toggle appears. |
|
H. Set Shift Cancellation rules and alert: Define the time restrictions on Client to be able to edit or cancel booking. |
‘Yes’ indicates that the staff can set the Shift Cancellation rules and alert the client. Time-based and other child settings will be applicable if true. Warning: When the flag is set to 'Yes’, the child flags shown below are also activated for selection and the staff can set the time to restrict the client to cancel shift and send the shift cancellation alert to internal staff and members using email/SMS. Note that the predefined shift cancellation Email and SMS Alert templates can be selected for the staff and members in the Notifications section of Masters as shown in the figure below. |
|
|
|
|
The staff can restrict the client to cancel the shift in case the shift start time remaining is equal to the time provided in hours. Note that the maximum hours limit should not exceed more than 24 hours. |
|
‘Yes’ indicates that the system will send shift cancellation details to the internal staff. |
|
|
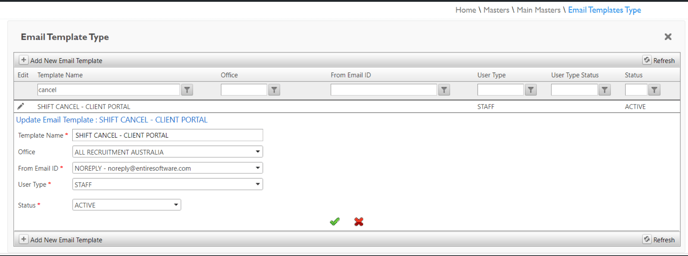
‘Yes’ indicates that an email notification will be sent to the internal staff with the shift cancellation details. To create the customised Shift Cancellation Email template for Staff, create the template having the User Type as 'Staff’ as shown in the figure below. |
|
|
|
|
‘Yes’ indicates that the system will send shift cancellation details to the member. |
|
|
‘Yes’ indicates that an email notification will be sent to the member with the shift cancellation details. To create the customised Shift Cancellation Email template for Member, create the template having the User Type as 'Member’ as shown in the figure below. |
|
|
|
|
|
‘Yes’ indicates that an SMS alert will be sent to the member with the shift cancellation details. Note that the SMS alert to members is shared with the default template set with the Module selected as 'Allocations’. |
|
I. Access of member information to clients via Member Card: Allow Clients to view member's profiles and employment information. |
‘Yes’ indicates that the client can view the member card and all the employment information available on the Client Portal.
Set ‘Yes’/ ‘No’ for each child flag settings as per your requirements.  |
|
1. Profile Details |
‘Yes’ indicates that the client will be able to view the Details tab of the member. |
|
2. Member Resume |
‘Yes’ indicates that the client will be able to view the Resume tab and can download the resume of the member from the member card. |
|
3. Contact Details (Address, Email Id, Phone Number, Next of Kin Details) |
‘Yes’ indicates that the client will be able to view the Contact Details tab of the member. |
|
4. Qualification(s) and Expertise(s) |
‘Yes’ indicates that the client will be able to view the Skills tab of the member. |
|
5. Visa Details (Including Visa document if any) |
‘Yes’ indicates that the client will be able to view the Right to Work Details and Visa Documents (if any) of the member. |
|
6. Member Documents: View & Download |
‘Yes’ indicates that the client will be able to view the Documents tab and can download the document from the member card. The Member Documents show the Category, and Document Description to the client. By default, documents are selected and you can select/ unselect and show/hide Document File. You can also set the default settings by clicking the Reset Default. |
|
|
|
|
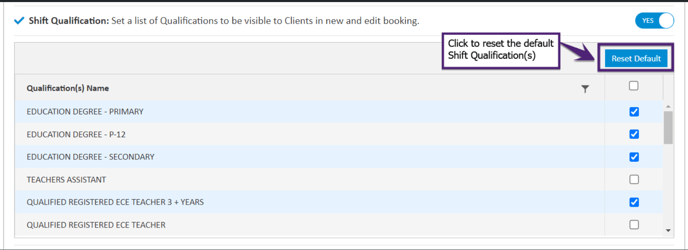
J. Shift Qualification: Set a list of Qualifications to be visible to Clients in new and edit booking. |
‘Yes’ indicates that the staff can set a list of Qualifications (all active Qualifications) that are visible to the client in the New and Edit Booking of the Bookings in the Client Portal. The Shift Qualification shows the selected Qualification(s) Name to the client. By default, Shift Qualification is selected and you can select/ unselect the qualification(s) by clicking the checkbox against the Qualification(s) Name. You can also set the default settings by clicking the Reset Default. |
|
|
|

Client Permissions Settings
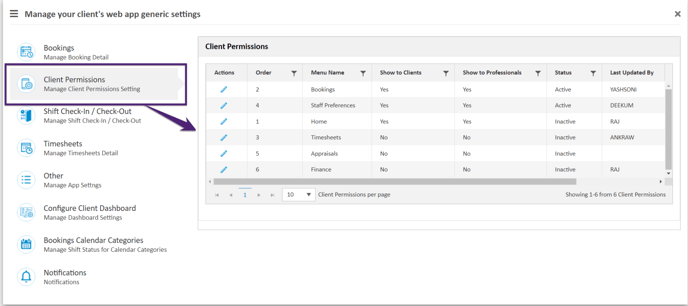
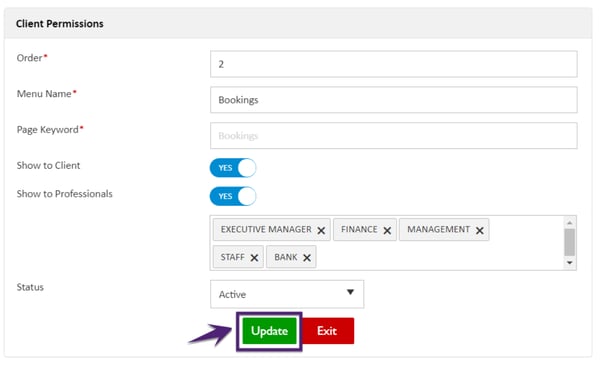
In the Client Permissions tab, the global master level settings for the Client Permissions are defined to manage client permissions for the Clients and Professionals. The Client Permissions are set for the Bookings, Staff Preferences, Home, Timesheets, Appraisals, and Finance tabs in the Client Portal application.
For each Menu Name, the Client Permissions page shows the Actions, Order, Menu Name, Show to Clients, Show to Professionals, Status, Last Updated By, and Last Updated On.
The Last Updated By shows the name of the user who last updated the setting and the Last Updated Date shows the last updated date and time of the setting.
Update Client Permissions
To update the Client Permissions for the available menu:
-
Click the Edit action icon as shown in the figure below and the Client Permissions pop-up window opens in edit mode

-
By default, all the menu options are set to True
-
Update all the required details and click Update

|
Field Name |
Description |
|
Order |
To define the order of the menu visibility in the client portal. |
|
Menu Name |
Name of the menu visible in the client portal. |
|
Page Keyword |
Show the provided page keyword and the keyword cannot be configured. |
|
Show to Client |
To provide access to the client for this menu. When the flag is set to ‘YES’ that indicates the client can access this menu. |
|
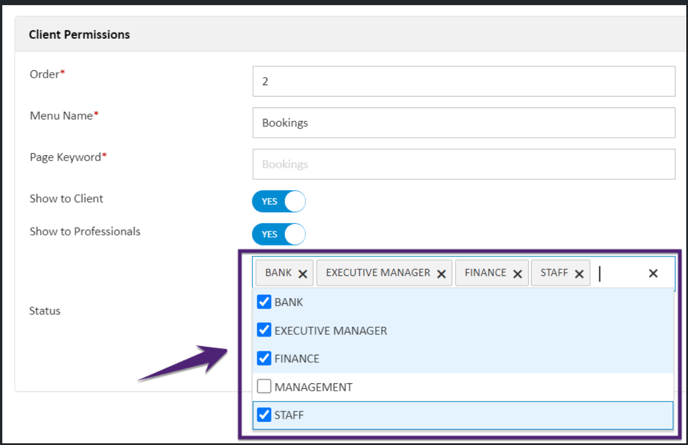
Show to Professionals |
To provide access to the selected professional for this menu. The professional list includes Bank, Executive Manager, Finance, Management, and Staff.
|
|
Status |
Set the menu as Active/Inactive. Active indicates that this menu will be visible to clients and professionals based on their set access. |
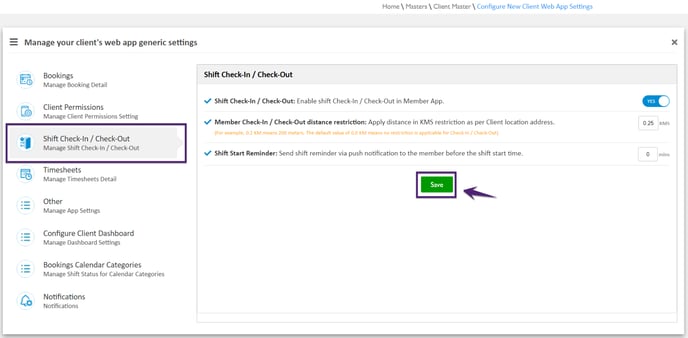
In the Shift Check-In / Check-Out tab, the global master level settings for members' shift check-in/check-out are defined to manage Shift Check-In and Check-Out for the booked shifts.
|
Field Name |
Description |
|
Shift Check-In / Check-Out: Enable shift Check-In / Check-Out in Member App. |
'YES’ flag indicates that the member will be able to use the Check-In and Check-Out functionality for the booked shifts in the Member App. Other settings i.e. Member Check-In / Check-Out distance restriction and Shift Start Reminder will be enabled if the toggle for this setting is set to ‘YES’. |
|
Member Check-In / Check-Out distance restriction: Apply distance in KMS restriction as per Client location address. |
To apply the member check-in/check-out distance restriction as per the client's location address. Warning: To activate this feature, please call the support team to set up your account with Google Maps. Set the ‘Member Check-In / Check-Out distance restriction’ parameter that is greater than 0.0 KM to restrict members to check-in/ check-out for the Shifts. For instance, if you set the distance restriction as 0.20 KMS (i.e. 200 meters), the member will be able to check-in/check-out within a 0.20 KMS radius as per the client’s location address. Note that the 0.0 KM means no distance restriction is applicable for the member check-in/ check-out. |
|
Shift Start Reminder: Send shift reminder via push notification to the member before the shift start time. |
Set the Shift Start Reminder time in minutes. Before the shift start time, a shift reminder via push notification will be sent to the member. |
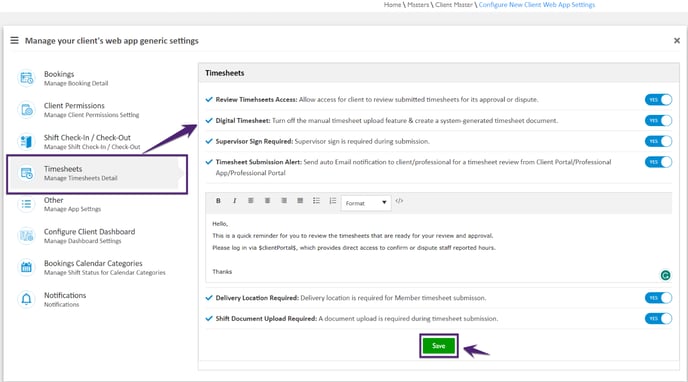
In the Timesheets tab, the global master level settings for members' timesheets are defined to manage the timesheet submission of members for the booked shifts.
|
Field Name |
Description |
|
Review Timesheets Access: Allow access for client to review submitted timesheets for its approval or dispute. |
'YES’ flag indicates that the client has access to review the submitted timesheet. |
|
Digital Timesheet: Turn off the manual timesheet upload feature & create a system-generated timesheet document. |
'YES’ flag indicates that the system will generate an automatic timesheet document for your finance with all the shift details and will turn off the manual timesheet upload feature. |
|
Supervisor Sign Required: Supervisor sign is required during submission. |
'YES’ flag indicates that the supervisor’s signature is mandatory for members during timesheet submission. |
|
Timesheet Submission Alert: Send auto Email notification to client/professional for a timesheet review from Client Portal/Professional App/Professional Portal. |
'YES’ flag will activate the auto email notification with the pre-defined message to the client/professional. This auto email notification will be sent to the client/professional for the timesheet review using from the Client Portal/ Professional App/ Professional Portal. |
|
|
|
|
Delivery Location Required: Delivery location is required for Member timesheet submission. |
‘YES’ flag indicates that the members must select the Delivery Location from the Member App during timesheet submission. |
|
Shift Document Upload Required: A document upload is required during timesheet submission. |
‘YES’ flag indicates that the members must upload the shift document from the Member App during timesheet submission. |
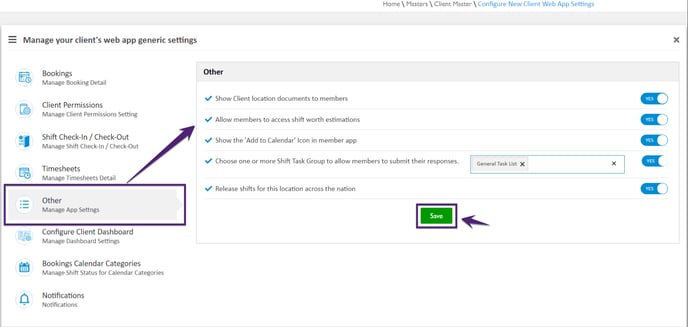
Other Settings
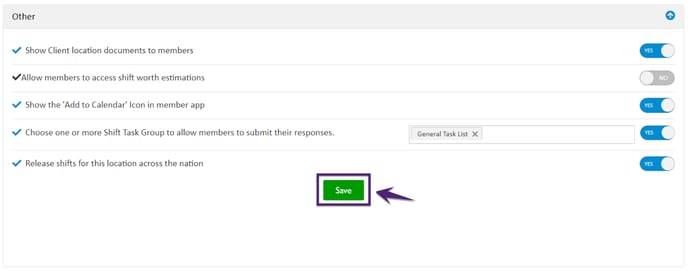
In the Other tab, the global master level settings to manage the App settings are defined for the Client Portal.
|
Field Name |
Description |
|
Show Client location documents to members. |
'YES’ flag indicates that the members are allowed to view/ download authorised shift documents from the dashboard in the member app. Members are recommended to view the available documents before every shift. |
|
Allow members to access shift worth estimations. |
'YES’ flag indicates that the members are allowed to view shift worth as per their Qualification and Expertise for the shift in the member app. |
|
Show the 'Add to Calendar' Icon in member app. |
Show/hide the ‘Add to Calendar’ icon from the member app. |
|
Choose one or more Shift Task Group to allow members to submit their responses. |
'YES’ flag indicates that the member needs to submit the response for the selected shift task group during the shift. |
|
Release shifts for this location across the nation. |
Releases the shifts to eligible members across multiple regions within a country. When the Flag is set to YES - the released shifts for the location will be visible to the members across the multiple regions. For instance, the members based in Sydney can view the released shifts of Melbourne if the Flag = YES. In the Client Level settings if the Flag = OFF, this setting will override the settings provided at the Global level. |
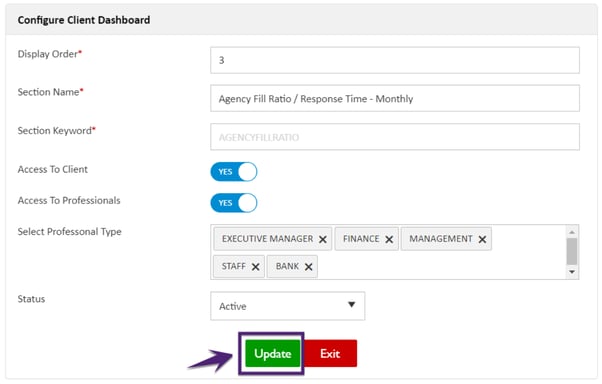
In the Configure Client Dashboard tab, the settings to configure the client dashboard are defined to manage the sections that will be available in the client portal dashboard with access defined to Clients/Professionals.
The Last Updated By shows the name of the user who last updated the setting and the Last Updated On shows the last updated date and time of the setting.

Update Configure Client Dashboard
To update the Configure Client Dashboard settings:
-
Click the Edit action icon as shown in the figure below and the Configure Client Dashboard pop-up window opens in edit mode

-
Update all the required details and click Update
|
Field Name |
Description |
|
Display Order |
To define the order of the section visibility in the client dashboard. |
|
Section Name |
Name of the section visible in the client dashboard. |
|
Section Keyword |
Show the provided section keyword and the keyword cannot be configured. |
|
Access to Client |
To provide access to the client for this menu with the flag set to ‘YES’. |
|
Access to Professionals |
To provide access to the selected professional for this menu. The professional type list includes Bank, Executive Manager, Finance, Management, and Staff.
|
|
Select Professional Type |
Select the Professional Type from the available list when the ‘Access to Professionals’ is set to YES.  |
|
Status |
Set the menu as Active/Inactive. Active indicates that this menu will be visible to clients and professionals based on their set access. |
Bookings Calendar Categories Settings
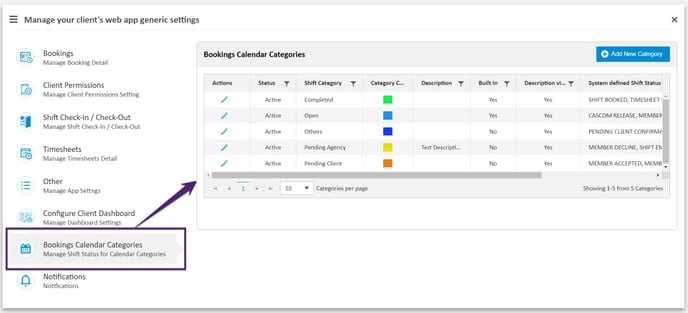
The Bookings Calendar Categories manage the Shift Status of all the available Calendar Categories and display the Actions, Status, Shift Category, Category Color, Description, Built-in, Description Visibility to Client, System Defined Shift Status, Last Updated On, and Last Updated By.
The Actions edits the existing Category, Status shows whether the existing category is active/inactive, Shift Category shows the name of the category, Category Color shows the color of all the available categories, Description shows the detail about the Shift Category, Built In shows the categories that are editable/non-editable (‘Open’ and ‘Completed’ categories are set as non-editable), System defined Shift Status shows the applicable shift status for each shift category, Last Updated By shows the name of the user who updated the category, and Last Updated On shows the date and time when the category was updated.
By default, four booking categories are shown when the flag for the new Client Portal application is activated and the specified Shift Status will be mapped with the corresponding Shift Category:
|
Shift Category |
System Defined Shift Status |
Description |
|---|---|---|
|
Open |
Member Offered, Member Broadcast, Shift Release, Client Confirmed, and Cascom Release. |
Shifts have been broadcasted to multiple available members for their action/attention. |
|
Completed |
Shift Booked and Timesheet Submitted. |
Confirmed shifts accepted by the Client and the Staff member. |
|
Pending Client |
Member Assigned, Member Accepted, and Client Proposed. |
Shifts require attention for Staff to approve or decline. |
|
Pending Agency |
Shift Entered, Member Pull Out, Member Decline, Member Removed. |
Agency Staff is actively working on these shifts. |
Add New Category
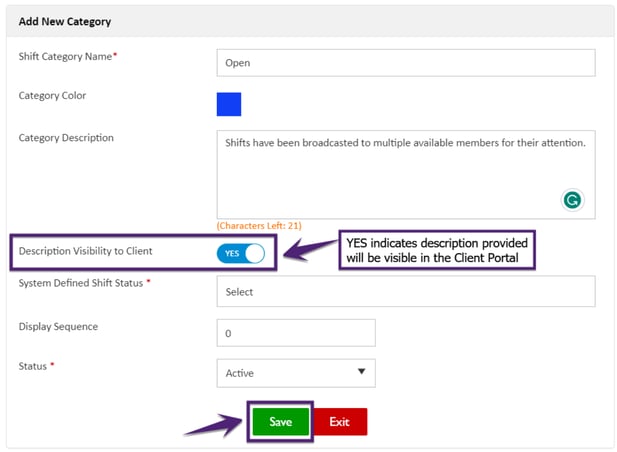
To Add a New Category in the Bookings Calendar Categories:
-
Click Add New Category
-
The Add New Category pop-up window opens. Provide all the required details
-
Click Save
|
Field Name |
Description |
|---|---|
|
Shift Category Name |
Name of the new category and the name provided should be unique. |
|
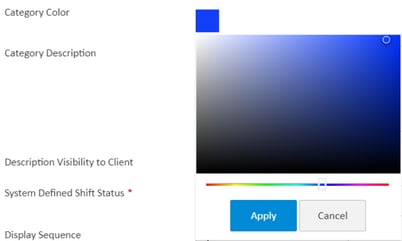
Category Color |
Shows the Color of the new category. This Category Color is set for the different booking Shift Categories. To select the Category Color:
 |
|
Category Description |
Describes the new category. |
|
Description Visibility to Client |
You can set the Description Visibility flag to ‘Yes’ or ‘No’. Here ‘Yes’ indicates description provided in the Category Description will be visible in the Client Portal. By default, the toggle is set to YES. |
|
System Defined Shift Status |
Shows the list of all the active Shift Status. Select all the required Shift Status corresponding to this Category. Note that you cannot replicate the already selected Shift Status into any other active category. |
|
Display Sequence |
Provide the order number to define the arrangement of a new category in a particular order. The Display Sequence provided will be reflected in the landing page of the Booking. |
|
Status |
The Status of the new category can be set to Active or Inactive. By default, the Status is set to Active. Note: You cannot set the Status to Inactive for the ‘Open’ and ‘Completed’ categories. |
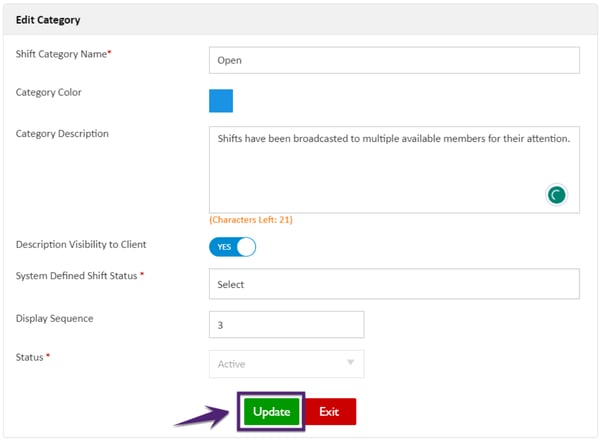
You can edit the existing category. To edit the existing category:
-
Click the edit icon in the Actions and Edit Category pop-up window opens

-
Edit all the required details in the existing Category
-
Click Update
Notifications Settings
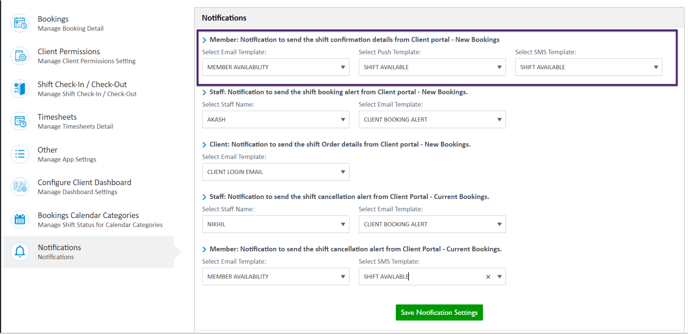
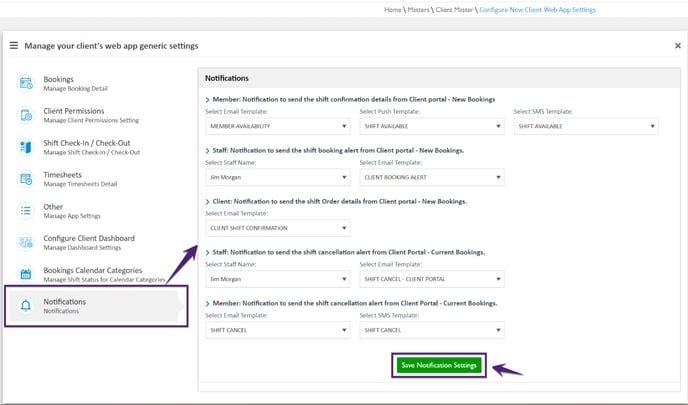
In the Notifications tab, the global notifications settings are set for the member, staff, and client using the Email Templates, Push Templates, and SMS Templates.
To set the Notifications templates for the member, staff, and/or client:
-
Select the required Email Template, Push Template, and/or SMS Template
-
For staff notifications, select the Staff Name
-
Click Save Notification Settings and the selected notifications settings are saved
|
Field Name |
Description |
|
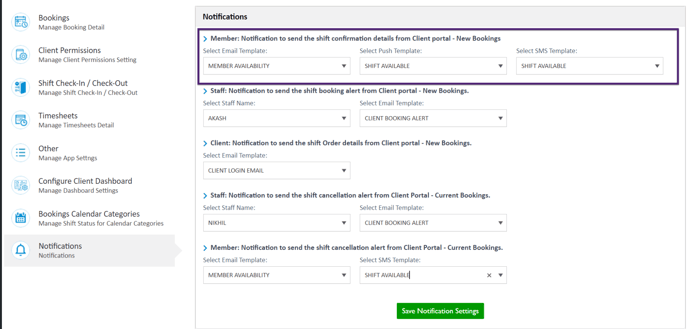
Member: Notification to send the shift confirmation details from Client portal - New Bookings. |
Notification to send the shift confirmation for New Booking to the member using Email Template, Push Template, and SMS Template. Select the Email Template, Push Template, and SMS Template from the available template list.


 |
|
Staff: Notification to send the shift booking alert from Client portal - New Bookings. |
Notification to send the shift booking alert for New Booking to the staff using Email Template.
|
|
|
|
|
Client: Notification to send the shift Order details from Client portal - New Bookings. |
Notification to send the shift order details for New Booking to the client using the selected Email Template.
|
|
Staff: Notification to send the shift cancellation alert from Client Portal - Current Bookings. |
Notification to send the shift cancellation alert for the current booking to the staff using Email Template.
|
|
|
|
|
Member: Notification to send the shift cancellation alert from Client Portal - Current Bookings. |
Notification to send the shift cancellation alert for the current booking to the member using Email Template and SMS Template.

|
Client Level Settings - Configure Client Interface
In Client Management of the Staff Portal application, you can Configure Client Interface to apply the client-level settings.
You can set the Independent Preferences setting for Compliance Rules. The Independent Preferences settings are not accessible in the global master level settings.
Important:- Note that when you apply client level settings and the flags set to ‘YES’ will override the settings provided in the global master level settings. The flags that are set as ‘NO’ will apply settings as defined in the global master level settings.
All the settings in Client Details → Online Permissions are now available in this Client Level Settings.
How to access Client Level Settings?
To access Configure Client Interface Settings in the Staff Portal:
-
Click Profiles → Client → Search Client or click Client Quick Link and the Search Client page opens
-
Now, select the client name checkbox with Location Type as Service, or Admin and Service, and the Action slider window opens as shown in the figure below
-
Click Client Management

-
In the Client Management page, click Configure Client Interface

Independent Preferences Settings
The Independent Preferences settings are set at the client level only and are not affected by the flag setting of Apply client-level settings.
You can define the Compliance Rules setting in the Independent Preferences and click Save.
|
Field Name |
Description |
|
Compliance Rules: Show client compliance rules in client portal. |
'Yes’ indicates that the compliance rules applicable are visible to the member. |

Bookings Settings
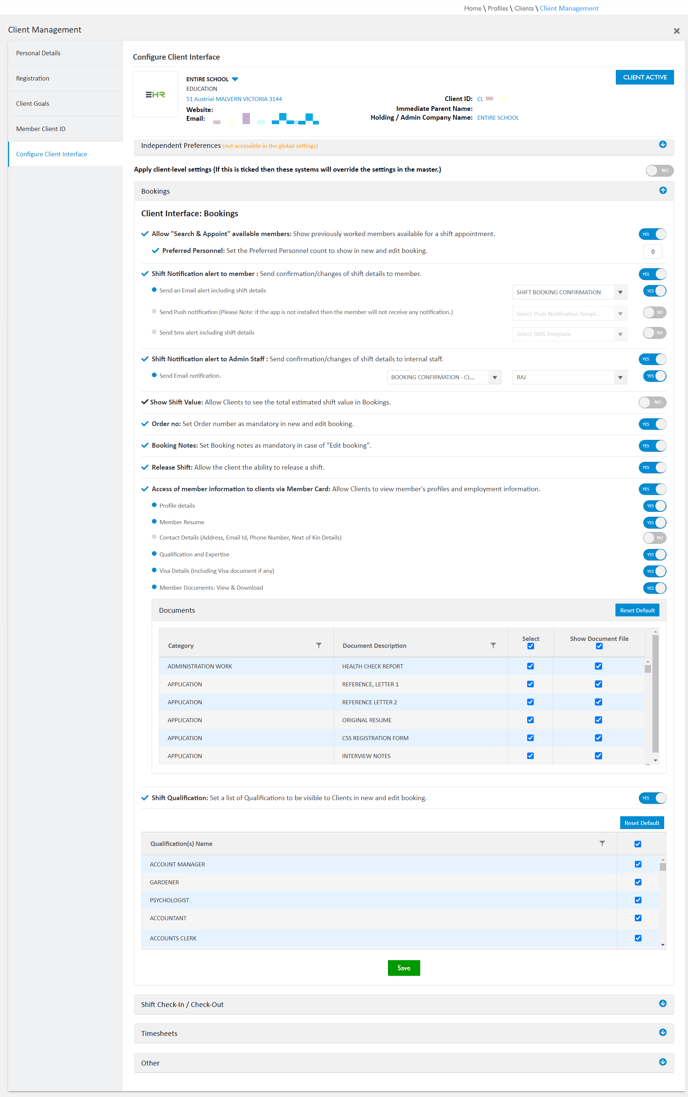
In the Bookings settings, you can manage client-level booking detail settings for the Client Portal.
To configure the client-level settings for the Bookings as per your requirements, select the required settings by clicking the toggle to ‘YES’. When you apply client-level settings, the flags set to ‘YES’ will override the settings provided in the global master settings. The flags that are set as ‘NO’ will apply settings as defined in the global master settings.
Refer to the Master Generic Settings for Bookings to read the instructions provided for each setting.
Shift Check-In / Check-Out Settings
In the Shift Check-In / Check-Out settings, the client-level settings for members' shift check-in/check-out are defined to manage Shift Check-In and Check-Out for the booked shifts.
To configure the client-level settings for the Shift Check-In / Check-Out as per your requirements, select the required settings by clicking the toggle to ‘YES’. When you apply client-level settings, the flags set to ‘YES’ will override the settings provided in the global master settings. The flags set as ‘NO’ will apply settings as defined in the global master settings.
Refer to the Master Generic Settings for Shift Check-In / Check-Out to read the instructions provided for each setting.

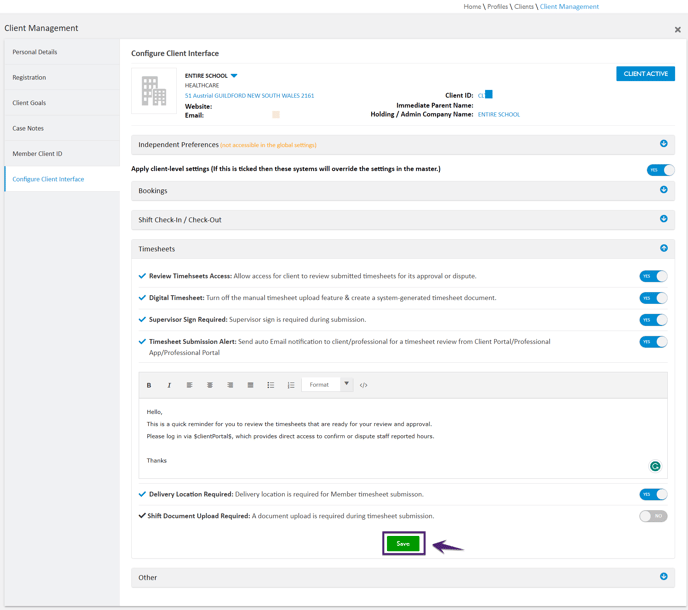
Timesheets Settings
In the Timesheets settings, the client-level settings for members' timesheets are defined to manage the timesheet submission of the members for the booked shifts.
Refer to the Master Generic Settings for Timesheets to read the instructions provided for each setting.
Other Settings
In the Other settings, the client-level settings to manage the App settings are defined for the Client Portal.
Refer to the Master Generic Settings for Other to read the instructions provided for each setting.
Client Portal Login
To login to the Client Portal application:
-
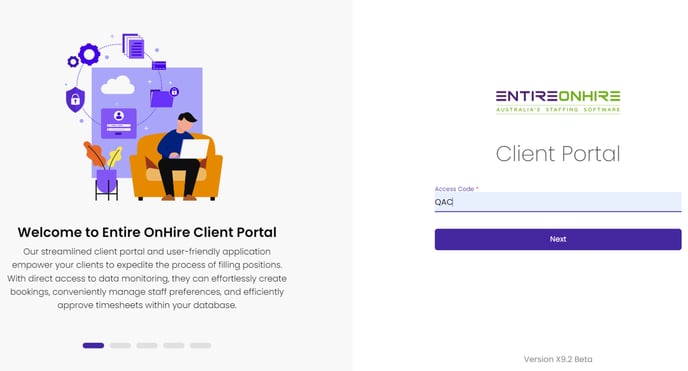
In the web browser, provide the Entire OnHire - Client Portal URL and your Client Portal login page opens with the Access Code, click Next
For Staff, providing the login information is not required as the Staff can open the Client Portal application (Login → Client Portal) from the Staff Portal without login information.
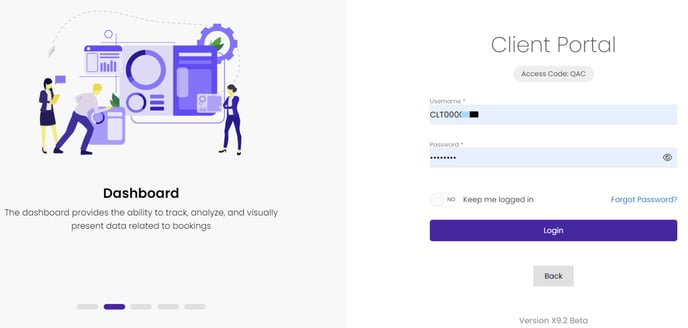
- Provide the Username and Password. Note that you need to provide a valid Company Code, User Name, and Password to your clients to successfully login to the Client Portal application.
-
Click Login and the user will login to the Client Portal application successfully
Forgot Password
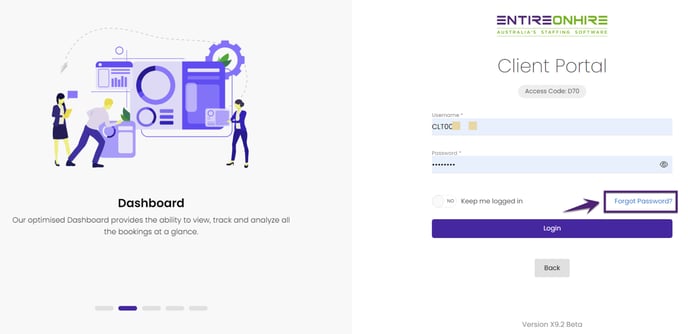
In case you do not remember the password:
-
Click Forgot Password? link as shown in the figure below
-
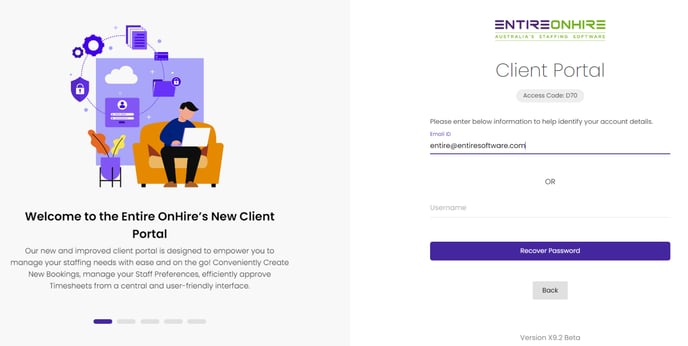
Provide the Email ID or User Name
-
Click Recover Password and the new password will be shared with you on your provided details
Keep me logged in
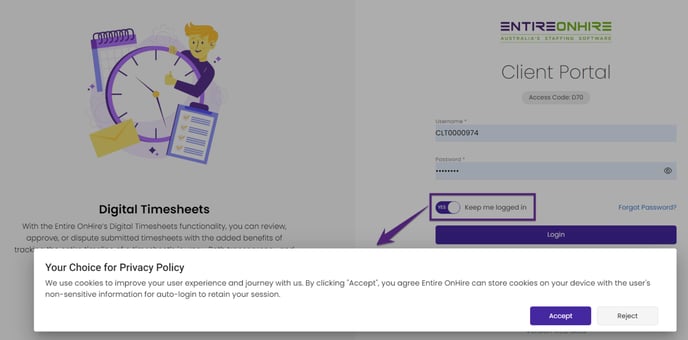
To retain the login session:
-
Select the Keep me logged in toggle to YES and the Your Choice for Privacy Policy dialog box appears
-
To accept the displayed privacy policy, click Accept or else Reject
Log Out
To log out of the Client Portal application:
-
Click your profile icon at the top right of the page
-
Click Log Out as shown in the figure below

Change Password
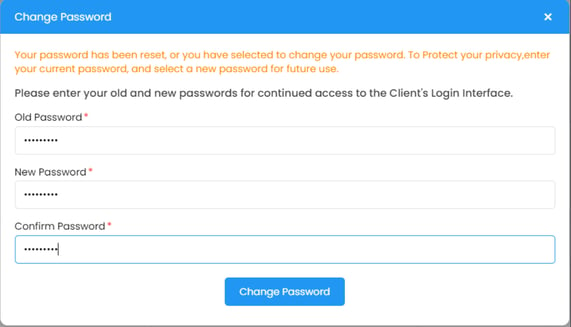
To change the password of your Client Portal application:
-
Click the profile icon as shown in the figure above and the Change Password pop-up window opens
-
Provide your Old Password
-
Now, provide the New Password and re-enter the same new password in the Confirm Password
-
Click Change Password and the message ‘Password changed successfully’ appears
Bookings
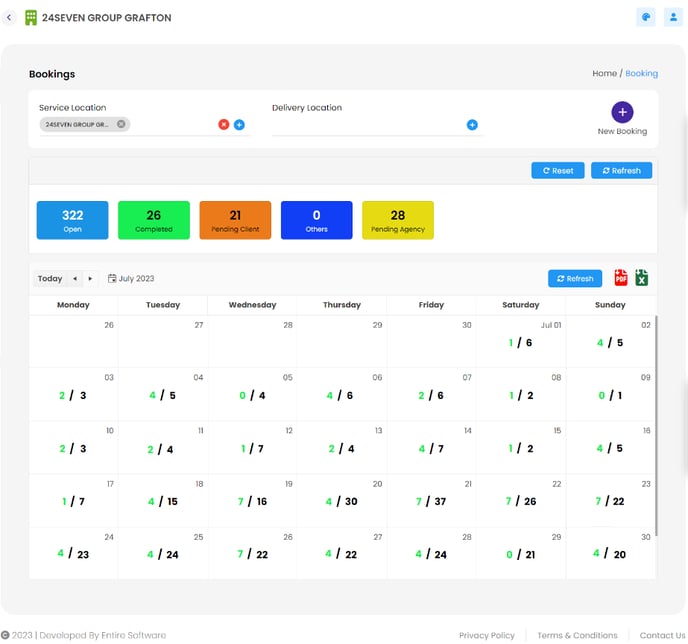
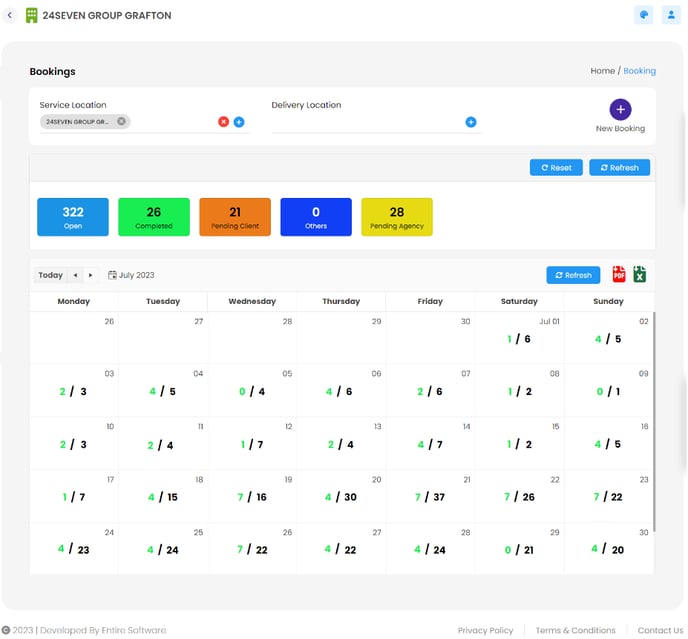
The Bookings page shows all the available shift bookings in a Calendar view organized date-wise. Each date shows the existing bookings (if any) with the current shift status as defined in the Master. You can create new bookings or edit existing bookings by clicking the required Calendar date.
By default, the Booking Shift Categories are shown as Completed, Open, Pending Agency, and Pending Client with customised color for each category. You can create your own customised Booking Shift Categories from the Masters with customised category colors.
The highlighting features available on the Bookings page:
-
The shift bookings are shown in a Calendar view organised date-wise and display all the bookings at a glance with the highlighted date as ‘Today’
-
You can navigate to view the previous/future month bookings by using the forward or backward icons
-
Clicking on any Shift Category shows the corresponding shift count number in the Calendar view and you can select/unselect any of the Shift Category
-
You can filter bookings based on the available Shift Categories that are shown in different colored boxes with Shift Category names (Completed, Open, Pending Client, or Pending Agency) and the numbers of shift bookings shown
-
In the Calendar view:
-
The total number of shifts is shown after the forward slash ‘/'. For example, ' 3/10’ - 10 indicates the total number of shifts. The default view shown is ‘Completed Shifts/Total Shifts’
-
The total number of shift categories associated are shown before the forward slash ‘/' and will change depending on the Shift Category selected
For example, on clicking the ‘3/10’ Completed Shift Category, ‘3’ indicates the total number of Completed Shift Category, or on clicking the '4/10’ Pending Client Shift Category, '4’ indicates the total number of Pending Client Shift Category -
The color of the Shift Category will vary depending upon the color defined in your Master and by default, Shift Category selected will be Completed
-
The total available shift count in the calendar view for the day will always be in black
-
Note that the color of the shift count that is shown before forward '/' is picked as defined in the Bookings Calendar Categories in the Client Masters → Configure New Client Web App Settings of the Staff Portal.
|
Field Name |
Description |
|
Service Location |
Select the Service Location. By default, the Service location is selected in case the professional is linked with a single client. If the infection is applied to the Service Location, it will appear in Red. On tap, the Applied Infection(s) are shown with the name of Infection(s) and Restriction Period. 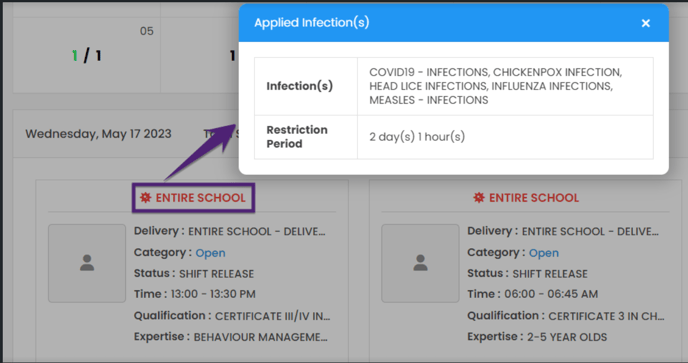 |
|
Delivery Location |
Select the Delivery Location(s) associated with the Service Location. If the infection is applied on the Delivery Location, it will appear in Red. |
|
Category |
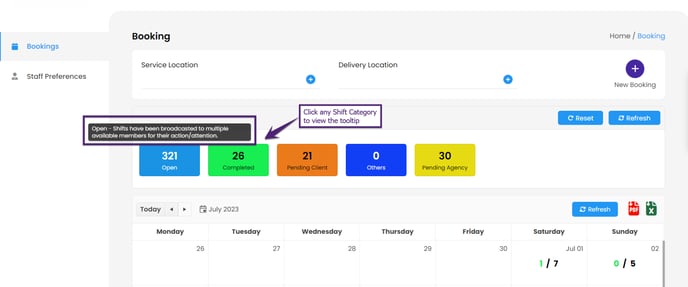
Shows the shift categories such as Completed, Open, Pending Client, or Pending Agency. The shift categories and their color are picked as defined in the Bookings Calendar Categories in the Masters → Client Masters → Configure New Client Web App Settings of the Staff Portal application. |
displayed based on the Description provided and the Description Visibility to Client set
to ‘YES’ in the Bookings Calendar Categories Master Settings.
View Booking Details
When bookings exist for a particular date, tap on the date, and all the bookings are loaded below the Calendar view. On scrolling down the page, the selected day and date are displayed with the Edit All Bookings and Refresh buttons. You can click the refresh icon to fetch the updated data.
Each shift booking shows all the available shift details with the applicable action required. Note that you can view/edit a single booking at a time. Each shift booking shows the following fields explained below.
|
Field Name |
Description |
|
Category |
Shows the shift categories such as Completed, Open, Pending Client, or Pending Agency (as defined in Bookings Calendar Categories Master Settings). |
|
Status |
The Status can be Member Accepted, Member Decline, Member Removed, Member Pulled Out, Member Offered, Member Assigned, Member Broadcast, Shift Release, Shift Booked, Timesheet Submitted, Client Confirmed, Client Proposed, and Shift Entered. |
|
Time |
Shows the Start and End Time of the shift. |
|
Shift Type |
Shift Type of the member based on the Service Location selected. |
|
Qualification |
Qualification required for the shift. |
|
Expertise |
Expertise based on the Qualification selected. |
|
Member Name |
Name of the active member. |
|
Profile Picture |
Profile picture of the member. On tap, the profile picture, the member card opens. |
|
Action icon |
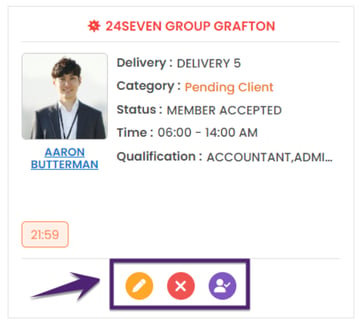
Edit, Cancel, View, and Accept icons are displayed based on the Shift Status. For details about Shift Status with Required Actions. Note that for the Clients, the Cancel icon will be visible based on Shift Status.
 |
|
Shift Worth Value icon |
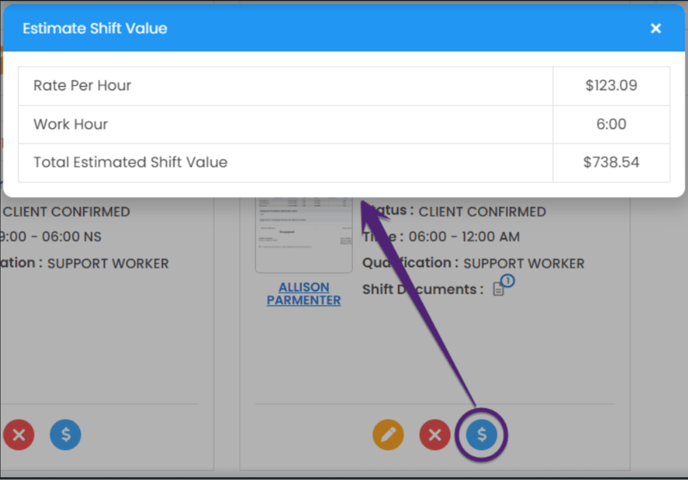
The Shift Worth Value icon appears based on the flag settings in Master ‘Show Shift Value: Allow Clients to view the total estimated shift value in Bookings'. If the flag is set to ‘YES’, the Shift Worth Value is visible for the shift. On clicking the Shift Worth Value icon, the Estimated Shift Value pop-up opens and shows the Total Estimated Shift Value. 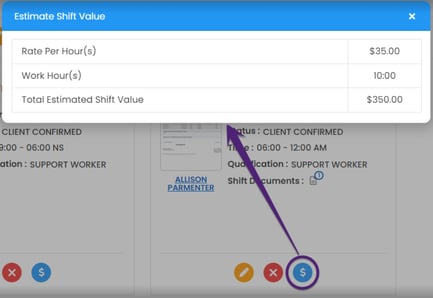 |
|
Booking Ratio |
Shows the Booking Ratio for the booked shifts in case of multi-bookings. 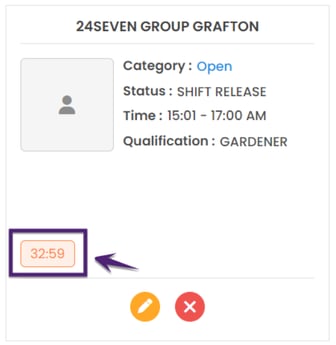 |
|
Shift Document icon |
Shows the Shift Documents uploaded for the booked shift. 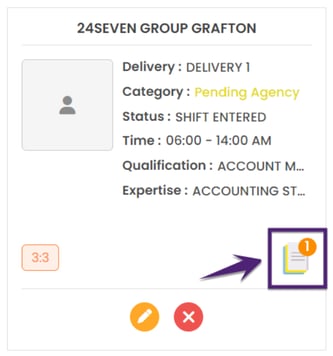 The Shift Documents can be viewed, downloaded, and deleted. 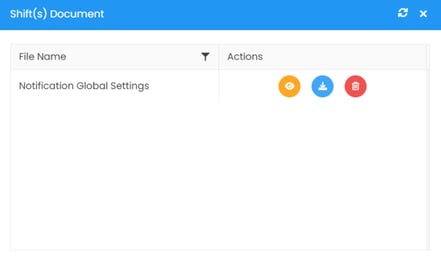 |
|
Notes icon |
Shows the available Notes for the Booked Shift. Click the Notes icon to view details.  |
|
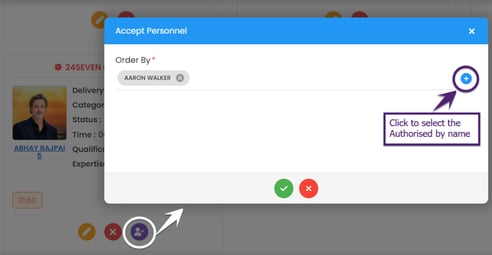
Accept icon |
Shows the Accept icon, in case a member has accepted the shift.  Tap the Accept icon and the Accept Personnel pop-up opens. Click the plus icon to select the name of the authorised person for the shift in the Order By and click the Confirm icon.
|
|
Timesheet icon |
Shows the Timesheet icon, in case Timesheet Snap exists for the completed shift. Tap on the Timesheet icon and the timesheet will open and the user can view and download the timesheet submitted. 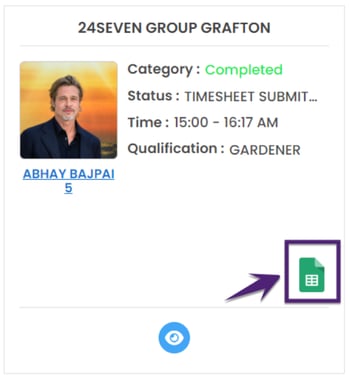 |
New Client Portal Transition Guide
The New Client Portal transition guide provides the details of the additions/modifications in the new Entire OnHire Client Portal application. Before using the new Client Portal, please read the instructions carefully to navigate the application successfully.
Things To Note
To run the Entire OnHire Client Portal application successfully, several important things must be understood, actioned, and implemented ![]()
![]() .
.
1. Online Permission in Client-Level Masters
In the Client Details page, all the Online Permissions (of the old client portal) are now available in the Client-Level Masters.
|
Field Name in Online Permission |
Field Name in Client-Level Permission |
|
Allow access for client to review timesheets |
Available in Timesheet Settings: |
|
Enable system-generated digital timesheets for location |
Available in Timesheet Settings: |
|
Allow the client to search for preferred personnel |
Available in Bookings Settings: |
|
Show location documents to members |
Available in Other Settings: |
|
Required Delivery location for member to submit Timesheet |
Available in Timesheet Settings: |
|
Allow members to access shift worth estimations |
Available in Other Settings: |
|
Release shifts for this location across the nation |
Available in Other Settings: |
|
Show the 'Add to Calendar' Icon in member app |
Available in Other Settings: |
|
Show client compliance rules in client portal |
Available in Independence Preferences: |
|
Mandate the shift document upload in timesheet submission by the member. |
Available in Timesheet Settings: |
|
Choose one or more Shift Task Group to allow members to submit their responses. |
Available in Other Settings: |
|
Allow the client the ability to release a shift from the client portal - New Booking |
Available in Bookings Settings: |
|
Allow auto push notifications to be sent to members if client assigns a shift - New Booking |
Available in Bookings Settings:
|
|
Allow auto SMS notifications to be sent to members if client assigns a shift - New Booking |
Available in Bookings Settings:
|
|
Turn on auto alerts via Email / SMS to internal staff for client portal - New Booking |
Available in Bookings Settings: Shift Notification alert to Admin Staff: Send confirmation/changes of shift details to internal staff.
|
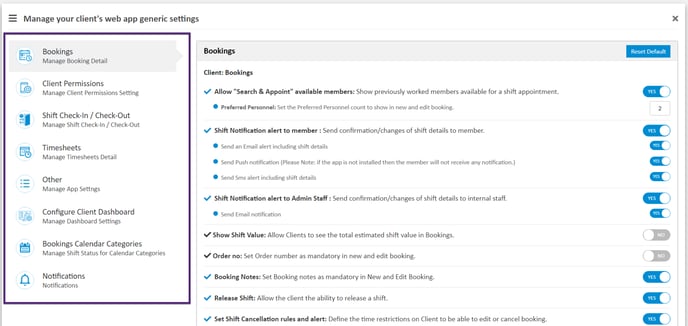
2. Global Master Settings
In the Configure New Client Web App Settings, you can manage your global web app generic settings to pre-define the general configurations as per your preference.
You can manage and configure generic settings from Masters→ Client Master → Configure New Client Web App Settings. The generic master settings include:
-
Bookings
-
Client Permissions
-
Shift Check-In / Check-Out
-
Timesheets
-
Other
-
Configure Client Dashboard
-
Bookings Calendar Categories
-
Notifications
Important: Note that the client-level settings will override the defined settings in the global master settings.
3. Client Level Master Settings - Configure Client Interface
In Client Management, you can Configure Client Interface to apply the client-level settings.
You can set the Independent Preferences setting for Compliance Rules. The Independent Preferences setting is not accessible in the global master settings.
Important:- Note that when you apply client-level settings and the flags set to ‘YES’ will override the settings provided in the global master settings. The settings in Client Details → Online Permissions are now available in this Client Level Settings.

4. New Flags in New Client Portal
Please note the new flags available in the Client Portal application:
|
New Flags |
Description (if the Flag is set to YES) |
|
Show Shift Value: Allow Clients to see the total estimated shift value in Bookings. |
In the Booking Master Settings, it allows the client to view the estimated shift value (shift worth) in the Booking page of the Client Portal. |
|
Access of member information to clients via Member Card: Allow Clients to view member's profiles and employment information. |
In the Booking Master Settings, the client can view the member card and all the employment information available on the Client Portal. |
|
Order no: Set Order number as mandatory in new and edit booking. |
In the Booking Master Settings, the Order Number field can be set to mandatory in the new and edit booking of the Bookings in the Client Portal. |
|
Booking Notes: Set Booking notes as mandatory in New and Edit Bookings. Note: This feature is not supported in this version as a mandatory setting but will work as an optional setting.
|
In the Booking Master Settings, the Booking Notes field can be set to mandatory in the New and Edit Booking of the Bookings in the Client Portal. |
|
Shift Qualification: Set a list of Qualifications to be visible to Clients in new and edit booking. |
In the Booking Master Settings, the staff can set a list of Qualifications (active Qualifications) that are visible to the client in the New and Edit Booking of the Bookings in the Client Portal. |
|
Preferred Personnel: Set the Preferred Personnel count to show in new and edit booking.
|
In the Bookings Settings, the selected count of Preferred Personnel names are displayed in the new and edit bookings. By default value provided is ‘0' that means all the Personnel names are displayed in the new and edit bookings. Note that the Preferred Personnel count ranges between 0 to 5. |
|
Shift Start Reminder: Send shift reminder via push notification to the member before the shift start time. Note: Not supported in this version
|
In Shift Check-In / Check-Out settings, set the Shift Start Reminder time in minutes. Before the shift start time, a shift reminder via push notification will be sent to the member. |
|
Set Shift Cancellation rules and alert: Define the time restrictions on Client to be able to edit or cancel booking. |
In the Booking Master Settings, the staff can set the Shift Cancellation rules and alert the client. Time-based and other child settings will be applicable if true. |
|
Supervisor Sign Required: Supervisor sign is required during submission. Note: Not supported in this version
|
'YES’ flag indicates that the supervisor’s signature is mandatory for members during timesheet submission. |
5. Attention for Notifications
When the new Client Portal application is installed successfully, set your Email/SMS/Push Notification templates for the staff, client, and members.
You can set the global notifications templates in the Notifications tab for the member, staff, and client by selecting the required Email Templates, Push Templates, and SMS Templates.
The Notifications can be set in the Booking Settings at the generic level and client-level master settings.
|
Field Name |
Description |
|
Shift Notification alert to member: Send confirmation/changes of shift details to member. |
‘Yes’ indicates that the system allows you to send the shift confirmation details to the member for their acknowledgment. Warning: When the flag is set to 'Yes’, the child flags shown below are also activated for selection and the user can set Email Alert, Push Notification, and/or SMS Alert. Note that the predefined Email Alert/ Push Notification/ SMS Alert templates can be selected in the Notifications section of Masters. |
|
|
|
|
‘Yes’ indicates that the system will send Email Alert including shift details to the members. The Email Alert to members is shared with the default Email Alert template having the User Type as 'Members’ as shown in the figure below. |
|
|
|
|
‘Yes’ indicates that the auto-push is ON and the system will send the push notification including shift details to members. The Push Notification to members is shared with the default template with the Module selected as 'Allocations’ as shown in the figure below. You can create the customised message template using the dynamic fields listed in the Add/ Edit SMS Messaging Template. |
|
|
|
|
‘Yes’ indicates that the auto-SMS is ON and the system will send the SMS alert including shift details to members. The SMS alert to members is shared with the default template with the Module selected as 'Allocations’ as shown in the figure below. You can create the customised SMS Alert template using the dynamic fields listed in the Add/ Edit SMS Messaging Template. |
|
|
|
|
Shift Notification alert to Admin Staff: Send confirmation/changes of shift details to internal staff. |
‘Yes’ indicates that the system will allow to send the booking confirmation details to the internal staff via email. |
|
‘Yes’ indicates that the system will send an Email notification including shift details to the internal staff with the pre-defined email template for the staff defined in the Notification of the Masters. The Email notification to Admin Staff is shared with the default Email Template having the User Type as ‘Staff’ as shown in the figure below. |
|
|
|
|
Note that the SMS Alerts are not supported for admin staff in this version.
|
|
Set Shift Cancellation rules and alert: Define the time restrictions on Client to be able to edit or cancel booking. |
‘Yes’ indicates that the staff can set the Shift Cancellation rules and alert the client. Time-based and other child settings will be applicable if true. Warning: When the flag is set to 'Yes’, the child flags shown below are also activated for selection and the staff can set the time to restrict the client to cancel shift and send the shift cancellation alert to internal staff and members using email/SMS.
Note that the predefined shift cancellation Email and SMS Alert templates can be selected for the staff and members in the Notifications section of Masters as shown in the figure below. |
|
|
|
|
The staff can restrict the client to cancel the shift in case the shift start time remaining is equal to the time provided in hours. Note that the maximum hours limit should not exceed more than 24 hours. |
|
‘Yes’ indicates that the system will send shift cancellation details to the internal staff. |
|
|
‘Yes’ indicates that an email notification will be sent to the internal staff with the shift cancellation details. To create the customised Shift Cancellation Email template for Staff, create the template having the User Type as 'Staff’ as shown in the figure below. |
|
|
|
|
‘Yes’ indicates that the system will send shift cancellation details to the member. |
|
|
‘Yes’ indicates that an email notification will be sent to the member with the shift cancellation details. To create the customised Shift Cancellation Email template for Member, create the template having the User Type as 'Member’ as shown in the figure below. |
|
|
|
|
|
‘Yes’ indicates that an SMS alert will be sent to the member with the shift cancellation details. Note that the SMS alert to members is shared with the default template set with the Module selected as 'Allocations’. |
6. Client Portal Login
To login to the Client Portal application:
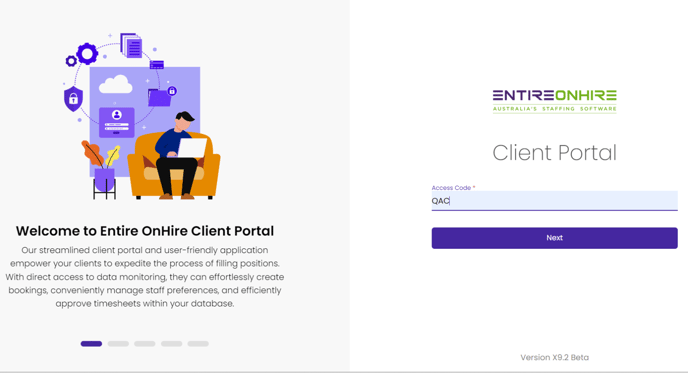
-
In the web browser, provide the Entire OnHire - Client Portal URL and your Client Portal login page opens with the Access Code, click Next
For Staff, providing the login information is not required as the Staff can open the Client Portal application (Login → Client Portal) from the Staff Portal without login information.
-
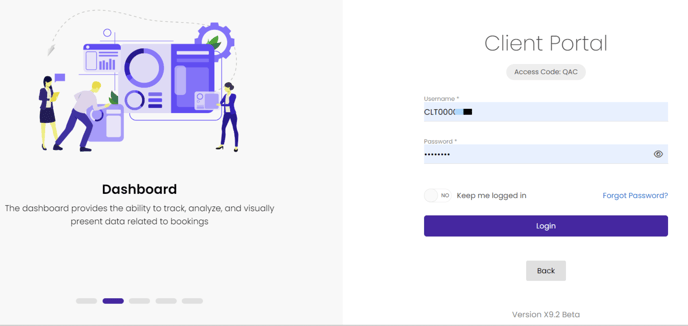
Provide the Username and Password.
-
Click Login, and the user will login to the Client Portal application successfully
7. Switch to the New Client Portal from the Old Client Portal
In case you are using the old Client Portal application and the new Client Portal flag is ON, you can view the link to open the new Client Portal application.
To open the Client Portal application, you need to Click here to Open the link as shown in the figure below.

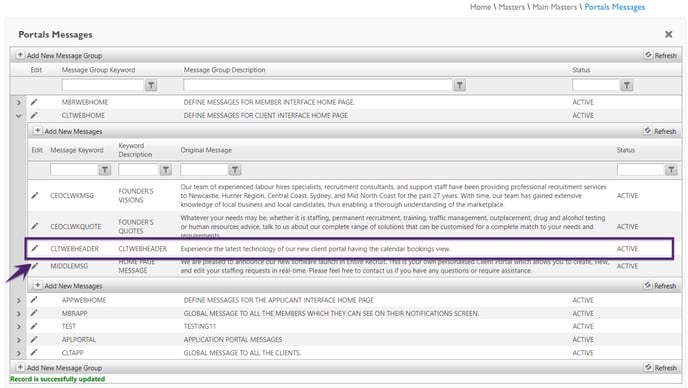
You can customise the message “Experience the latest technology of our new client portal having the calendar bookings view” as per your requirement from Main Masters → Portal Messages as highlighted in the figure below.
8. Update on the Client Portal Mobile App
We are not releasing the Client Portal Mobile App in this release and our current mobile app will work as usual.
9. Flags not Supported in this Release
Please note the flags that are not supported in this release and the listed below flags will be live soon.
|
Flags not Supported |
Description |
|
Shift Start Reminder: Send shift reminder via push notification to the member before the shift start time (in Member App). |
Set the Shift Start Reminder time in minutes. Before the shift start time, a shift reminder via push notification will be sent to the member. |
|
Supervisor Sign Required: Supervisor sign is required during submission (in Member App). |
'YES’ flag indicates that the supervisor’s signature is mandatory for members during timesheet submission. |
|
Booking Notes: Set Booking notes as mandatory in New and Edit Bookings (in Client App). |
In the Booking Master Settings, the Booking Notes field can be set to mandatory in the New and Edit Booking of the Bookings in the Client Portal. |
Member App - Smart Shifts
The brand new Smart Shifts feature in the Workforce App allows your members to narrow down the search of the specific Released Shifts by using their preferred restriction criteria. A popular example would be to use Smart Shifts to filter the list by Shift Distance Range.
Rather than sifting through potentially hundreds of released shifts on their small mobile screen, members can view the Released Shifts with this custom filtered view in order to best meet their travel requirements. Members can add multiple Smart Shift filters, and each filter can have multiple matching conditions.
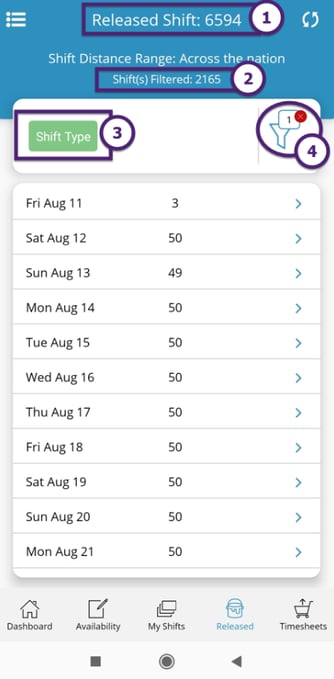
When the Smart Shift filters are applied, the Released Shifts screen shows Released Shift numbers, Shifts Filtered numbers, name(s) of any filters applied, as well as the number of filters applied on the filter badge icon. The member can easily add, edit, or remove any applied Smart Shift filters in order to view a broader range of released shifts on their screen 😊.
How to Access Smart Shifts?
To access Smart Shifts from the Member App:
-
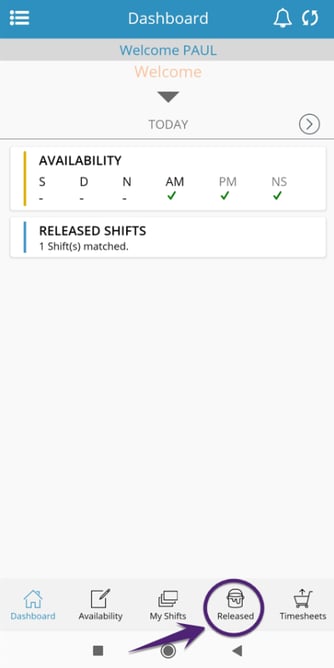
From the Dashboard, click the Released icon to open the Released Shifts screen
-
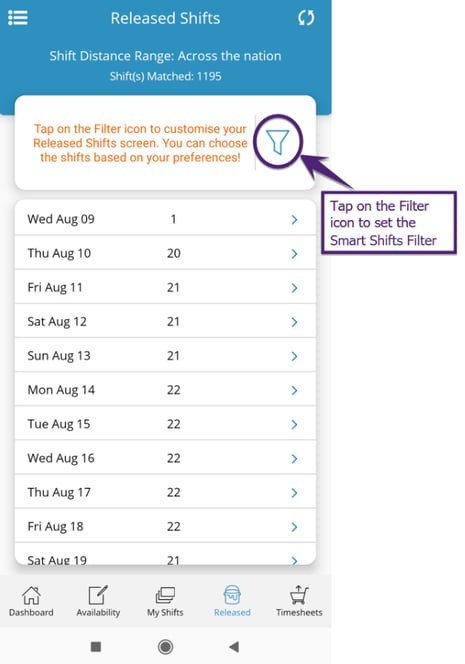
The Released Shifts screen shows the Shifts based on the default Shift Distance Range filter with the number of Shift(s) Matched. Tap on the filter badge icon (as shown in the figure below) to open the Smart Shifts Filter screen
-
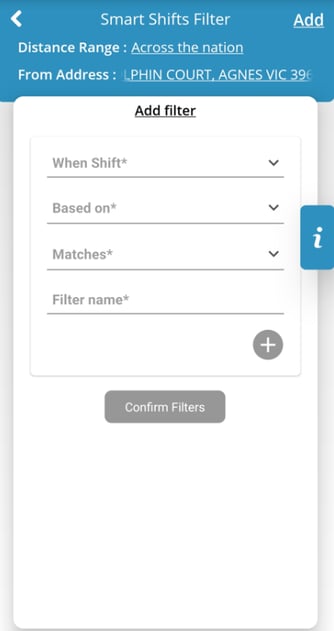
In the Smart Shifts Filter screen, you can add a new filter to search the Released Shifts as per your requirements. For the first time Add filter header appears as shown in the figure below
How to Add New Smart Shift Filters?
To add a new filter in the Smart Shifts Filter screen:
-
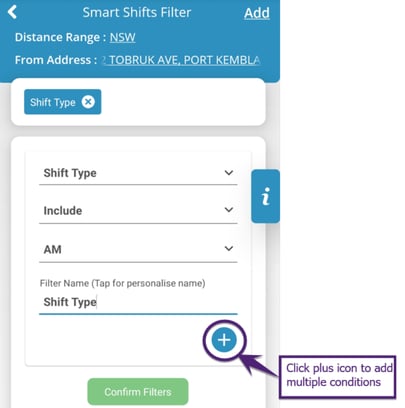
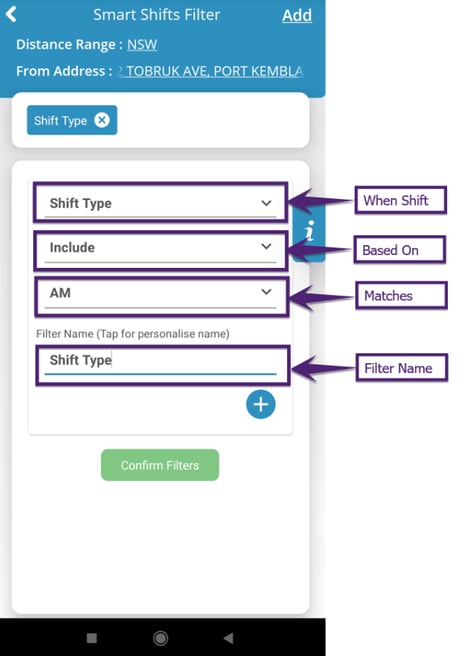
Provide the When Shift, Based on, Matches, and Filter Name details
-
You can add conditions to the new filter by clicking the plus icon
-
In the Add Condition, Select the option ‘AND / OR’ by clicking on the required option. By default, the ‘AND / OR’ condition is enabled and the option highlighted in blue is the selected option. Note that ‘AND’ evaluates all conditions added must be true and ‘OR’ evaluates any one of the conditions added must be true for the overall condition to be true
-
Provide the When Shift, Based on, and Matches details. You can further add multiple conditions as per your requirements
-
You can remove the Condition by clicking the minus
 icon as shown in the figure below
Note that you cannot add conditions with the same ‘When Shift’ filter condition in the filter, it will show the message ‘This filter condition is already applied’.

|
Field Name |
Description |
|
When Shift |
In the When Shift, the filter options are available that are Based on added conditions and selected Matches. The following options are available in the When Shift:
|
|
Based on |
In the Based on, select the condition related to the selected ‘When Shift’ that can be applied to the selected Matched option. The Based on condition is predefined for all the ‘When Shift’ filters as per the requirement and is loaded based on the selected option. The ‘Based on’ conditions available for the selected ‘When Shift’ filter are:
|
|
Matches |
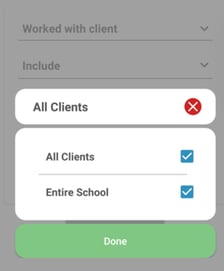
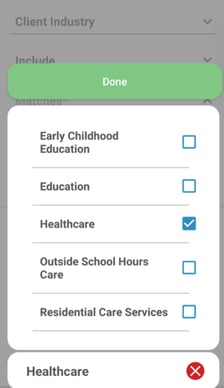
The When Shift filter shows the options as Shift Type, Shift Date, Shift Day, Shift Expertise, Client Industry, and Worked with client. Depending on the selected filter, the Based on conditions and Matches options are available. If the When Shift option selected is:
Note that the Shift Types available in the pop-up window are based on the ‘Show in Booking’ flag in the Allocation Master → Members Shifts of the Staff Portal application. 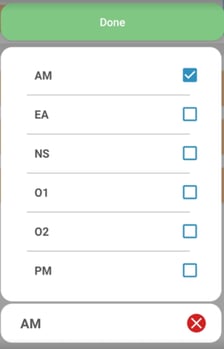
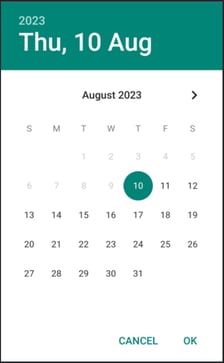

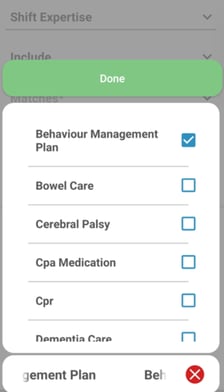
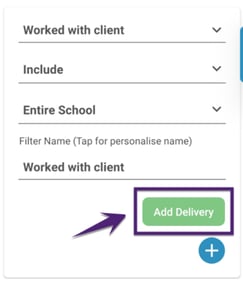
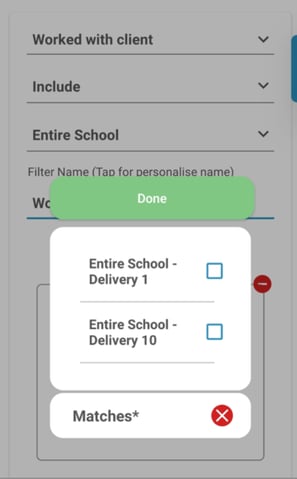
The Delivery filter is added for the Worked with the client. 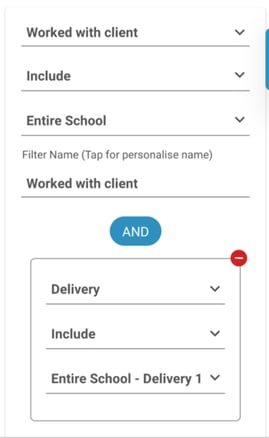 Note that the Add Delivery option appears only if the selected Service Location has a delivery attached to it. |
|
Filter Name |
Name of the Filter. By default, the filter name is provided as the ‘When Shift’ filter option selected. You can provide the new filter name as per your requirement. New Smart Shifts filter are named automatically based on the selected ‘When Shift’ filter. If a similar ‘When Shift’ filter option is selected, a number is added in front of the filter name to generate the unique filter names. For instance, if the ‘When Shift’ filter is added twice for Shift Type, the first filter will be named ‘Shift Type’, and the second filter will be named ‘2 - Shift Type’. |
|
Plus icon |
To add multiple conditions in any filter.
|
|
Add Filter |
To add a new filter that can include multiple conditions. 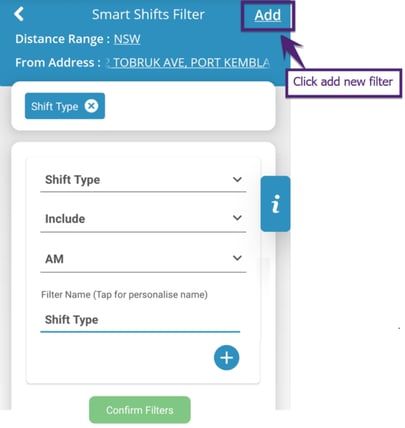 |
|
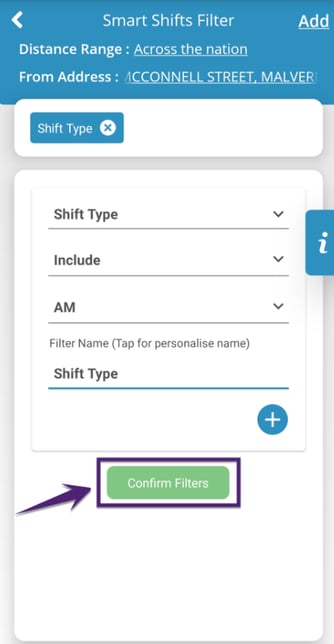
Confirm Filters |
Saves and applies the filter in the Released Shift screen. |
-
Once all the required filter details are provided, click Confirm Filters as shown in the figure below
-
The filter is applied successfully in the available Released Shifts screen
 . Now, the Released Shifts screen shows:
1. Released Shifts: shows the total number of Released Shifts by the agency based on the member
release shift matching criteria
2. Shift(s) Filtered: shows the total number of Shift(s) Filtered based on the new filter added
3. Filter: shows the filter name ‘Shift Type’ applied and highlighted in green color. You can click the filter
name to edit this filter
4. Filter badge icon: shows the red cross icon with the number of filters applied
![]() Click this link to view the detailed Smart Shifts feature.
Click this link to view the detailed Smart Shifts feature.
Resolved Issues
We are constantly working to improve our Entire OnHire Application and have resolved the following issues for you ![]() .
.
|
Issues |
Summary |
Status |
|
Professionals/Clients not able to withdraw future shifts in the Client Allocations module of the Staff Portal application. |
Issue Resolved. In the Client Allocations, the Professionals/Clients are now able to withdraw future shifts successfully. |
RESOLVED ✅ |
|
Time validations set to Withdraw, Cancel or Edit shift(s) by the Professional/ Client in the Client Allocations module of the Staff Portal application. |
Issue Resolved. In the Client Allocations, the Professional/Client can Withdraw, Cancel or Edit shift(s) before 2 hrs from Shift Start Time else the validation messages are displayed. The validation message to Withdraw/Cancel Shift → ‘Unbooked shift(s) can only be Withdrawn before 2 hrs from Shift Start Time’. The validation message to Edit Shift → ‘Shift(s) can only be Edited before 2 hours from Shift Start Time’. |
RESOLVED ✅ |
|
Issue in updating Job Expiry Date while updating the SEEK Job Entry. |
Issue Resolved. In the Update Job Entry for SEEK, now the user can update and save the Job Expiry Date as well as Update Job Entry. |
RESOLVED ✅ |
Feedback
We have incorporated the new features, enhancements, and fixes to provide you with a delightful user experience ![]() . We would love to hear back from you about your experience with our product or service. Please drop your suggestions and feedback at
. We would love to hear back from you about your experience with our product or service. Please drop your suggestions and feedback at ![]() support@xeople.com.
support@xeople.com.

