
In the next screen, you need to set your parameters to ensure that shifts for the current payroll processing week appear
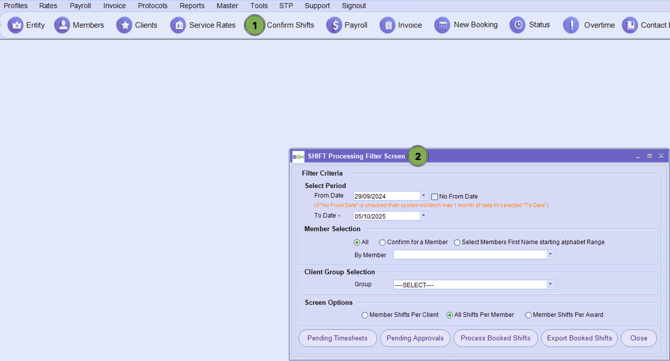
From Date: Automatically is set to the first day of the current pay week
To Date: Automatic set to the day before you sign in. This needs to be changed to the week ending date of the pay week you wish to process
Member Selection: Ensure this is set to All
Client Group Selection: Will allow you to only see the clients assoicated with that client group to comfirm together
Screen Options: Select one of the ones below
Members shifts per client
Choosing this option will group all shifts worked by a member for each client location. Meaning the system will show a single entry for each client location the Member attended shifts within the time period applied.

Shifts will appear like this

All shifts per member
Choosing this option will group all shifts a member has worked across all client locations. Meaning a single validation screen will pull all shifts that the member worked within the time period applied regardless of the client location.
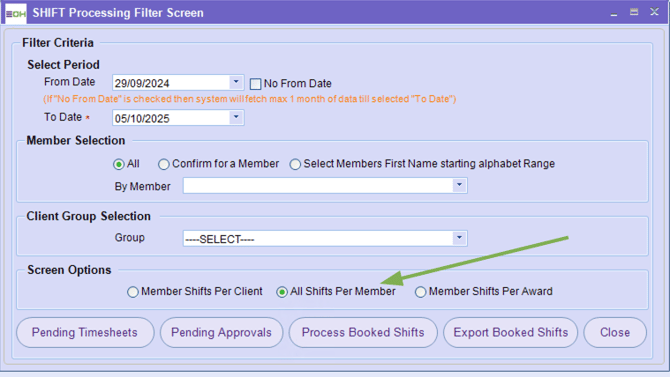
The image below shows all Members who worked during the period applied as a single row.
Member shifts per award
Choosing this option will group all shifts a member has worked by the award. Meaning a single validation screen could have multiple client locations if they have the same award

It will look like this
How to Remind Members to submit timesheets if they have not accepted
1. Select the date range the Pending Timesheet options
2. Select All then Select "Send Selected Emails" or "Send Select SMS"
Default email - Contact Members
Please note that you can tailer the templates from the "Set Email Protcols" as well you can select "Include Shift Details" in the template.

To send, follow the screenshots below
If you would like to export out pending timesheets list to send to your allocations team you can select all and then Select Export to PDF or Excel and send to them
Columns in both exports for the pending approvals are listed below
- Timesheet Number - Empty
- Member Name
- Member ID
- Member Mobile Number
- Member Email
- Service and Delivery
- Shift Date
- Type
- Start and End
PDF Template- 
Excel Template -

How to Remind Clients to approve unapproved timesheets if they are pending
1. Select the date range and then select the Pending Approvals options
2. Ensure your email template is configured correctly. Just like pending timesheets, you have the same functionality to export reports and contact users.  If
If
If you would like to export out pending timesheets list to send to your allocations team you can select all and then Select Export to PDF or Excel and send to them
Columns in both exports for the pending approvals are listed below
- Timesheet Number
- Member Name
- Member ID
- Member Mobile Number
- Member Email
- Service and Delivery
- Shift Date
- Type
- Start and End
PDF Format - 
Excel Format -

Exporting Booked Shifts
There is an option to export out booked shifts for a report of all pending timesheets


This report will is show below.
The columns are shown below
-
First Name
-
Last Name
-
ID
-
Service Location
-
Delivery Location
-
Qualification
-
Shift Date
-
Start Time
-
End Time
-
Shift Hours
-
Docket Number
-
Discrepancy Notes
-
Client Notes
-
Shift Status
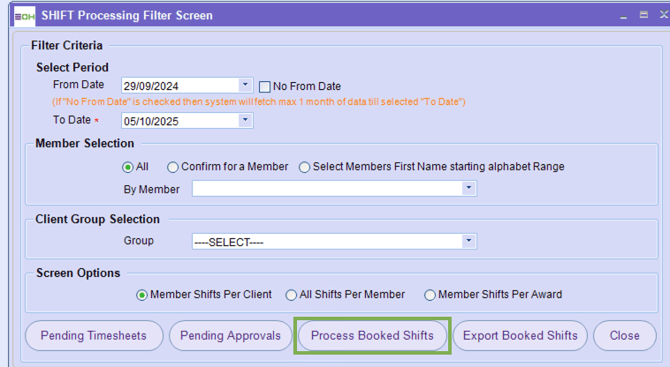
Confirming Shifts
Once you have set your parameters, to move to the validation screen, please click "Process Booked Shifts".
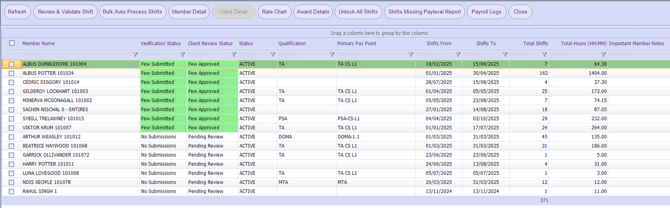
The shifts then appear in an excel-like spreadsheet
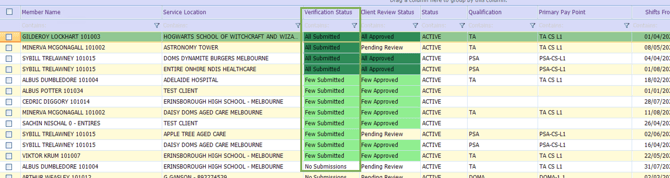
The shifts are automatically grouped by their Verification Status and are listed alphabetically ( by first name ) within the groups
All Submitted - means all timesheets for all shifts have been submitted by the member
Few Submitted - means some timesheets for some shifts have been submitted by the member
No Submissions - means no timesheets for any shifts have been submitted by the member
Helpful Tip: All of the columns in this screen can be filtered. This allows you to verify a particular member or by status or by qualification etc. You are able to do this by dragging to the top section


Overview of the Confirming Shift Screen
Below is a screenshot and below explains all the buttons that are available
| Refresh | This will refresh and reload the screen |
| Review and Validate Shifts | This will allow you to verify the shifts |
| Bulk Auto Process Shifts (Add on Feature) | This runs the Bulk Payroll Process |
| Member Details | This will take you to the Members Card to make any changes |
| Client Details | This will take you to Client Card to make any changes |
| Rate Chart | This will take you to the rates section to review and update as required |
| Award Details | This will take you to the award section |
| Unlock All Shifts | This will unlock the shifts - You will be removed from any logged on shifts - This is great to do at the end of every shift to make sure you are not locked in a shift  |
| Shifts Missing Paylevel Report |
This is where you can see all members pending confirmation you can audit and update to prevent any stucks in your payroll so this is great to do prior to beginingand correct if required.
|
| Payroll Logs(Apart of Add on Features) | This will show the prior bulk payroll logs completed prior to redownload the reports etc. |
| Close | This will close out of this screen. |


To verify, you can either double click on the member name or select

The validation screen then comes up and lists all the shifts for the selected member
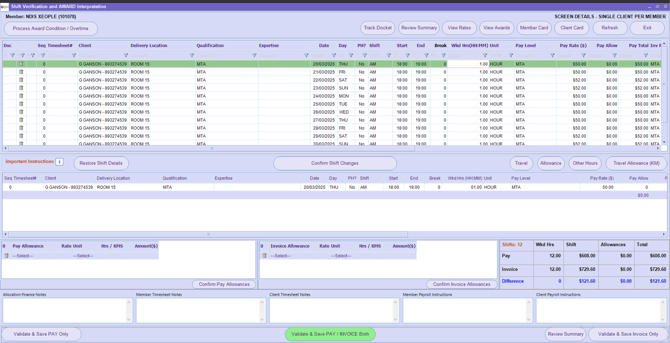
The detail in the top half of the screen is collected from the Allocations screen. This displays the shift as booked.
This detail is then repeated in the bottom half of the screen but anything in this half of the screen can be edited during verification.

Overview Process
Options Available
Whilst confirming shifts you are able to access this other quick actions

| Track Docket | This allows you to track the docket eg find a timesheet and understand where that shift is located or part processed within the system |
| Review Summary | This will show you a review of all shifts within the section. |
| View Rates | This will take to directly to the rates to review and verify why that rate is coming |
| View Awards | This will link to the awards for your to review and make changes |
| Member Card | This will take you to the member profiles to make some changes |
| Client Card | This will show you the clients card profile |
| Refresh | This will refresh and remove any changes you have made and revert to the oringal submissions |
| Exit | This will close this screen and return you to the list of shifts/members to confirm |
To verify the shift, click on the timesheet number to view the timesheet and then compare this to the actual booking.

If the timesheet submitted by the member differs from what is booked, the component of the shift that is different is highlighted in red text.
We can see in the above image that the Travel column has 28kms in there whereas the shift was booked with none.
To enlarge the timesheet please click the plus maginfied glass and it will open in paiint.
 .
.
Please note: If you change anything in the bottom half of the screen, you must select Confirm Shift Changes ( located in the middle of the screen to save these changes and they will be reflected in orange.

What to check during verification:
· Timesheet number entered matches the number in the image
· Client is correct
· Delivery Location is entered ( if required )
· Qualification is correct
· Expertise is entered ( if required )
· Shift Day / Date are correct
· PH ( Yes or No )
· Shift type is correct
· Start / End and break are correct
· Pay and Invoice rates are correct ( system will allow $0.00 pay and invoice )
· Pay and Invoice allowances are correct
If pay and invoice rates are missing, you will see the below on the verification screen
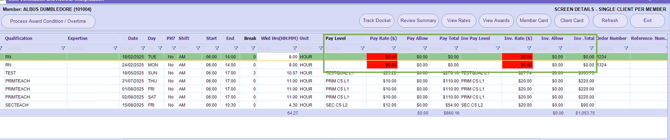
You will need to ensure these are corrected prior to proceeding.
Processing the Award
To Process the award to ensure shifts are split correct and overtime is calculated if required ensure to select "Process Award Condition and Overtime" and this will make nessacary changes inline with your conditions


Adding/Confirming Travel
If you need to add in or the member has added Travel Allowance for KM travelled, please select Travel Allowance - Please note this will be in orange if there is travel added via the timesheet:
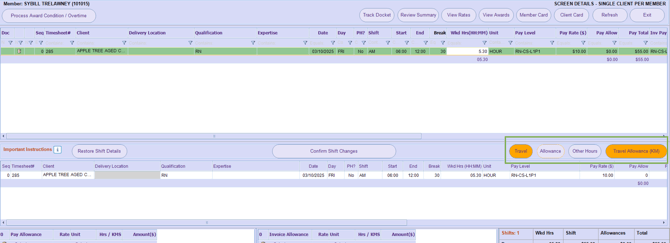
This button is located to the far right of the Confirm Shift Changes button

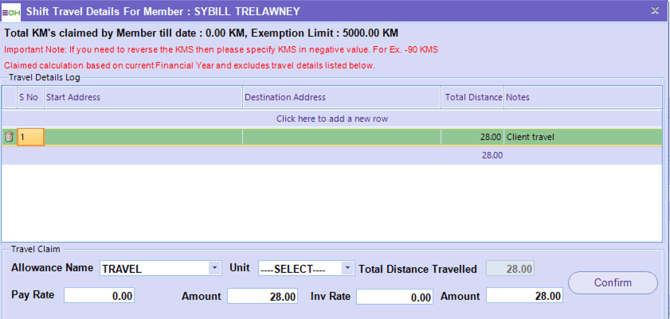
The amount of kms travelled in the Total Distance box, navigate down to the Travel Claim section, select the Unit value, enter the pay rate and enter the invoice rate. Once you have entered everything, select this button to save

Once you click confirm it will be added to the allowance section

Adding an Allowance
If you require to add an allowance you are able to select in the box and free type

Ensure to click confirm pay allowance

If you would like to charge this to the client, you can right-click and state "Copy to Invoice" or “ Copy All to Invoice," and this will add accordingly - make sure to click confirm. This will then not stay orange letting you know the change has saved


Once you have viewed all of the shifts for this member, you can use the "Review Summary" to see an overview


Final Confirmation
Once you have made any necessary changes and you are happy to proceed, you select whether you would like to pay only, invoice only or complete both!

This is located down the bottom of the screen and is in the middle.
Once selected, the pay and invoice values will be calculated and saved for later processing during the pay and invoice runs. You will also be returned to the front ( excel like ) screen.
NB: There are two other validate options, these are used if you want to pay only and not invoice or conversely, invoice only and not pay.
Pay only option is located to the left of the PAY / INVOICE button and the invoice only is located to the right of this button. Selecting any of these will also return you to the front screen.


Located just above the PAY / INVOICE button are some notes fields, these are:

|
Name |
Purpose |
|---|---|
|
Allocation Finance Notes |
This field will display any finance notes entered against the shift (Red fill ) |
|
Member Timesheet Notes |
This field will display any notes entered by the member whilst submitting their timesheet ( Yellow fill ) |
|
Client Timesheet Notes |
This field will display any notes entered by the client whilst submitting an electronic timesheet ( if applicable ) |
|
Member Payroll Instructions |
This field will display any notes that have been permanently placed against a member ( ie watch break times, always claims no break ) |
|
Client Payroll Instructions |
This field will display any notes that have been permanently placed against the client ( ie mandatory 30min break for every shift over 6 hours ) |
Notes in these fields should be read during verification of the shift/s
Quick Shift Options
There are several quick shift options that can be used during the verification process. These can be accessed by right-clicking on the shift.

|
Name |
Purpose |
|---|---|
|
Apply Timesheet Discrepancy Change |
If the Member has submitted a different time from your booking, please click this link to manually update it. Please note that in VX and above, this is no longer required, and the approved timesheet will automatically apply the changes.
|
|
Set or Reset Public Holiday |
It means if the public holiday was not set and shift was booked before the public holiday was added, then we can apply the public holiday rates by clicking on this and vice versa - if we have to take out the public holiday
|
|
Add Verification Notes |
Insert notes that are relevant as to why a shift has been verified, which will transfer through to Payroll Process Eg: no break time taken as per xxx at the facility – MM
|
|
Query Shift |
Insert notes regarding a query you may have with the shift Eg: to confirm end time with facility – MM
NB: shifts that are at query status are not processed in any payroll run until it is validated This will create a separate line for that member and show query shift.
|
|
Remove Query Shift |
This will remove the query shift, which you would use once the query is completed. You can then push it through to payroll.
|
|
Discard Shift Permanently |
If you do not need to process the shift at all
This will delete it Permanently so only do this if you are 100% sure
|
|
Discard Shift Temporarily |
If you select this - it will discard the shift from the confirming screen so you can process everything else forward and come back to that later
|
|
Clear Submitted Timesheet Details |
This is used if you wish to clear the submitted timesheet to allow another timesheet to be uploaded against the shift.
NB: this action reverts the shift back to booked status and reappears on the member’s app
|
|
Swap Timesheet Details |
This is used if a member uploads the wrong photo against the wrong shift. Using this allows you to swap the incorrect photo to the correct shift
|


