
Introduction
With effect from 1 February 2023, employees of businesses where the employer has 15 or more employees, can access 10 days of paid family and domestic violence leave. This special leave pertains to full-time, part-time, and casual employees.
Summarized points of this new legislation:
-
10 days per annum, non- accumulative year to year
-
Entitlement upfront from time of employment (i.e., not required to accumulate over time)
-
Renewed on the date of employment or 1st of February whichever is the later
-
Applicable to all direct employees of a business (Full-time, Part-time, Casual)
-
Applicable per day/shift that is currently rostered at the time of leave
-
Can be applied in advance or retrospectively
-
Cannot be shown on employee payslip
Refer to the articles below to know in detail about this new legislation:
![]() New paid family and domestic violence leave
New paid family and domestic violence leave
![]() Paid family and domestic violence leave - Fair Work Ombudsman
Paid family and domestic violence leave - Fair Work Ombudsman
![]() Employer guide to family and domestic violence
Employer guide to family and domestic violence
This article will help you to apply for the ‘Family and Domestic Violence Leave’ in our Entire OnHire application. We advise you to set up similar to your Member Compensate as explained in this linked article – How to use Member Compensate.
How to Set up Family and Domestic Violence Leave?
Follow the simple and easy steps explained below to set up family and domestic violence leave in our Entire OnHire application. You require to set up Masters to Add New SubGroup, create New Service Location, mark a shift as a special leave in the Allocation of Staff portal application, and finally process in your Finance application.
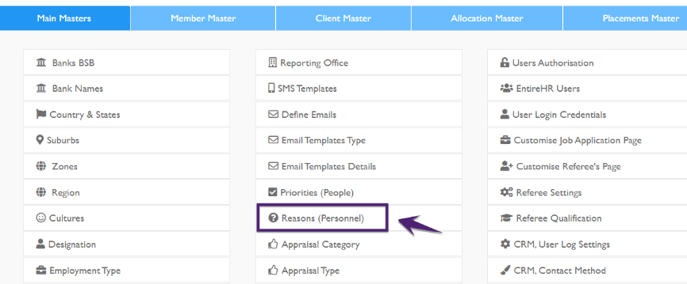
Step 1: Setup Masters to Add New SubGroup
In the Masters (Reason (Personnel)) of the Staff portal application, you need to create the new Subgroup as ‘MBR Compensate’ to apply for the required special leave. To set up New Subgroup as MEMBER COMPENSATE:
-
Click Masters → Main Masters → Reasons (Personnel)
-
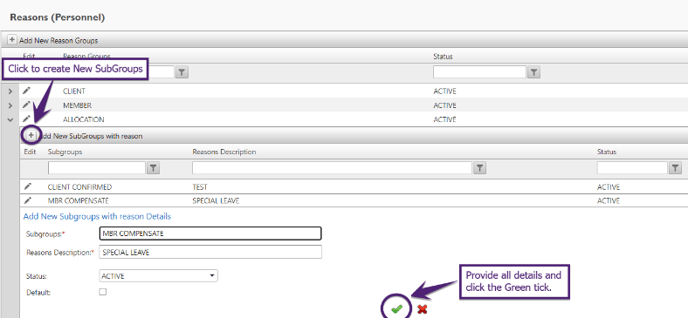
In the Reasons (Personnel), expand the Allocations reason group and click Add New SubGroups with reason
-
Provide Subgroups as ‘MBR COMPENSATE', Reasons Description as ‘SPECIAL LEAVE’, and Status as 'ACTIVE’
-
To save click the Green tick as shown in the figure below
Step 2: Create New Service Location
The next step is to create a new Service Location with your Location Name (for instance ‘EntireOnHire’) and Delivery Location as Special Leave. Follow the steps explained below:
-
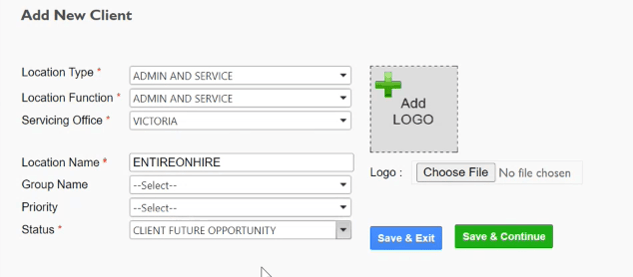
Click Profiles → Client → Add new Client and the Add New Client page opens

-
Select Location Type and Location Function as ADMIN AND SERVICE
-
Select your Servicing Office
-
Provide the Location Name as the name of your organisation (or you can use any customised Location Name to be used for this leave type)
-
Select Status as CLIENT FUTURE OPPORTUNITY
-
Click Save & Continue
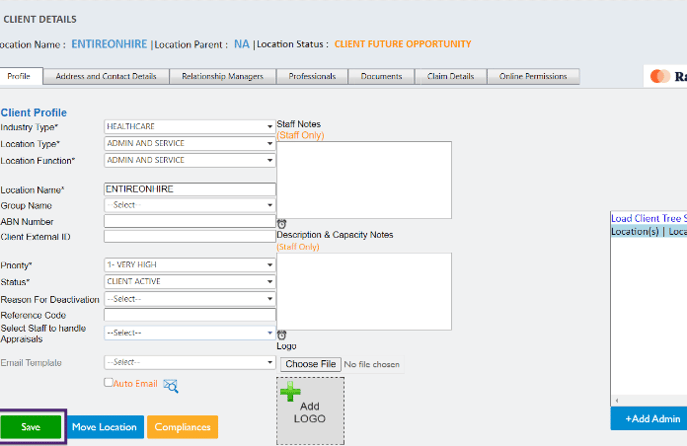
Now, in the Profile tab:
-
Select Industry Type
-
Select Priority
-
Set Status as CLIENT ACTIVE
-
Click Save
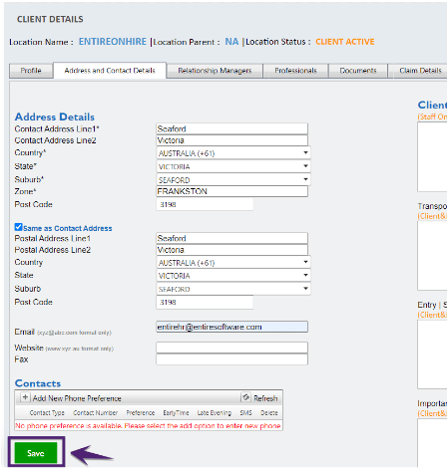
In the Address and Contact Details tab:
-
Provide Contact Address, Country, State, Suburb, Zone, and Post Code
-
Click Same as Contact Address checkbox
-
Provide valid Email
-
Click Save
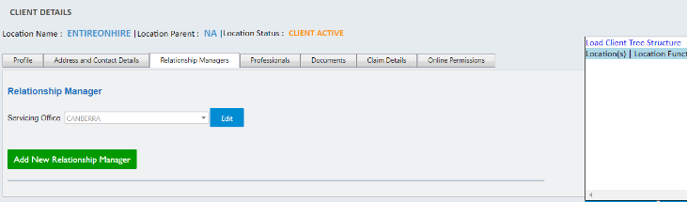
In the Relationship Managers tab:
-
If required you can Add New Relationship Manager or retain the same Relationship Manager
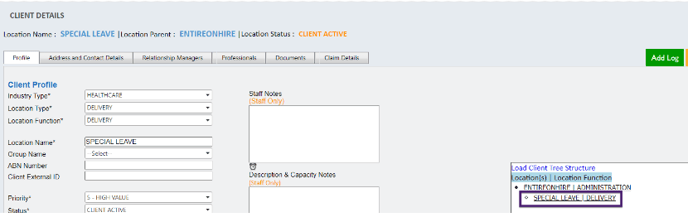
Client Tree Structure
-
Now, click Load Client Tree Structure, and the Location Name appears for instance ‘ENTIREONHIRE’
-
Click provided Location Name i.e. ‘ENTIREONHIRE’
-
Click +Add Delivery

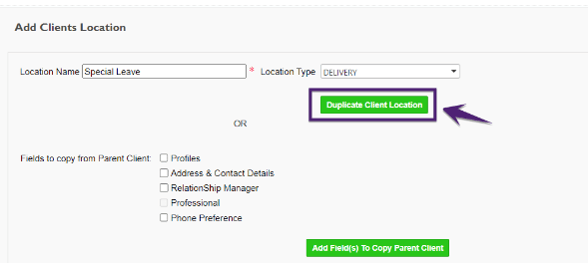
In the Add Clients Location page:
-
Provide Location Name as Special Leave and Location Type as DELIVERY
-
Click Duplicate Client Location and a confirmation message appears ‘Are you sure you want to Add Client Location?’.
-
Click Ok.
-
Now reload the Client Tree Structure and modify the Location Function to DELIVERY
-
Click Save
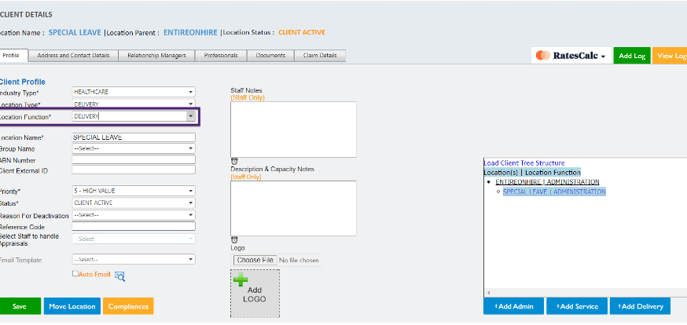
To add a new Location Function, click the link here.
-
Now reload the Client Tree Structure again and the Location Function is shown as DELIVERY
Step 3: Allocations - Mark Shift as Special Leave
In the Client Allocations, to avail Special Leave for the member, the required shift should be marked as Special Leave.
In case the member is already booked for the shift and needs to avail Special Leave(s), the member should be pulled out of the existing shift. In the Client Allocations page, to remove a member out of the ‘Shift Booked’ for the required date:
-
Select the required Shift Booked and click Select drop down from the taskbar and select MEMBER PULLED OUT
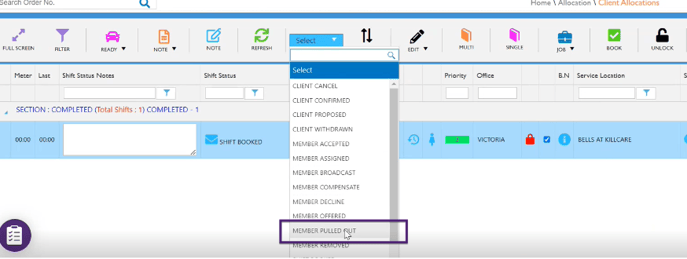
-
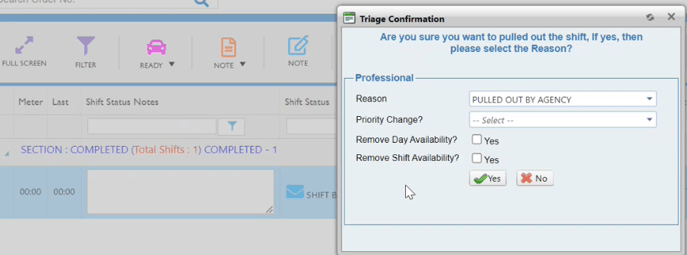
Now, click the update Status icon and the confirmation pop-up appears
-
Provide the required Reason and click Yes
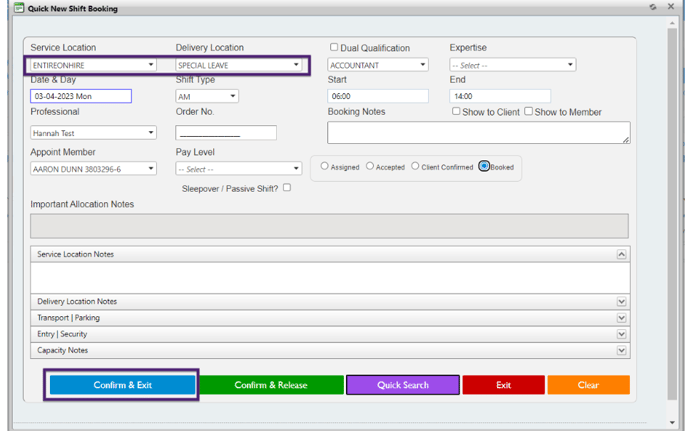
Now to mark the Shift as Special Leave:
-
Create a new shift with similar date and time details
-
Select Service Location as your organization name as created above (for instance EntireOnHire)
-
Select Delivery Location as ‘Special Leave’ and fill in all the remaining details (Date & Day, Shift Type, Professional, Appoint Member)
-
Select the status as Booked and click Confirm & Exit
-
-
Now, the new shift is created in the Allocations page as Shift Booked with Service Location as ‘your company name’ and Delivery Location as ‘Special Leave’
-
Select this new Shift and click Select drop down from the taskbar and select Member Compensate
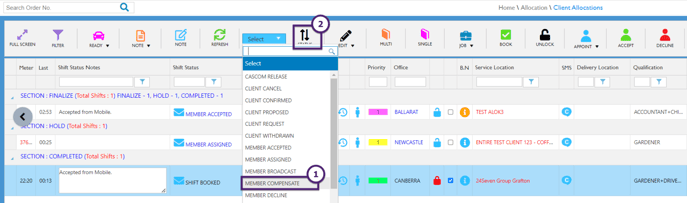
-
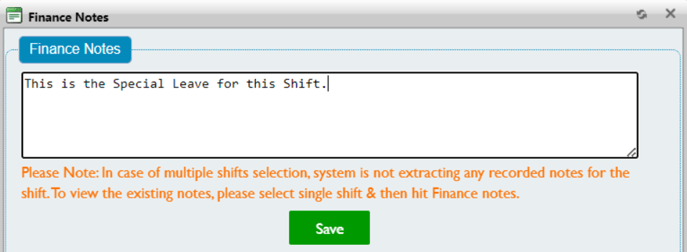
If required you can provide the Finance Notes (Notes → Fin Note) for this Shift Booked
-
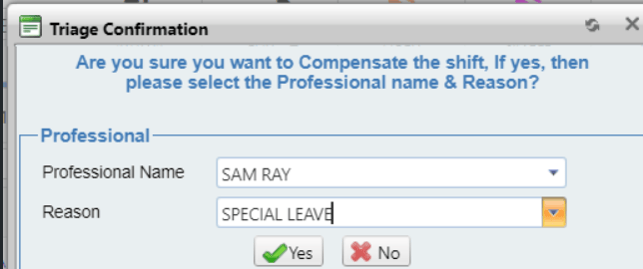
Now, click the update Status icon and the confirmation pop-up appears and in the Confirmation pop-up, select the Professional Name
-
Select Reason as 'Special Leave and click Yes
-
Finally, now this Shift for the selected member is marked as Special Leave in the Allocation
Step 4: Process in Finance Application
When the Shift Booked is set as Member Compensate with the reason as ‘Special Leave’ in the Staff portal application, now process this Shift Booked further for payment to the member in the Finance application.
Clients - Define Rate Table
For the new Client Name (Location Name - for instance, ENTIREONHIRE) you need to define the Rate Table for the first time.
Note that the Shift will not be Invoiced to the Clients as this is a Special Leave and the details need to be provided to define the Rate Table for the Shift else the shift will not be processed for payments to the members.
To define the Rate Table:
-
Click Clients and the Search Client screen opens. Now search the required Client Name (for instance ENTIREONHIRE) and click on the Client Name and the Client Payroll screen opens to define the Rate Table for the Shifts

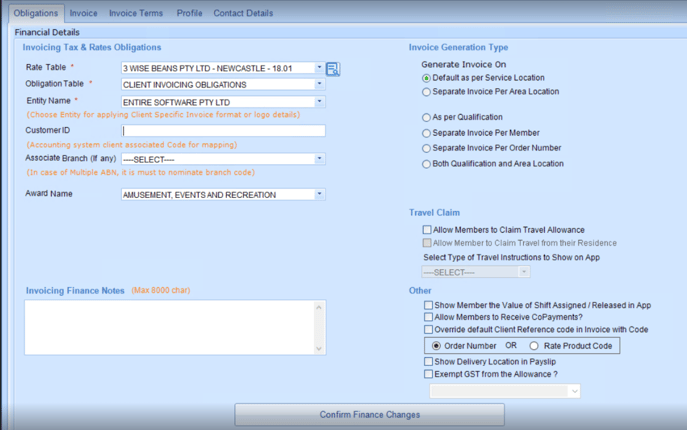
In the Client Payroll screen:
-
In the Obligations tab, select Rate Table, Obligation Table, Entity Name, and Award Name
-
Click Confirm Finance Changes and the success message appears
-
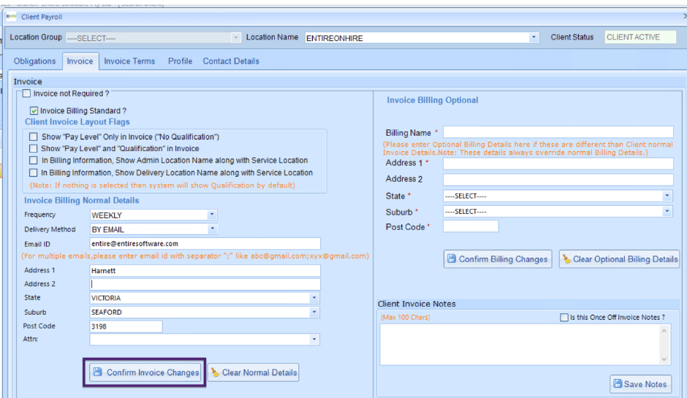
Now click the Invoice tab and click Invoice Billing Standard? checkbox
-
Select Invoice Billing Normal Details such as Frequency, Delivery Method, Email ID, and Address (Address 1, Address2, State, Suburb, Post Code) details
-
Click Confirm Invoice Changes and the success message appears
-
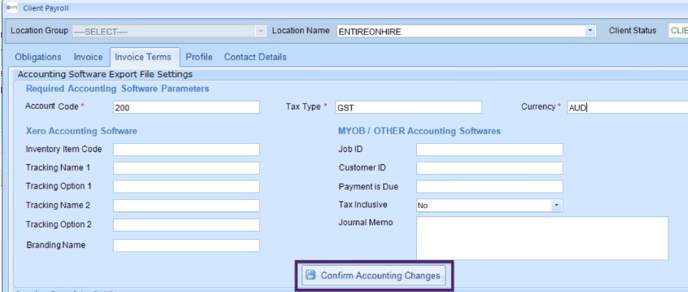
Now click the Invoice Terms tab and provide the Account Code, Tax Type, and Currency
-
Click Confirm Accounting Changes
Finally, the Rate Table is set for the payroll.
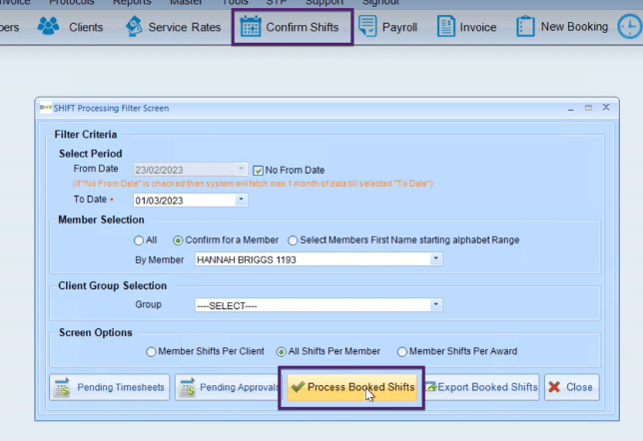
Confirm Shift
To process the shift, click Confirm Shifts, and the Shift Processing Filter screen opens. In the Shift Processing Filter screen:
-
Select the required To Date
-
In the Member Selection, click Confirm for a Member option and select the name of the member in the By Member drop-down
-
In the Screen Options, click All Shifts Per Member option
-
Click Process Booked Shifts
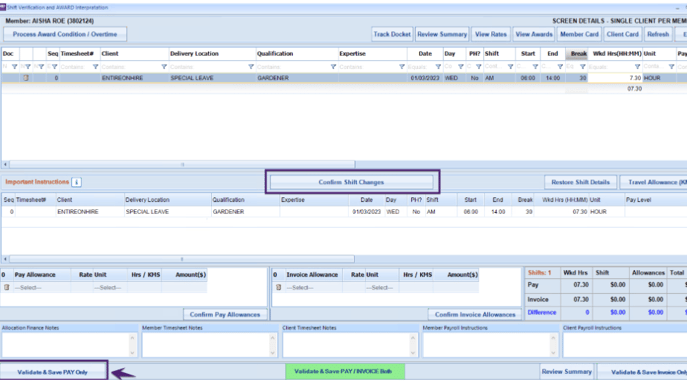
This processed shift will be visible in the Confirm Shifts / Timesheets Verification screen. Now double-click on the Shift (as shown in the figure below) and Shift Verification and Award Interpretation screen opens
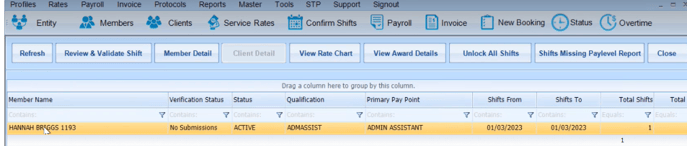
-
In Shift Verification and Award Interpretation screen, check the Client name (as new Client Name), Delivery Location (as Special Leave), and Shift Status (as Member Compensate)
-
Here you can update the Shift details such as Worked Hours (Wkd Hrs), Pay Rate, etc., and click Confirm Shift Changes.
-
Click Validate & Save PAY Only
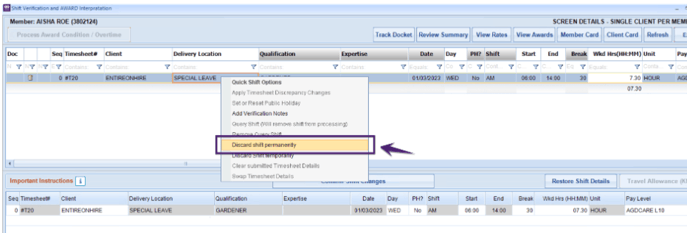
-
In the final step, you need to remove the Shifts that are marked for Special Leave as the shift will not be sent for further invoicing to the clients. To remove, right-click on the shift and click Discard shift permanently as shown in the figure below

 .
.
How to Track Special Leave Shifts?
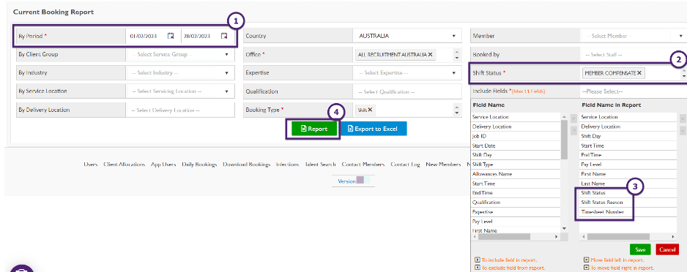
To track the Special Leaves, you can generate the required reports from the Report. To generate the report
Click Reports → Booking Reports → Current Booking Report
-
Provide the date range in By Period
-
In Shift Status, select ‘MEMBER COMPENSATE’
-
In Include Field, add Shift Status, Shift Status Reasons, and Timesheet Number in the Field Name in Report
-
Click Report
Special Leave in STP
For the STP Submissions, the paid family and domestic violence leave(s) should be part of the Gross and need not be mapped against any ATO-defined Allowances/Additions Codes.