
Content
How to Access the Configure Dashboard?
What are Dashboard Settings?
How is Dashboard Access Controlled?
How to Clone the Dashboard?
How to Edit the Dashboard?
How to Delete the Dashboard?
How to Configure a New Dashboard?
How to Access the Configure Dashboard?
To configure the new dashboard, click Configure Dashboard from the user login as shown in the figure below.
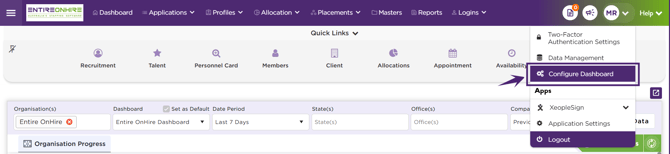
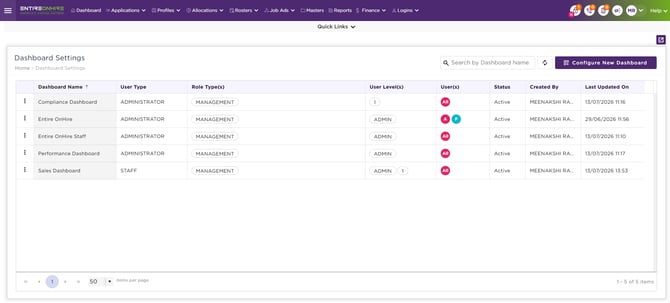
The Dashboard Settings page opens, displaying all dashboards available to the logged-in user.
What are Dashboard Settings?
The Dashboard Settings page displays all dashboards available to the logged-in user. Staff/ owner can configure new dashboards to control access and visibility based on User Type, Role Type(s), User Level(s), and selected User(s). Depending on the assigned permissions, dashboard users can create, clone, edit, and delete dashboards for customised use.
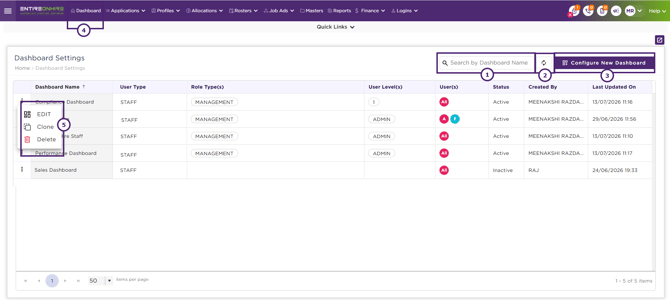
This page displays key details for each dashboard, including Dashboard Name, User Type, Role Type(s), User Level(s), User(s), Status, Created By, and Last Updated On. On this page, you can:
- Search — Search for a specific dashboard by name.
- Refresh — Refresh the Dashboard Settings page.
- Configure New Dashboard — Create a new dashboard configuration (available to staff and dashboard owners).
- Dashboard — Navigate back to the main dashboard screen.
- Three Dots — Each dashboard includes a three-dot menu that provides the following actions, depending on the dashboard configuration and the user's permissions:
- Edit — Modify the existing dashboard configuration.
- View — View the dashboard configuration in read-only mode. Depending on the user's access permissions, either Edit or View is available.
- Clone — Create a copy of the dashboard with similar configuration settings. Access to customize the cloned dashboard depends on the user's permissions.
- Delete — Delete the dashboard. Only staff or the designated dashboard owner can delete a dashboard. If staff configured the dashboard, end users can be restricted from deleting it.
How is Dashboard Access Controlled?
Dashboard visibility is controlled as follows:
1. User Access
- The dashboard creator will always have access to the dashboard.
- Only the users selected during dashboard configuration can view and access the dashboard. Users who are not included in the configured access list cannot view or access the dashboard.
- When All is selected under User(s), the dashboard is automatically available to all current and future users who match the selected User Type, Role Type(s), and User Level(s) criteria.
- When specific users are selected, only those users (along with the dashboard creator) can access the dashboard.
2. User Status Changes
- User Reactivation/Deactivation
- When a user(s) is deactivated, the dashboard is no longer visible to them.
- When the user(s) is reactivated, dashboard access is automatically restored, provided they continue to meet the configured access criteria.
- Role Type or User Level Changes
- If a user's Role Type(s) or User Level(s) change and no longer match the dashboard configuration, access is automatically removed.
- If the user later matches the configured Role Type(s) or User Level(s) again, access is automatically restored.
3. Multiple Dashboard Assignments
-
A user can be assigned to multiple dashboards, including dashboards with overlapping user configurations.
4. Additional Considerations
- If no users match the selected filters, the message 'No users found' is displayed.
- When All is selected under User(s), any newly created users who satisfy the configured criteria automatically receive dashboard access.
- Dashboard assignment history is retained even when users are deactivated.
- Existing dashboard access rules continue to function correctly after a user is reactivated.
Dashboard Visibility Rules
| Configuration | Visibility |
|---|---|
| No User Level or Role Type selected | The dashboard is displayed to all users or only the selected users, depending on the User(s) selection. |
| User Level and one or more Role Type(s) selected | The dashboard is displayed only to users who satisfy the selected User Level, Role Type(s), and User(s) criteria. |
How to Clone the Dashboard?
To clone the existing dashboard:
- Select the three-dot menu for the dashboard and click Clone.

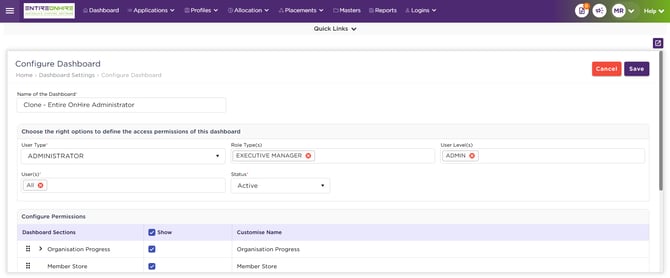
- A new cloned dashboard is created with all the existing dashboard configurations. The Dashboard Name is automatically prefixed with 'Clone'.
- Update the dashboard configuration as required.
- Click Save.
How to Edit Dashboard?
To edit the existing dashboard:
- Select the three-dot menu for the dashboard and click Edit.

- Update the dashboard configuration as required.
- Click Save.
How to Delete the Dashboard?
To delete the existing dashboard:
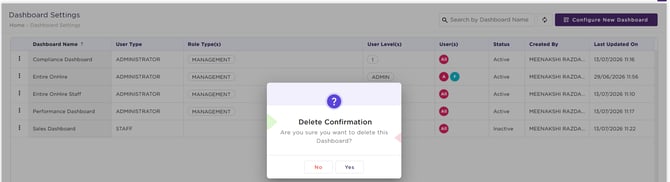
- Select the three-dot menu from the dashboard and click Delete.
- A confirmation message is displayed.
- Click Yes to delete the selected dashboard.
How to Configure a New Dashboard?
To configure a new dashboard from the Dashboard Settings page:
-
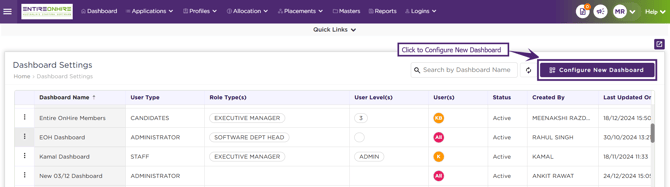
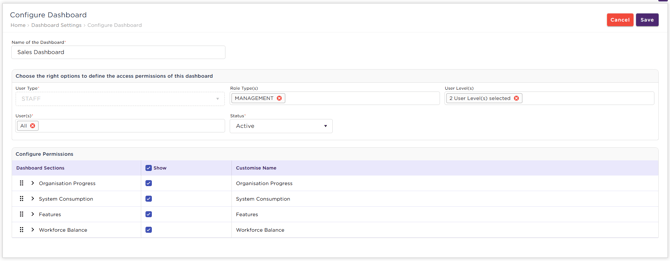
Click Configure New Dashboard. The Configure New Dashboard page opens.
-
In the Configure New Dashboard page:
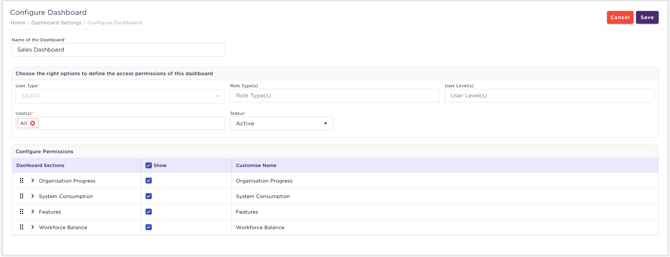
- Provide the Name of the Dashboard.
- By default, the logged-in user's User Type is displayed and is read-only (for example, Staff).
- Select Role Type(s), User Level(s), if required, to define dashboard access.
- Select User(s). Selecting one or more User(s) is mandatory when configuring a new dashboard.
- Configure show/ hide permissions for the dashboard sections by selecting the appropriate checkboxes.
- Click Save.
|
Field Name |
Description |
| Name of the Dashboard | Provide the Dashboard Name. |
| User Type |
By default, the logged-in user's User Type is displayed and is read-only (for example, Staff). |
| Role Type(s) |
Select the Role Type from the list. You can select more than one Role Type for the selected Dashboard. |
| User Level(s) |
Based on the selected role, the User Level list will be fetched from masters. Select the User Level from the available list. You can select more than one User Level for the selected Dashboard. |
| User(s) |
The list of User(s) is populated based on the selected User Type, Role Type(s), and User Level(s). Select one or more User(s) from the list, or select All to grant access to all users who match the configured criteria. The Role Type(s), User Level(s), and User(s) details are retrieved from the corresponding masters. Note: Selecting one or more User(s) is mandatory when creating or editing a dashboard configuration. |
|
Status
|
Set the dashboard status to Active or Inactive. |
|
Configure Permissions
|
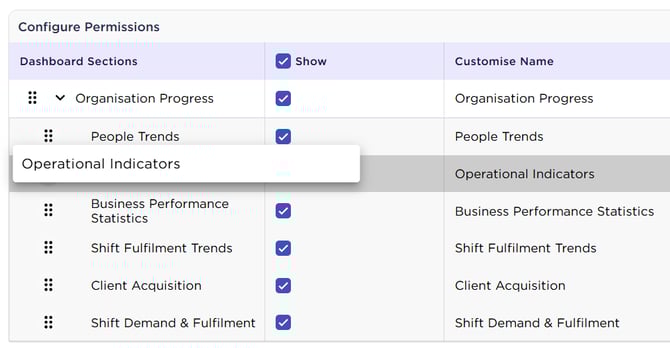
To display dashboard sections, select the appropriate Show checkbox for each Dashboard Section. Selecting the Show checkbox at the header level selects or clears all dashboard sections. You can also rearrange the dashboard sections using the six-dot drag handle by dragging each section to the desired position within the layout.
|
Related Articles:
Dashboard
Organisation Progress
System Consumption
Features
Workforce Balance