
Introduction - What is Client Compliance?
Client Compliances allow you to define specific rules about which members can attend a specific site - rather than just the general, qualification-based rules that are included by default. This ensures that different protocols and procedures can be catered to - across your client base (so, you can ensure that only members with an induction are allowed to attend a specific site).
These can apply at the following levels:
- Service or Delivery Location
- Qualification
- Expertise
In terms of impacts on your system, you should note that:
- Visibility of Available Shifts:
Regardless of whether or not a member is compliant - they will be able to see all of the same shifts as previously. They - Ability to Accept Shifts
If a member is not compliant for a shift they will not be able to accept it via the app - depending on settings, they may be prompted to sign to acknowledge the compliance, upload documents, or contact the agency. - Rules apply automatically
Simply set your rules once and these will apply each time that the above combination of locations, qualifications, and expertises applies - meaning only the right staff can be sent on shift.
Table of Contents:
- How to: access Client Compliances
- How to: add a new rule?
- How to: edit an existing rule?
- How to: remove an existing rule?
- How to: duplicate existing rules?
- How to: book with compliances?
How to: access Client Compliances
To access the relevant screen, follow the below:
- Click Profiles → Clients → Client Compliances per the below screenshot:

- The page then opens showing the rules, restrictions, and feedback for a given service location:

From this screen, you are able to view, edit and add the compliance rules for all Service (and delivery) locations across your client sites.
How to: add a new rule?
The fields for a new compliance rule are shown below: First, you need to define the rule name itself and then specify where the rule applies (delivery location), to whom (qualification), and when (expertise):
- Delivery Location: you may select only one delivery location per rule
- Qualification: again, you can select a single qualification per rule
- Expertise: again, you can select a single expertise per rule - note that the options available are dependent on the qualification
Next, you need to select the document which determines if a member is compliant (this is a mandatory field). This means choosing a document category and a name to be associated with the rule - the member is then compliant when they have this document on file and are not compliant otherwise. 
The next item is whether or not to restrict accepting/assigning shifts - this option will generally be set to yes as it stops non-compliant members picking the shift up. However, when this option is set to no, it will simply result in the member having to review the compliance rules/information without necessarily having to accept.
Additionally, there are multiple options for the acknowledgement type - which determines how the rule interacts with the member app. The choices are:
- -- Acknowledgement Type--: this applies by default and simply means that the member does not have the option to acknowledge the compliance via the app - instead, they must contact the agency and provide a copy of their document to be mapped.
- Read and Accept: this allows members to read through the message and uploaded file (see below) and simply press 'Accept' to indicate that they have done so
- Read and Send Information: this allows members to directly upload a document via the compliance screen and may require verification (depending on how the document is defined in your masters settings)
- Read and Sign: this allows members to read through the message and uploaded file (see below) and add a digital signature at the end to acknowledge that they have done so - functionally, it is very similar to read and accept
 Next, you must add a message to the members which will appear on the app - often, this provides context around why the rule is required or how members can become compliant (e.g., by sending in the mapped document). Additionally, a file can also be attached to contain further information - often, this will include more specific details relevant to the rule.
 Finally, the last aspect is nominating whether the rule is ACTIVE or INACTIVE.
Acknowledgement Types and Colour Coding
One important consideration is how the acknowledgement type will impact what the member sees on the app. At the most simple level, compliance rules will appear when a member tries to accept a shift and rules are either coded:
- Orange: No member action possible via the app - the document for the rule is not on file and there is no acknowledgement type selected so the member must provide the required document to the agency directly
- Red: Member action required - the member can complete the compliance rule directly via the app and become compliant for the shift (this includes all of the possible acknowledgement types)
- Blue: No member action required (information only) - this occurs when the rule is not set to restrict the member accepting/being assigned to the shift. The member will still need to view the associated information but will not be blocked from picking up the shift
In the example below, the rule Working with Children Check Required is highlighted orange, as the member is not able to acknowledge it via the app and the message appears to advise how they can handle it. Conversely, the other rule is highlighted red as it is a Read and Sign - which the member can immediately complete via the app themselves. The message at the bottom of the screen indicates that the member is still not compliant and is unable to accept the shift.
 Additionally, when the Read and Send Information option is selected, the member is prompted to supply this via uploading an image prior to accepting the shift (note that if verification is required, the document will not be immediately accepted and still require siting/intervention on the agency's behalf):
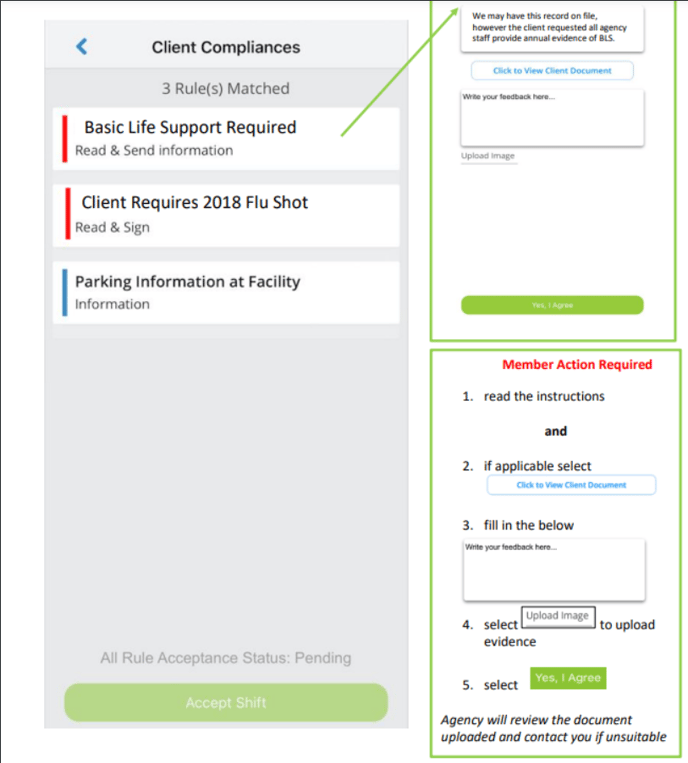 Additionally, the Read and Sign option will prompt the member to read the relevant information (including the message and the file) and then sign to acknowledge that they have done so:
 Lastly, in the event that the rule is information only - they will have to view the below screen but no action is required beyond selecting 'Accept Shift':
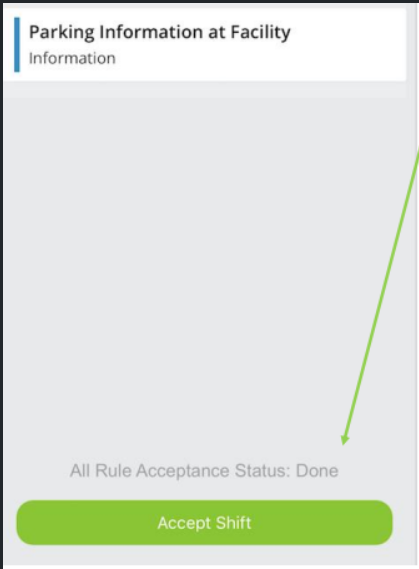
Acknowledgement Storage
By default, the system will check whether or not the nominated document has been uploaded against a particular member. If no document has been uploaded and the member is able to acknowledge the compliance (i.e., some acknowledgement type has been selected), then a document will be created when the compliance is acknowledged.
These documents are stored separately to other records - preventing any interference. These are called compliances acknowledgements are very similar to documents (but are not checked in the document batch expiry program). These appear on the member profile under the miscellaneous tab: From this screen, it is possible to delete the acknowledged compliances (e.g., the file that needs to be acknowledged may have changed):
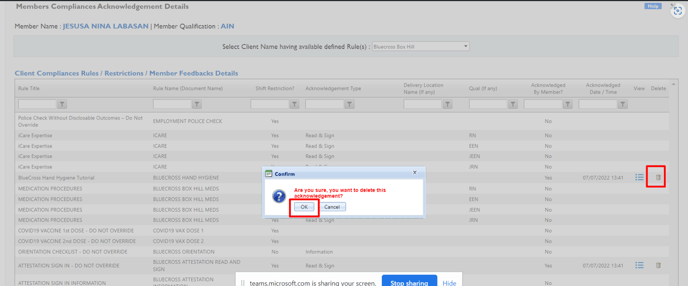 Alternately, these acknowledged compliances can be viewed under the normal documents tab
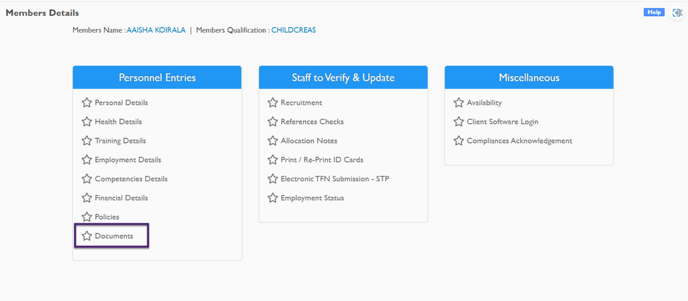
-
Click > View Compliances/Acknowledgements to view the Compliance Acknowledgement.
- View the Member Acknowledgements document by clicking the Click to View Acknowledgement icon.
- Member Acknowledged Documents are set according to the client compliances. You can download any document by clicking on it.

These can then be downloaded by pressing the blue icon above. The document will come through as a PDF file.
How to: edit an existing rule?
Existing rules will appear once a given client is selected - to edit the rule, simply press the edit icon and then complete the details as per the above:
How to: remove an existing rule?
Here there are two choices - once on the client compliance page for a given client, either edit each of the rules to be made inactive and set the status to INACTIVE or alternately press the 'Deactivate Rules' button to deactivate all of them. If this is successful you will get the message below: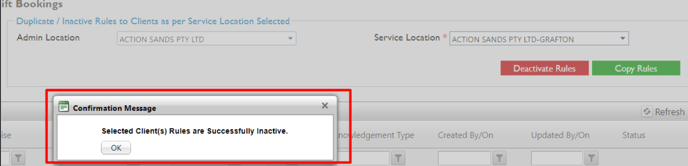
How to: duplicate rules from one client to another?
To duplicate/copy rules from one client to another - first select the service location with the desired set of rules, then select the associated admin location for the client which the duplicated rules will apply to. Then, you are able to select all of the relevant clients (under this admin) and then press 'Copy Rules'.
When this is successful, the below message will appear:
Alternately, when the rules cannot be copied across (which happens when the client already has active rules attached), then the following message will appear:
In this case, you are best to inactivate those rules at the target service location and then try again.
How to: book with compliances?
When placing a booking via the quick booking screen, you can see rules which depend on the:
- Service Location
- Delivery Location
- Qualification
- Expertise
NOTE: the above is to say that these rules apply automatically when shifts meet the determined criteria and cannot be applied on an ad-hoc basis. The applied rules then appear at the bottom of the quick booking screen per the below - these rules are additionally colour-coded and include information about their acknowledgement types: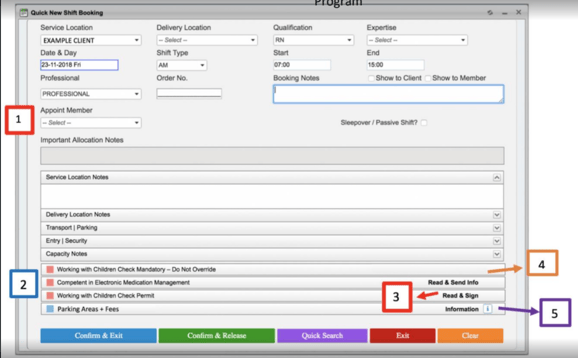


Once you select any member in the search and bring up their member card - you can then select the Compliance Rules tab.
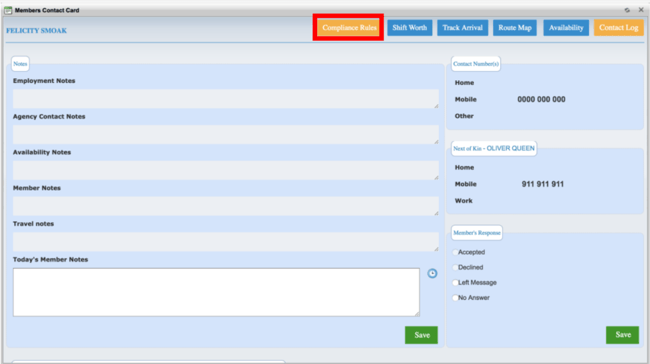
This will bring up a list of all of the relevant compliances and whether or not the member has met the rules.  From this screen, you can only see whether or not the member is compliant - you are not able to make any changes. For a read-and-sign compliance, the member is best to be assigned to the shift and pick it up off the app, as they will be prompted to complete the compliance.
Note also that allocators are able to override these rules in general - for example, when there is a delay in a document being uploaded after hours. Members are not able to override these rules in any circumstances.